system
menuitem
menuitem( index, [label], [callback] )| index | A number (1-5) for the order of the menu item in the pause menu. |
| label | (optional) A string up to 16 characters long that will be displayed in the pause menu. |
| callback | (optional) A function that will be called after the menu item is clicked. |
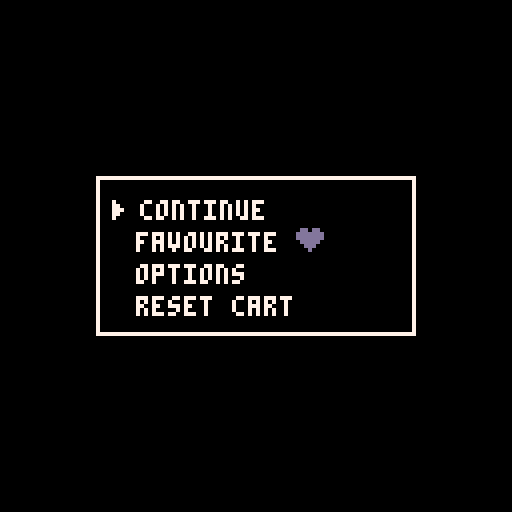
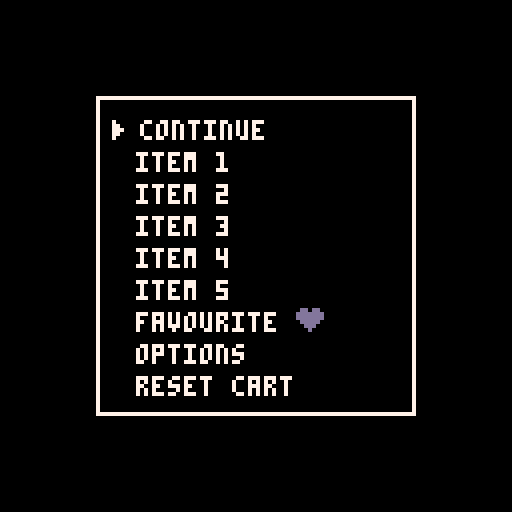
This function will add or remove additional options in the Pause Menu of the game. You can add up to 5 additional items in the menu.
This is the default pause menu (press "P" on the keyboard, or start button on a controller while a game is running):
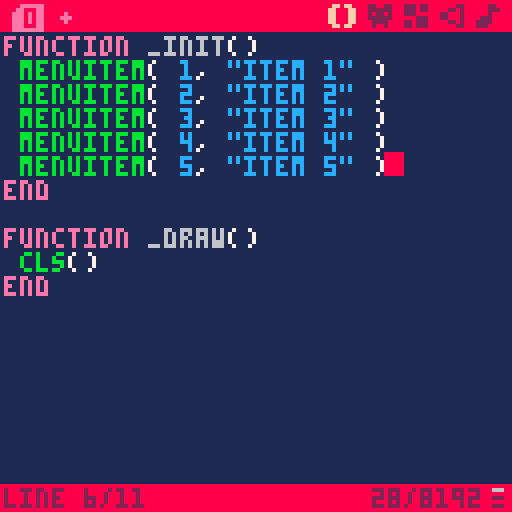
This is an example adding all 5 slots in the pause menu:
![]()
menuitem( 1 , "item 1" )- add new menu item at the top-most slot of the pause menu, under "continue" labeled "item 1"
menuitem( 3 )- remove the menu item at slot 3
menuitem( 2, "invert Y", invert )- add a menu item at slot 2, with the label "invert Y" and call a function named "invert" when clicked
menuitem( 5, "difficulty: "..diff, change_mode )- add a menu item at slot 5, with the label "difficulty: ___" using a variable named "diff", and run the function named "change_mode" when clicked.
![]()
3546
20 Oct 2023
These are advanced options that you can use inside of print() to change certain settings.
Here are the Control Codes:
| \0 | terminate printing |
| \* | repeat next character this number of times. |
| \# | draw solid background with this color number. |
| \- | shift cursor horizontally by a value minus 16 pixels |
| \| | shift cursor vertically by a value minus 16 pixels |
| \+ | shift cursor by two values minus 16 pixels on X and Y axes. |
| \^ | special commands (more below) |
| \a | audio commands (more below) |
| \b | backspace |
| \t | tab |
| \n | newline |
| \v | decorate previous character (more below) |
| \f | set foreground colour (text color) |
| \r | carriage return (move cursor to start of same line) |
| \014 | switch to custom font (memory 0x5600) |
| \015 | switch to default font |
Some of the above commands take one or two values (similar to arguments passed to functions) immediately after the code to alter how it affects your print string or other settings.
These values can be given as single digits (0-9). Higher values can be given using letters (similar to hexidecimal code). So a=10, b=11, all the way to z=35.
![]()
Examples:
print("print this \0 but don't print this")
--print this
- This will stop printing at the "\0" in the string.
print("\*5abc")
--aaaaabc
- This will duplicate the letter A, 5 times.
print("\*a123")
--111111111123
- This will duplicate the number 1, A times (which is 10).
print("print this\b")
--print thi
- This will remove the character just before the "\b".
print("start here \n continue here")
--start here
--continue here
- This will begin printing on the current line, then move the cursor down and continue printing on the next line.
print("start \t continue")
--start   continue
- This will indent 11 pixels then continue printing the string.
![]()
\^These special commands begin with "^" and then take one or two parameters immediately after.
| \^ | Skip a number of frames. Takes 1 argument: [number] where (1,2,3,4...9) = (1,2,4,8...256) |
| \^c | Clear the screen to a color, and reset cursor to (0,0). Takes 1 argument: [color index (0-f)] |
| \^d | Set the delay for every character printed. Takes 1 argument: [number of frames delayed] |
| \^g | Move the cursor position to home. |
| \^h | Set the current cursor position as home. |
| \^j | Jump the cursor so many pixels right and down, takes 2 arguments: [x-axis number of pixels], [y-axis number of pixels] |
| \^r | For text-wrap, sets the wrap boundary, takes 1 argument: [character number] which will be multiplied by 4 |
| \^s | set tab stop width used by \t (tab control code), takes 1 argument: [number of pixels] |
| \^x | set character width default 4 |
| \^y | set character height default 6 |
| Enable these Rendering Options (disable with prefix -) | |
| \^w | print in wide mode: characters scaled by 2x1 pixels |
| \^t | print in tall mode: characters scaled by 1x2 pixels |
| \^= | print in stripey mode: drawn only even pixels when wide or tall |
| \^p | print in pinball mode: wide, tall, and stripey modes combined |
| \^i | invert the foreground and background colors |
| \^b | toggle a 1 pixel border padding on left and top (default on) |
| \^# | enable solid background, disabled by default |
| Added in v0.2.7 | |
| \^u | print with underline: 1px line with 1px gap under text |
| \^o | print in outline mode: takes 2 arguments, [color index (0-f)], [mask (00-FF) ] |
All of these control codes help you customize the text in your game without spending many tokens. However, it can be tedious to figure out and make the string of text hard to read. Luckily, there is a tool to help you out! This is a WISYWIG (what you see is what you get) editor where you can type in your text, and change the control codes with simple buttons and see exactly how your text will look. It even has layers and lets you copy the string so you can paste it right in your game where you want it.
![]()
4819
3 Jan 2026
config
Some configuration settings are available within PICO-8 and customizable through commands. Watch our video tutorial all about that, also applicable to the free Education Edition.
If you purchased PICO-8 then you have more configuration settings available in the config.txt file. Here is that file from version 0.2.6b.
// - - - - - - - - - - - - - - - - - - - - - - - - - - - -
// Configuration for pico-8
//
// config.txt is read on startup and saved on exit.
// To generate the default config.txt, delete this file.
//
// - - - - - - - - - - - - - - - - - - - - - - - - - - - -


// :: Video Settings

window_size 0 0 // window width, height
screen_size 0 0 // screen width, height (stretched to window)
show_fps 0 // Draw frames per second in the corner


// :: Window Settings

windowed 1 // 1 to start up in windowed mode
window_position -1 -1 // x and y position of window (-1, -1 to let the window manager decide)
frameless 0 // 1 to use a window with no frame
fullscreen_method 1 // 0 maximized window (linux)  1 borderless desktop-sized window  2 hardware fullscreen (warning: erratic behaviour under some drivers)
blit_method 0  // 0 auto  1 software (slower but sometimes more reliable)  2 hardware (can do filtered scaling)


// :: System Settings

foreground_sleep_ms 2 // number of milliseconds to sleep each frame. Try 10 to conserve battery power

background_sleep_ms 10 // number of milliseconds to sleep each frame when running in the background

sessions 74 // number of times program has been run

// (scancode) hold this key down and left-click to simulate right-click
rmb_key 0 // 0 for none  226 for LALT

// Desktop for saving screenshots etc. Defaults to $HOME/Desktop
desktop_path

// 1 to allow controller input even when application is in background
read_controllers_in_background 0


// :: Audio Settings (use "volume" for PICO-8)

sound_volume 192 // 0..256
music_volume 256 // 0..256


// :: usually 1024. Try 2048 if you get choppy sound

mix_buffer_size 1024


// :: map scancodes. Format: 44=47,80=89,..  (scancode a, scancode b -- when press a, generates b)
// run the program with -scancodes to determine which scancodes to use
map_scancodes


use_wget 0 // (Linux) 1 to use wget for downloads instead of libcurl (must be installed)


// :: pico-8

version 0.2.6b

// audio volume: 0..256
volume 192


// Location of pico-8's root folder
root_path C:/Users/USER/AppData/Roaming/pico-8/carts/


// Location of cartridge save data
cdata_path C:/Users/USER/AppData/Roaming/pico-8/cdata/


// Specify which player index joystick control begins at (0..7)
joystick_index 0


// Treat the first n controllers as if they were a single merged controller
// e.g. merge_joysticks 2 --> P0 gets controllers 0,1, P1 gets controller 2..
merge_joysticks 0


// Custom keyboard scancodes for buttons. player0 0..6, player1 0..5, menu_button, player2 0..5, player3 0..5
button_keys 0 0 0 0 0 0 0 0 0 0 0 0 0 0 0 0 0 0 0 0 0 0 0 0 0

// Play notes as they are plotted in frequency mode
live_notes 0

// iff 1: when using keyboard cursor, snap to closest pixel / map cel
cursor_snap 0

// 0 default  1 dark blue background in code editor  2 black background in code editor   3 gray background in code editor
gui_theme 1

// scale of screenshots and gifs // 2 means 256x256
screenshot_scale 3
gif_scale 3

// maximum gif length in seconds (0..120; 0 means no gif recording)
gif_len 120

// when 1, reset the recording when pressing ctrl-9 (useful for creating a non-overlapping sequence)
gif_reset_mode 0

// 0 for off. 1 for auto. 2 to allow control of a cart's framerate due to host machine's cpu capacity
host_framerate_control 1

// filter splore cartridges
// 0 off   1 on (exclude cartridge tagged as 'mature' by community)
splore_filter 0

// tab display width (1 ~ 4 spaces)
tab_width 2

// 0 off 1 on: draw tab characters as small vertical lines
draw_tabs 1

// 0 off 1 on: record the current cartridge and editor view every 3 seconds (see [appdata]/activity.log.txt)
record_activity_log 1

// 0 off 1 on: allow F6..F9 (alternative: ctrl 6..9)
allow_function_keys 1

// 0 off 1 on: automatically check for a newer version of a BBS cart each time it is run.
check_for_cart_updates 1

// hide mouse cursor for n seconds when typing.
auto_hide_mouse_cursor 5

// 0 off 1 on: backup with a new timestamped filename on every run
// normally not needed -- was used for debugging crash-on-run
aggressive_backups 0

// back up cartridge in editor every n minutes when not idle (0 for no periodic backups)
periodic_backups 20

// global screen transformations:
//  129 flip horizontally
//  130 flip vertically
//  133 rotate CW 90 degrees
//  134 rotate CW 180 degrees
//  135 rotate CW 270 degrees
transform_screen 0

// 0 off  > 1: colour to draw pixel grid in the gfx editor at zoom:8 and zoom:4 (16 for black)
gfx_grid_lines 0

// file naming for screenshot / gif / wav captures
// 0 sequential (foo_0.png, foo_1.png)    1 timestamp (foo_20240115_120823.png)
capture_timestamps 0
![]()
3467
3 Oct 2024
2108
22 Jan 2023
Anytime inside of PICO-8, whether you are in-game or in an editor, you can take a screenshot by pressing Ctrl+6 (Cmd+6):
![]()
![]()
This will saves a screenshot to the folder specified in your config file (Default location is $HOME/Desktop). You can change this behavior by editing the PICO-8 config.txt file. See Customize Configurations on how to do that.
Taking screenshots like this also works in the PICO-8 Education Edition, as well as any online PICO-8 player in a browser. However, it does not automatically download. There may be a pause of the game while it is working, then a small thumbnail preview of the image you just captured will be presented in a popup window at the top left of the PICO-8 player. You must right-click on this image and choose Save image as.. to download.
Alternatively, you can press F6:
![]()
Warning: This hotkey does not work in your browser.
![]()
3179
18 Sep 2024
Anytime inside of PICO-8, whether you are in-game or in an editor, you can take a screenshot by pressing Ctrl+7 (Cmd+7):
![]()
![]()
This will save a screenshot as a cart label to the currently loaded game. After doing this, you can then save or export a cartridge as a .p8.png and the label image will be visible on the cover of the cart.
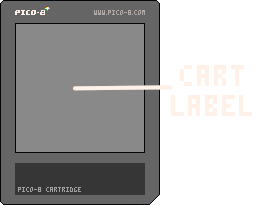
Taking cart label screenshots like this also works in the PICO-8 Education Edition. You cannot use the export command, but you are able to save as .p8.png and download the cart image, which you can upload to the Lexaloffle BBS or share with friends. Drag and drop this .p8.png cart into PICO-8 or the Education Edition to load the game.
Alternatively, you can press F7:
![]()
Warning: This hotkey does not work in your browser.
![]()
3194
18 Sep 2024
Anytime inside of PICO-8, whether you are in-game or in an editor, you can take a video (animated .gif file) by pressing Ctrl+9 (Cmd+9):
![]()
![]()
This will save a .gif video to your the folder specified in your config file (Default location is $HOME/Desktop). You can change this behavior by editing the PICO-8 config settings. See Customize Configurations on how to do that.
This also works in the PICO-8 Education Edition, as well as any online PICO-8 player in a browser. However, it does not automatically download. There may be a pause of the game while it is working, then a small thumbnail preview of the gif you just captured will be presented in a popup window at the top left. You must right-click on this gif and choose Save image as.. to download.
Alternatively, you can press F9:
![]()
Warning: This hotkey does not work in your browser.
Set a Starting Point
PICO-8 is always recording the screen, with a default duration of the last 8 seconds. You can increase this duration up to 120 seconds using the config settings. See Customize Configurations on how to do that. So by using the above command to save the gif, it will save the full duration of video based on this setting. However, you can also save shorter videos and control when the gif starts recording without changing these settings.
To specify a video recording starting point, first press Ctrl+8 (Cmd+8):
![]()
![]()
Alternatively, you can press F8 (again, does not work in a browser):
![]()
![]()
2993
4 Nov 2023
PICO-8 games can be shared and played in several ways, even if you use the free PICO-8 Education Edition.
1. Raw PICO-8 filetype ( .p8 )
The default file that your game is formatted and saved in is a text file with the .p8 file extension. This can be opened and edited in any text editor, but the art, sound, music, and label are encoded and while possible to edit, is very difficult to do manually. Loading this filetype in PICO-8 allows you to use the built in editors.
Find your .p8 files by using the Folder Command. The files are small enough to send as attachments in any email and most chats.
To open this file, the recipient must open PICO-8 or run the Education Edition in a browser, then simply drag and drop the file onto the screen while viewing the command line.
![]()
2. PICO-8 Cartridge Image ( .p8.png )
This image file is formatted to hold your entire game data hidden within. It can be opened by any image viewer or editing software, however, making edits and overwriting it will likely corrupt the game data.
The Education Edition can save .p8.png files using the save command instead of the export command.
Find your .p8.png files by using the Folder Command. The files are small enough to send as attachments in any email and most chats.
To open this file, the recipient must open PICO-8 or run the Education Edition in a browser, then simply drag and drop the file onto the screen while viewing the command line.
![]()
3. Lexaloffle BBS Online ( .p8.png )
Lexaloffle is the company that made and maintains PICO-8. The BBS (Bulletin Board System) is a forum of games, comments, questions, and tutorials, hosted by Lexaloffle as the main hub of the PICO-8 community and the massive games library that can be accessed through Splore.
You will need to make an account and login, then you can upload your cart to the BBS, which you can keep unlisted, or make publicly available to be played in its own webpage or through PICO-8's Splore.
![]()
4. Export to HTML
(not available in Education Edition)
You may want to host your game on your own website, or play through a browser while offline. Doing this will create 2 files, a .html file as the landing page and PICO-8 web player, and a .js file which holds your game data and is loaded by the .html file. You will need both files to play your game.
You can upload these two files in the same folder of your website to host your own game online, and share the URL link with your friends.
![]()
4. Export as Standalone
(not available in Education Edition)
For the easiest way to play your game offline and share with friends who do not own PICO-8, you can export your game in a fully packaged executable. Separate packages are created for different operating systems, so it doesn't matter if your friends are Windows, Mac, or Linux users.
You can share the exported package with them and your game will come with a barebones PICO-8 game player without the ability to edit, enter commands, nor access splore. It is fully dedicated to only playing your game, much like any other game you download and run on your computer.
![]()
4. Upload to a Game Hosting Platform
You can upload your game to online gaming platforms such as itch.io, newgrounds, kongregate, Game Jolt, and even Steam (though not free). You will likely require an exported version of your game either as HTML or Standalone, and then zip them in a specified way depending on the gaming platform you are uploading to.
![]()
4766
20 Sep 2024
You can find your PICO-8 files and folders here:
OSX: /Users/Yourname/Library/Application Support/pico-8
Linux: ~/.lexaloffle/pico-8
You can browse your PICO-8 files on your operating system whenever you need to. You may want to when changing configuration settings, copying, renaming, or deleting files. This is the main "/pico-8" folder in Windows.

Note: You may not have all of these folders and files, they are not all necessary. For example, if you haven't used Splore yet to favorite a game, then you won't have a favourites.txt file, but it will be created and saved here once you do so.
![]()
Main Folder
As seen above, these are the folders and files you are likely to have in this folder:
| Folder: .../pico-8 | |
|---|---|
| /backup | stores autosaved backup files of games you have edited. |
| /bbs | stores data about carts that you browse and play via "splore" (the lexaloffle game library browser) |
| /carts | stores the carts and other files you create, edit, and save locally. (the root folder when using the command line) |
| /cdata | stores the "cart data" for games that use this persistent memory storage. |
| /cstore | stores the carts saved by the cstore() function. |
| /plates | stores your custom html templates that you can apply to an html export. |
| activity_log.txt | the record of your PICO-8 activity (time spent in editors/games) |
| config.txt | the configuration settings that you can customize |
| favourites.txt | the record of carts that you clicked to save in your favorites collection in splore. |
| log.txt | records details about running PICO-8, carts, and any errors |
| sdl_controllers.txt | a file for customizing controller support and button mappings |
carts folder
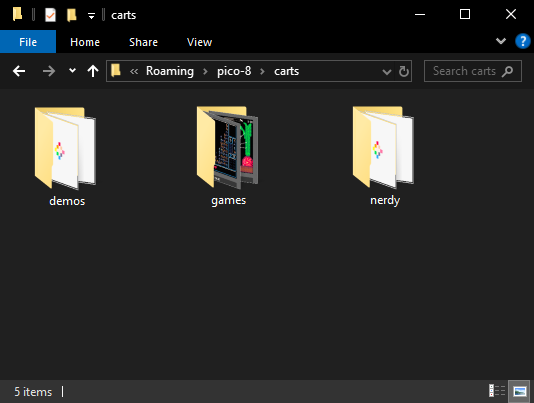
This is your "/carts" folder, it is the home folder of the files you can browse from the PICO-8 command line. This can be opened quickly with a file explorer in your operating system by using the folder command in PICO-8. There are file navigation commands that you can use in PICO-8 to explore child folders and files within your carts folder.
/bbs folder

![]()
3548
29 Nov 2024
"PICO-8 is a fantasy console for making, sharing and playing tiny games and other computer programs. It feels like a regular console, but runs on Windows / Mac / Linux. When you turn it on, the machine greets you with a commandline, a suite of cartridge creation tools, and an online cartridge browser called SPLORE." - PICO-8 Homepage
Official Homepage
| Console Specs | |
|---|---|
| Display | 128x128 16 colours |
| Cartridge Size | 32k |
| Sound | 4 channel chip blerps |
| Code | P8 Lua |
| CPU | 4M vm insts/sec |
| Sprites | 256 8x8 sprites |
| Map | 128x32 tiles |
Made by Lexaloffle Games LLP.
Developer: Joseph White ("Zep")
Contact: hey@lexaloffle.com
2052
31 Mar 2023
You may have heard of something called "ASCII" (American Standard Code for Information Interchange). It is an ordered sequence of numbers to represent individual characters in computers. The characters could be letters, numbers, punctuation marks, symbols, etc. In ASCII, each character is assigned a unique numeric value or "character code". For example, the ASCII code for the uppercase letter 'A' is 65, while the code for the lowercase letter 'a' is 97.
PICO-8 has its own sequence of characters in its own order. We call these "P8SCII" for fun. Below is the full list of P8SCII characters from 0 to 255, separated into their groups.
You can use chr() and ord() to switch between the P8SCII characters and their ordinal number values.
![]()
(0-15) Control Codes
From numbers 0 to 16, the P8SCII "characters" are actually control codes rather than symbols. These are advanced options that you can use inside of print() to change certain settings. See more about how to use these in the Special Control Commands page.
"Ord" = Ordinal Number Value
| Ord | Code | Control |
|---|---|---|
| 0 | \0 | terminate printing |
| 1 | \* | repeat next character this number of times. |
| 2 | \# | draw solid background with this color number. |
| 3 | \- | shift cursor horizontally by a value minus 16 pixels |
| 4 | \| | shift cursor vertically by a value minus 16 pixels |
| 5 | \+ | shift cursor by two values minus 16 pixels on X and Y axes. |
| 6 | \^ | special commands (see here) |
| Ord | Code | Control |
|---|---|---|
| 7 | \a | audio commands (more below) |
| 8 | \b | backspace |
| 9 | \t | tab |
| 10 | \n | newline |
| 11 | \v | decorate previous character (more below) |
| 12 | \f | set foreground colour (text color) |
| 13 | \r | carriage return (move cursor to start of same line) |
| 14 | \014 | switch to custom font (memory 0x5600) |
| 15 | \015 | switch to default font |
![]()
(16 - 31) Symbols
"Ord" = Ordinal Number Value | "Chr" = Character
| Ord | Chr |
|---|---|
| 16 | ▮ |
| 17 | ■ |
| 18 | □ |
| 19 | ⁙ |
| 20 | ⁘ |
| 21 | ‖ |
| 22 | ◀ |
| 23 | ▶ |
| Ord | Chr |
|---|---|
| 24 | 「 |
| 25 | 」 |
| 26 | ¥ |
| 27 | • |
| 28 | 、 |
| 29 | 。 |
| 30 | ゛ |
| 31 | ゜ |
![]()
(32 - 126) ASCII Numbers, Letters, and Punctuation
"Ord" = Ordinal Number Value | "Chr" = Character
These all correspond to the standard ASCII numbers and characters. Note that the uppercase letters (A-Z) are actually puny font in PICO-8, while the lowercase letters (a-z) are printed as the normal PICO-8 font which looks like all caps.
| Ord | Chr |
|---|---|
| 32 | (space) |
| 33 | ! |
| 34 | " |
| 35 | # |
| 36 | $ |
| 37 | % |
| 38 | & |
| 39 | ' |
| 40 | ( |
| 41 | ) |
| 42 | * |
| 43 | + |
| 44 | , |
| 45 | - |
| 46 | . |
| 47 | / |
| 48 | 0 |
| 49 | 1 |
| 50 | 2 |
| 51 | 3 |
| 52 | 4 |
| 53 | 5 |
| 54 | 6 |
| 55 | 7 |
| 56 | 8 |
| 57 | 9 |
| 58 | : |
| 59 | ; |
| 60 | < |
| 61 | = |
| 62 | > |
| 63 | ? |
| 64 | @ |
| Ord | Chr |
|---|---|
| 65 | A |
| 66 | B |
| 67 | C |
| 68 | D |
| 69 | E |
| 70 | F |
| 71 | G |
| 72 | H |
| 73 | I |
| 74 | J |
| 75 | K |
| 76 | L |
| 77 | M |
| 78 | N |
| 79 | O |
| 80 | P |
| 81 | Q |
| 82 | R |
| 83 | S |
| 84 | T |
| 85 | U |
| 86 | V |
| 87 | W |
| 88 | X |
| 89 | Y |
| 90 | Z |
| 91 | [ |
| 92 | \ |
| 93 | ] |
| 94 | ^ |
| 95 | _ |
| 96 | ` |
| Ord | Chr |
|---|---|
| 97 | a |
| 98 | b |
| 99 | c |
| 100 | d |
| 101 | e |
| 102 | f |
| 103 | g |
| 104 | h |
| 105 | i |
| 106 | j |
| 107 | k |
| 108 | l |
| 109 | m |
| 110 | n |
| 111 | o |
| 112 | p |
| 113 | q |
| 114 | r |
| 115 | s |
| 116 | t |
| 117 | u |
| 118 | v |
| 119 | w |
| 120 | x |
| 121 | y |
| 122 | z |
| 123 | { |
| 124 | | |
| 125 | } |
| 126 | ~ |
| 127 | ○ |
![]()
(127 - 153) PICO-8 Glyphs
These are special characters unique to PICO-8. You can manually type these glyphs into PICO-8 by holding Shift while pressing a certain letter. Here are the glyphs with the corresponding letter to use with Shift. The arrow and button keys are even recognized in btn() and btnp() functions.

"Ord" = Ordinal Number Value | "Chr" = Character
| Ord | Chr | Key Press |
|---|---|---|
| 128 | █ | shift + A |
| 129 | ▒ | shift + B |
| 130 | ? | shift + C |
| 131 | ⬇️ | shift + D |
| 132 | ░ | shift + E |
| 133 | ✽ | shift + F |
| 134 | ● | shift + G |
| 135 | ♥ | shift + H |
| 136 | ☉ | shift + I |
| 137 | 웃 | shift + J |
| 138 | ⌂ | shift + K |
| 139 | ⬅️ | shift + L |
| 140 | ? | shift + M |
| Ord | Chr | Key Press |
|---|---|---|
| 141 | ♪ | shift + N |
| 142 | 🅾️ | shift + O |
| 143 | ◆ | shift + P |
| 144 | … | shift + Q |
| 145 | ➡️ | shift + R |
| 146 | ★ | shift + S |
| 147 | ⧗ | shift + T |
| 148 | ⬆️ | shift + U |
| 149 | ˇ | shift + V |
| 150 | ∧ | shift + W |
| 151 | ❎ | shift + X |
| 152 | ▤ | shift + Y |
| 153 | ▥ | shift + Z |
![]()
(154 - 203) Japanese Hiragana
"Ord" = Ordinal Number Value | "Chr" = Character
| Ord | Chr |
|---|---|
| 154 | あ |
| 155 | い |
| 156 | う |
| 157 | え |
| 158 | お |
| 159 | か |
| 160 | き |
| 161 | く |
| 162 | け |
| 163 | こ |
| 164 | さ |
| 165 | し |
| 166 | す |
| 167 | せ |
| 168 | そ |
| 169 | た |
| 170 | ち |
| 171 | つ |
| 172 | て |
| 173 | と |
| 174 | な |
| 175 | に |
| 176 | ぬ |
| 177 | ね |
| 178 | の |
| Ord | Chr |
|---|---|
| 179 | は |
| 180 | ひ |
| 181 | ふ |
| 182 | へ |
| 183 | ほ |
| 184 | ま |
| 185 | み |
| 186 | む |
| 187 | め |
| 188 | も |
| 189 | や |
| 190 | ゆ |
| 191 | よ |
| 192 | ら |
| 193 | り |
| 194 | る |
| 195 | れ |
| 196 | ろ |
| 197 | わ |
| 198 | を |
| 199 | ん |
| 200 | っ |
| 201 | ゃ |
| 202 | ゅ |
| 203 | ょ |
![]()
(204 - 253) Japanese Katakana
"Ord" = Ordinal Number Value | "Chr" = Character
| Ord | Chr |
|---|---|
| 204 | ア |
| 205 | イ |
| 206 | ウ |
| 207 | エ |
| 208 | オ |
| 209 | カ |
| 210 | キ |
| 211 | ク |
| 212 | ケ |
| 213 | コ |
| 214 | サ |
| 215 | シ |
| 216 | ス |
| 217 | セ |
| 218 | ソ |
| 219 | タ |
| 220 | チ |
| 221 | ツ |
| 222 | テ |
| 223 | ト |
| 224 | ナ |
| 225 | ニ |
| 226 | ヌ |
| 227 | ネ |
| 228 | ノ |
| Ord | Chr |
|---|---|
| 229 | ハ |
| 230 | ヒ |
| 231 | フ |
| 232 | ヘ |
| 233 | ホ |
| 234 | マ |
| 235 | ミ |
| 236 | ム |
| 237 | メ |
| 238 | モ |
| 239 | ヤ |
| 240 | ユ |
| 241 | ヨ |
| 242 | ラ |
| 243 | リ |
| 244 | ル |
| 245 | レ |
| 246 | ロ |
| 247 | ワ |
| 248 | ヲ |
| 249 | ン |
| 250 | ッ |
| 251 | ャ |
| 252 | ュ |
| 253 | ョ |
![]()
(254 - 255) Arcs
"Ord" = Ordinal Number Value | "Chr" = Character
| Ord | Chr |
|---|---|
| 254 | ◜ |
| 255 | ◝ |
![]()
5010
30 Dec 2025


