sprites
sget
sget = "spritesheet get"
sget( x, y )| x | the distance from the left side of the screen (in pixels). |
| y | the distance from the top side of the screen (in pixels). |
This function will return the color number (0-15) of a single pixel currently drawn at the (x,y) coordinate specified on the sprite sheet. If you request a pixel that is outside of the screen, then sget will return 0 (zero).
![]()
Example:
sset(10,20,8)              --draw at (10,20), a red pixel
pixel_color = sget(10,20)  --returns 8 (red)
![]()
3427
3 Nov 2023
sset
sset = "spritesheet set"
sset( x, y, [color] )| x | the distance from the left side of the spritesheet (in pixels). |
| y | the distance from the top side of the spritesheet (in pixels). |
| color | (optional) a color number |
This function will draw a single pixel to the (x,y) coordinate specified, but on the spritesheet not the screen. You can specify the color as a number (0-15) according to the palette. The default color is the current draw color (last color set by either color() function or by a drawing function's color argument).
![]()
Example:
sset(10,0,8)    --draw at (10,0), a red pixel
sset(11,1)    --draw at (11,1), still a red pixel
spr(1,20,30)    --draw sprite 1 at (20,30)

color(12)       --set draw color to #12, blue
sset(16,0)      --draw at (16,0), a blue pixel
sset(17,1)      --draw at (17,1), a blue pixel
spr(2,20,38)    --draw sprite 2 at (20,38)
As you can see, you can specify the draw color multiple ways. In the first example we use the color argument in the sset function the first line and the same color is carried over to the second sset. In the second example, we set the color first with the color function which is also carried over to sset.
![]()
Simple Animations
This function can save you some sprite sheet space if you want to animate just one or two pixels, such as this flashing light on an ambulance.

Here is how you could make this animation using 2 sprites. We show the sprite editor to manually do what the code is doing: changing between drawing sprite 1 and sprite 2.
cls()
car=1
counter=0

function _update()
	counter+=.1
	if counter<1 then
		car=1    --sprite 1
	elseif counter<2 then
		car=2    --sprite 2
	else
		counter=0
	end
end

function _draw()
	spr(car,20,30)
end
And here is how you can save a tile on the sprite sheet by doing the same animation with only 1 sprite and the sset() function. We show the sprite editor to manually do what the code is doing: swapping one pixel in the sprite sheet to a different color.
cls()
car=1
counter=0

function _update()
	counter+=.1
	if counter<1 then
		sset(12,0,8) --red
	elseif counter<2 then
		sset(12,0,12) --blue
	else
		counter=0
	end
end

function _draw()
	spr(car,20,30)
end
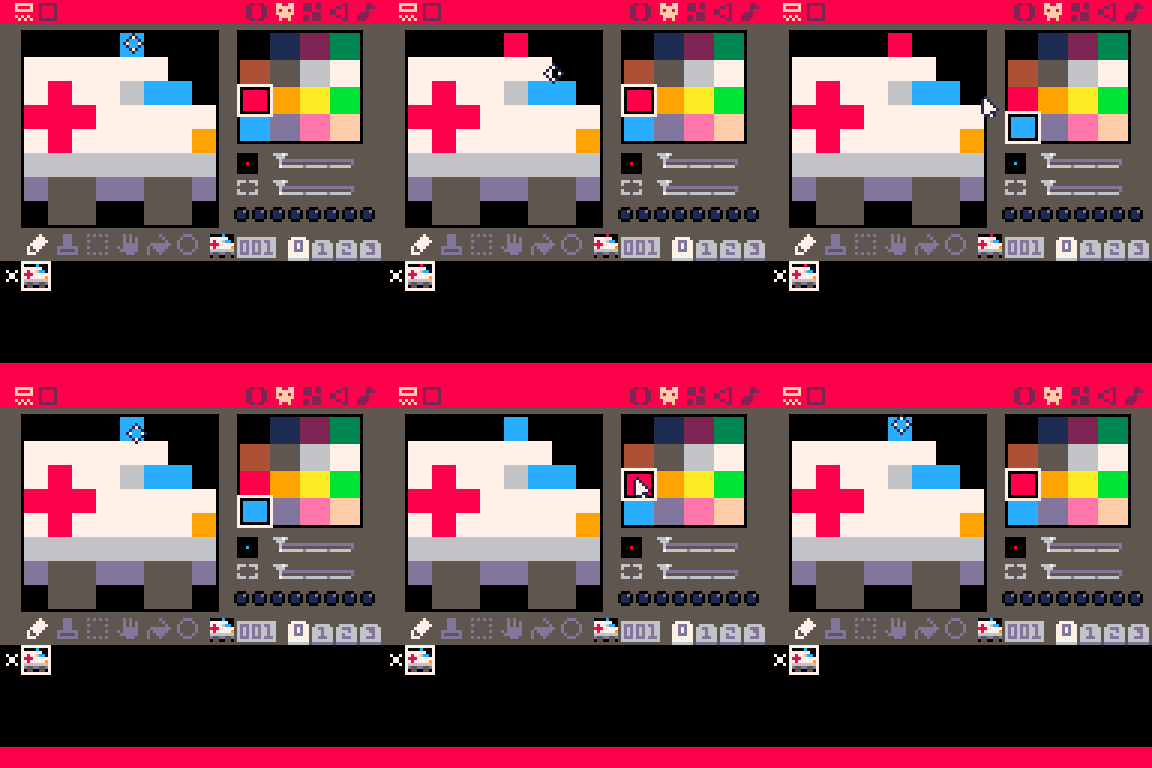
So if your animations are as simple as swapping a couple colored pixels around, consider using this function to help be more efficient with your sprite sheet space.
![]()
2571
6 Feb 2024
fget
fget = "flag get"
fget( sprite, [flag] )| sprite | the sprite number of the sprite you want a flag checked. |
| flag | (optional) the flag number (0-7) of the flag you want checked. |
This function will compare if the sprite has the flag set or not. If you provide a flag argument then it will return true if that flag is set on that sprite and false if it is not set on that sprite.
If you do not provide a flag argument, then the fget function will return a single bitfield of all flags that are set on that sprite.
![]()
Example:
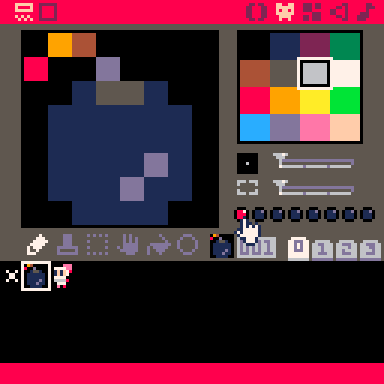
-- bomb= sprite 1, flag 0 on

print( fget(1,0) ) --true
print( fget(1,1) ) --false![]()
Getting Multiple Flags
You can set the flags manually in the sprite editor or with the function fset, which will do the same. You can have multiple flags turned on for a single sprite. Here we will turn on flag 0 for the bomb sprite and multiple flags on for the man sprite in the sprite editor.
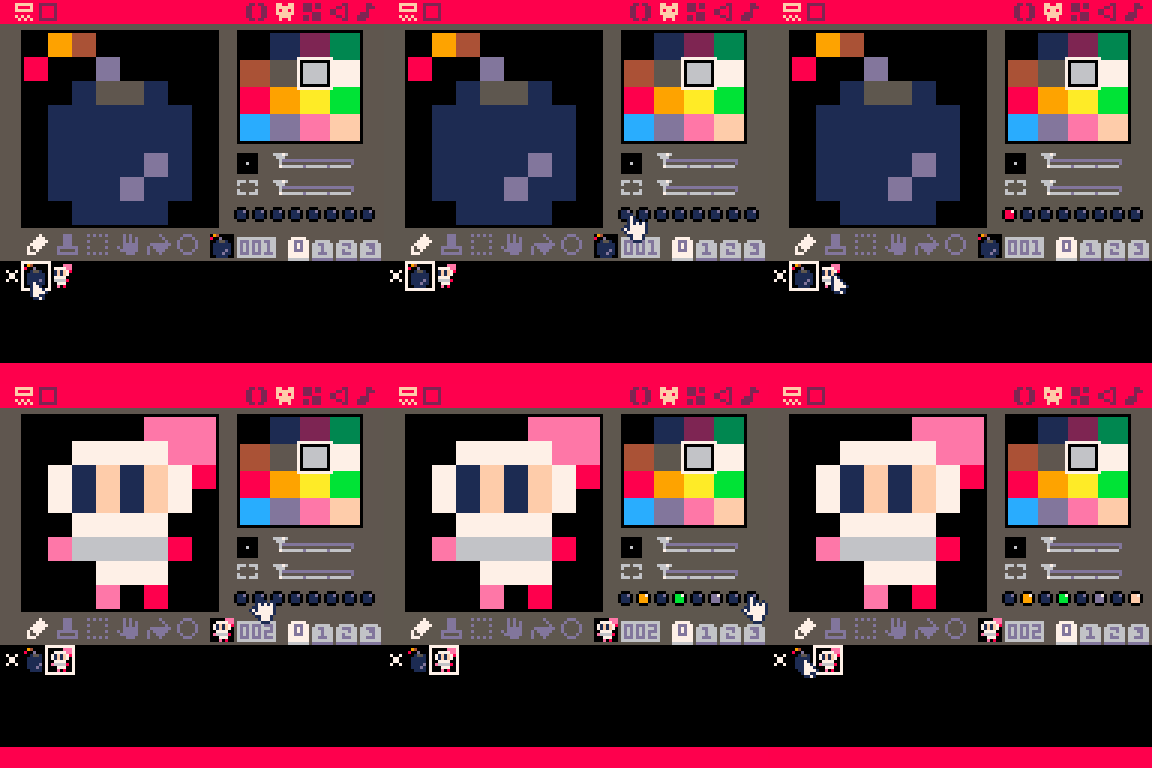
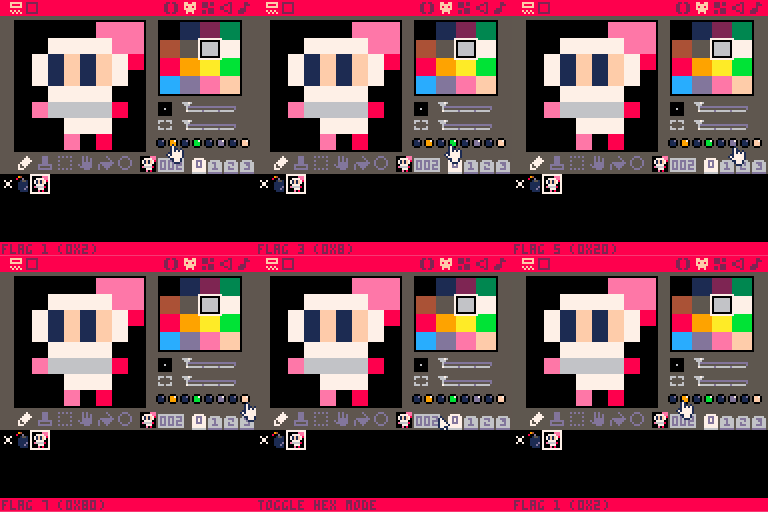
When you hover your mouse over the flags in the sprite editor, the flag number will be displayed at the bottom left of the screen. Notice that flags 1, 3, 5, and 7 are all turned on for the man sprite. So when we ask fget for any of those specific flags it will return true. If we want to know all of the flags that are turned on we don't specify the flag argument in our call for fget, and we need to understand the bitfield number that is returned.
Now let's use this set up to make calls to fget and see what is returned.
-- bomb= sprite 1, flag 0
-- man = sprite 2, flag 1,3,5,7

--bomb
print( fget(1,0) ) --true
print( fget(1,1) ) --false
print( fget(1) )   --1

--man
print( fget(2,0) ) --false
print( fget(2,5) ) --true
print( fget(2) )   --170
Notice that when we specify a flag to be checked, the returning value is either true or false, but when we left out that argument, the bomb sprite returned the number 1, and the man sprite returned the number 170. These numbers are bitfields that represent exactly which flags are turned on and they will be a number between 0 (no flags turned on) and 255 (all flags turned on).
To help read these numbers, here is a table to understand which flag or flags are on depending on the bitfield returned.
| flag # | bitfield |
|---|---|
| 0 | 1 |
| 1 | 2 |
| 2 | 4 |
| 3 | 8 |
| 4 | 16 |
| 5 | 32 |
| 6 | 64 |
| 7 | 128 |
By adding the bitfield value of the flags that you want turned on, you will get the unique number that is returned by a sprite that has those specific flags turned on. In our example, the bomb sprite returned the bitfield 1 because only flag 0 was turned on. And the man sprite returned 170 because:
| flag #s | bitfields | total |
|---|---|---|
| 1, 3, 5, 7 | 2 + 8 + 32 + 128 | = 170 |
![]()
4181
8 Dec 2023
fset
fset = "flag set"
fset( sprite, [flag], value )| sprite | the sprite number of the sprite you want a flag checked. |
| flag | (optional) the flag number (0-7) of the flag you want checked. |
| value | true or false to turn the flag on or off. Or a bitfield. |
This function will set the sprite's flag(s) on or off. If you provide a flag argument then it will set the value of that specific flag to the value.
If you do not provide a flag argument, then the fset function will apply the value to all flags.
![]()
Example:

In this example you can see that we manually turned on flag 0 for the bomb sprite. So the first time we get the flag 0, it returns as true. Then we set it false using fset, and get it again and find that it is now false, turned off. So we can change which flags are on for sprites in code while the game is running.
-- bomb= sprite 1, flag 0 on
print( fget(1,0) ) --true

fset(1,0,false) --set flag 0 to false
print( fget(1,0) ) --false
You can easily turn all flags on or off for a single sprite like this:
fset( 1,true )  --all on
fset( 1,false ) --all off![]()
Setting Multiple Flags
You can set the flags manually in the sprite editor or with this function fset. You can have multiple flags turned on for a single sprite. Here we have flag 0 turned on for the bomb sprite and multiple flags turned on for the man sprite in the sprite editor. We can do the same thing in code like this:

-- bomb= sprite 1, flag 0
-- man = sprite 2, flag 1,3,5,7

--bomb
fset( 1,0,true ) --flag 0, on

--man
fset( 2,1,true ) --flag 1, on
fset( 2,3,true ) --flag 3, on
fset( 2,5,true ) --flag 5, on
fset( 2,7,true ) --flag 7, on
To avoid many calls to the same function, there is an easier way to set multiple flags. To do this, we need to understand the bitfield number that we can use to represent multiple boolean states (flags as true or false).
Bitfields represent exactly which flags are turned on and they will be a number between 0 (all flags turned off) and 255 (all flags turned on).

Here is a table of flag numbers and their corresponding bitfield values.
| flag # | bitfield |
|---|---|
| 0 | 1 |
| 1 | 2 |
| 2 | 4 |
| 3 | 8 |
| 4 | 16 |
| 5 | 32 |
| 6 | 64 |
| 7 | 128 |
By adding the bitfield value of the flags that you want turned on, you will get the unique number that is returned by a sprite that has those specific flags turned on. In our example, the bomb sprite has only flag 0 turned on so the bitfield value is simply 1.
fset( 1, 1, true ) --flag 0, trueAnd the man sprite we want multiple flags turned on, specifically flags 1, 3, 5 and 7. If you refer to the table above, we can add up the bitfield values of each of those flags and get the total bitfield value that represents those exact flags turned on, which is 170 because:
| flag #s | bitfields | total |
|---|---|---|
| 1, 3, 5, 7 | 2 + 8 + 32 + 128 | = 170 |
Now we can show you how you can simplify the multiple calls to the function for each flag, down to a single call using a bitfield value.
--set multiple flags using multiple calls
fset( 2,1,true ) --flag 1, on
fset( 2,3,true ) --flag 3, on
fset( 2,5,true ) --flag 5, on
fset( 2,7,true ) --flag 7, on

--set multiple flags using 1 call
fset( 2,170 ) --flags 1,3,5,7 on
Notice that when we don't specify a flag in the arguments, and instead after the sprite number, we only provide the number 170 which will be taken as the value argument, not the flag argument.
![]()
3086
26 Apr 2025
spr
spr = "sprite"
spr( sprite_number, x, y, [w, h], [flip_x], [flip_y] )| sprite_number | the sprite number |
| x | how far from the left of the screen to draw the sprite. |
| y | how far from the top of the screen to draw the sprite. |
| w | (optional) how many tiles wide to draw from the sprite sheet. (default 1) |
| h | (optional) how many tiles tall to draw from the sprite sheet. (default 1) |
| flip_x | (optional) boolean, if true draw the sprite flipped horizontally. (default false) |
| flip_y | (optional) boolean, if true draw the sprite flipped vertically. (default false) |
This function will draw a sprite from the sprite sheet to the screen. You must provide the (x,y) position of where to draw the sprite. The pixel at the screen position (x,y) will be the top left pixel of the sprite. When flipping the sprite, this screen position is not changed, only how the sprite is drawn at this same position.
You may optionally provide w (width) and h (height) arguments to draw sprites larger than a single 8x8 pixel tile. Note that width and height arguments are given as tiles, not pixels, so a width of 2 and height of 3 will draw a 16x24 pixel sprite.
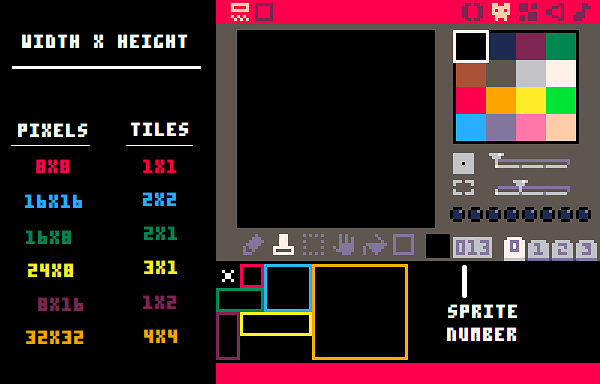
You may optionally provide flip arguments. Note that you must provide width and height arguments before these flip arguments, even if you want the default width and height.
spr( 1, 10,20, true ) --will not draw
spr( 1, 10,20, 1,1, true ) --will draw flipped![]()
Example:
-- 16x16 sprite

spr( 1, 10, 20, 2, 2 )![]()
7710
29 Apr 2024
sspr
sspr = "stretch sprite"
sspr( sx, sy, sw, sh, dx, dy, [dw, dh], [flip_x], [flip_y] )| sx | sprite sheet x position (in pixels) |
| sy | sprite sheet y position (in pixels) |
| sw | sprite width (in pixels) |
| sh | sprite height (in pixels) |
| dx | how far from the left of the screen to draw the sprite |
| dy | how far from the top of the screen to draw the sprite |
| dw | (optional) how many tiles wide to draw the sprite (default same as sw) |
| dh | (optional) how many tiles tall to draw the sprite (default same as sh) |
| flip_x | (optional) boolean, if true draw the sprite flipped horizontally (default false) |
| flip_y | (optional) boolean, if true draw the sprite flipped vertically. (default false) |
This function will draw a sprite of a specific size to a specific size from the sprite sheet to the screen.
SX, SY, SW, SH
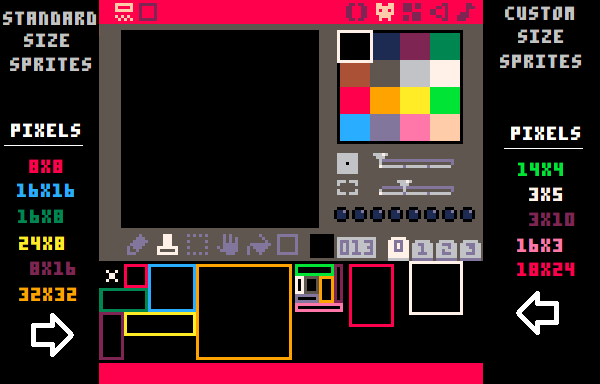
These four arguments must be passed when calling this function. All of them deal with the sprite sheet space. The (sx,sy) are the coordinates of where to take the sprite from the sprite sheet. It will take a rectangle of the sprite sheet starting from the top left corner at (sx,sy) and with a width and height of (sw,sh).
DX, DY, DW, DH
The (dx,dy) arguments are required to draw the sprite at those coordinates on the screen. The (dw,dh) arguments are optional since they default to the same width and height from the sprite sheet, what you give as (sw, sh). In most cases, you will want to simply draw the sprite exactly the same size as it appears in the sprite sheet. However, these 2 arguments (sw, sh) allow you to stretch and squash the sprite to different sizes, something that spr() cannot do. That is why you may want to use sspr() even for standard size sprites.
FLIP_X, FLIP_Y
When flipping the sprite, horizontally or vertically, the screen position (dw,dh) is not changed, only how the sprite is drawn at this same coordinates. Note that you must provide draw width and draw height arguments before these flip arguments, even if you want the default sprite width and height.
![]()
Example:
-- 16x16 sprite
sx=8
sy=8
sw=16
sh=16
dx=10
dy=20
sspr( sx,sy, sw,sh, dx,dy )
-- 6x5 sprite
sx=8
sy=8
sw=6
sh=5
dx=10
dy=20
sspr( sx,sy, sw,sh, dx,dy )![]()
5510
29 Apr 2024
In video games, a sprite sheet is a single image that contains multiple smaller images, called sprites. To allow the game to draw these sprites to the screen more efficiently, the separate sprites are usually grouped together into a larger image. A game can have a single sprite sheet with every sprite on it, or sometimes it is smarter to break them up by scenes, characters, menus, overlays, etc.
Here is an example of a large outdoor sprite sheet that could be used to build a town, grassy fields, steep cliffs, rivers, waterfalls, and even a castle dungeon, all combined into a single image.
![]()
You can see how variety is created by drawing several different rocks, boxes, grass edges, bushes, benches, and more to make the scenery more interesting. Pieces of the sprite sheet can be mixed and matched like the 2 houses for example can create a whole town of houses, each with a different number of windows, chimneys, and doors. Some sprites on this sprite sheet are made to be animations such as the water tiles with the droplets or the waterfall splashes, and the 3 fountain sprites are actually just 1 fountain but with animated water.
This is an example of a large sprite sheet for a single character, with many variations of poses that will create the animations in the game. You can see walking, carrying, attacking with a sword, and climbing, with each action animated across 3 to 4 poses, and each row is a different direction with the character facing down, right, up, and left.
![]()
Studying the 2D sprite sheet of games you like is a great way to learn sprite drawing tips, sprite sheet efficiency, as well as sprite animation.
By putting all of these sprites together on a single sheet, the game can pull out specific parts of the sprite sheet to draw everything on the game screen. This method helps the game run more smoothly and saves memory by keeping all related images in one place.
![]()
PICO-8 Sprite Sheet
In PICO-8, a sprite sheet works in a similar way but with some specific limitations. PICO-8 has a fixed 128x128 pixel area where you can store all of your sprites, and each sprite is usually an 8x8 pixel area called a tile. You can fit up to 256 sprites on the sheet.
Like in other games, these sprites can be used for characters, items, backgrounds, or any visual element in the game. PICO-8 has built-in tools to help you edit and organize these sprites in its sprite editor, allowing you to easily design and manage the visuals for your game within this limited space.
The sprite sheet is split into 4 different tabs seen in the bottom right of the sprite editor and labeled as numbers 0, 1, 2, and 3. You should know that the data stored in tabs 2 and 3 (the bottom half of the sprite sheet) is shared with the bottom half of the map in the map editor.
This is an example of the exported sprite sheet of the demo game Jelpi by Zep. You can see that the game's sprites are only using the top half of the sprite sheet, while the bottom half looks strange. That's because the game uses the full map and we are able to see the data of the bottom half of the map expressed as colored pixels here in the bottom half of the sprite sheet.
So without using memory manipulation techniques, the default limitation forces you to choose to use the full sprite sheet but with less map space, or use the full map but with less sprites.
It is important to understand not only how to use the sprite sheet for drawing sprites, but also how to use it efficiently, how to balance variety of characters and scenery with animation frames, and how to make it easier to code your animations. You might be surprised how much life you can bring to your game with just 2 frames of animations instead of the 50 frames of one character in the example above.
(From the game Puzzles of the Paladin.)
![]()
6799
20 Sep 2024
A sprite is a small, two-dimensional image that's used in video games. Think of sprites as the visual building blocks of 2D games - they're used to represent characters, objects, items, and other visual elements in the game world.
A collection of sprites is called a sprite sheet.
Sprites are typically made with a transparent background. In many programs, a fully transparent background is shown with a gray checker pattern.
In PICO-8 the default transparent color is black (#0) but if you look at many games that use black in their sprites, they change the transparent color to a color they don't use in the sprites. Then the background of the sprite sheet is set to the new transparent color instead.
![]()
Animated sprites are drawn frame by frame, or piece by piece, and then stitched together in code. Quickly drawing the different sprite poses creates the illusion that a single sprite is moving and animating but it is really a series of sprites.
(From the game Puzzles of the Paladin. The editors look different because of a customized color palette.)
The default sprite size in PICO-8 is 8x8, but you can increase the sprite size in multiples of 8. These can be drawn to the screen using spr().
You can also draw your sprites in various sizes to save space on your sprite sheet. You can draw these to the screen using sspr().

Sprites in PICO-8 can have up to 8 flags turned on which can be used for anything the developer wishes. This is one way to group and identify different types of sprites as friendly or hostile, as objects you can collide with, break, or pick up, and more.
4853
17 Sep 2024
