PICO-8
Guide
Guide Categories
Beginner Friendly Browsing
Audio Colors Commands Controls Debug Editors Getting-started Loops Lua Maps Math Save-export Screen Shapes Sprites System Tables Variables
The Official Manual is provided here for quick access. Our specific guide pages will also direct you to specific relevant sections of the Official Manual.
save-export
save
save gamename
The save command is used to save your game as a text file with the filetype .p8. The game data is saved within the file and can be read by PICO-8 (including Education Edition). Once saved in this format, you may use the ctrl+s shortcut. Any subsequent saves will overwrite this same .p8 file.
A .p8 file can be loaded into PICO-8 by load command, or by dragging and dropping the .p8 file into PICO-8.
![]()
Carts Folder
To easily find your .p8 files (in the "carts" folder), use the Folder Command.
The default directories for the "carts" folder are:
| Windows: | C:/Users/Yourname/AppData/Roaming/pico-8/carts |
| Mac OSX: | /Users/Yourname/Library/Application Support/pico-8/carts |
| Linux: | ~/.lexaloffle/pico-8/carts |
To change the location of your saved carts, navigate to the .../pico-8/ root folder (the parent folder of .../carts), and find the config.txt file. Open this in any text editor and scroll down until you see:
// Location of pico-8's root folder
root_path C:/Users/Yourname/AppData/Roaming/pico-8/carts/
// Location of cartridge save data
cdata_path C:/Users/Yourname/AppData/Roaming/pico-8/cdata/
Edit the path to your desired paths and save. You'll have to restart PICO-8 for this to take effect.
Tip: You can save your PICO-8 root and carts folder to the cloud (using Google Drive, Dropbox, etc.) to have your games available and saved across multiple devices.
![]()
Education Edition
You can save using this command in the Free Education Edition of PICO-8 and it will create the .p8 file and automatically download it to your default downloads folder.
A .p8 file can then be loaded back into PICO-8 Education Edition by load command, or by dragging and dropping the .p8 file onto the PICO-8 screen in the browser.
![]()
External Text Editor
You can open .p8 files in any text editor or your favorite coding program (IDE), such as Visual Studio Code, Notepad++, Sublime Text, etc. This is good for people who want to avoid the PICO-8 font, have more visual space to read and write code, and use specific code editor features such as syntax highlighting in their preferred theme, debugging, and code completion.
Important: Be careful when editing your .p8 files using both PICO-8 editors and external editors because you can overwrite one with the other and lose unsaved changes. Be sure to always save before switching between PICO-8 editing and external editing.
All .p8 game files must begin with:
pico-8 cartridge // http://www.pico-8.com
version ##
Note: The version ## is an integer, for example version 0.2.5g is actually version 41 when viewing the .p8 file in a text editor.
There are some designated strings that are used to properly separate code, tabs, graphics, map, sfx, music, and label data. These are:
__lua__ |
Designates the start of the game code. |
-->8 |
Designates the start of a new tab. |
__gfx__ |
Designates the start of the sprite graphics data. |
__map__ |
Designates the start of the map graphics data. |
__sfx__ |
Designates the start of sound effects data. |
__music__ |
Designates the start of music data. |
__label__ |
Designates the start of the 128x128 cartridge label data. |
![]()
5077
8 May 2023
.png
export filename.png
The export .png command is used to save your sprite sheet as a 128x128 image of all 4 tabs of the sprite sheet arranged vertically. For example, here are the four sprite sheet tabs exported, and for comparison is the Jelpi demo game's exported spritesheet.
It is important to know that the lower half of the sprite sheet and the lower half of the map share the same data space. This is why Jelpi's sprite sheet looks strange. Tab #2 and #3 are not being used by the sprite graphics data and instead, they are being used by the map graphics data.
![]()
1554
16 Apr 2023
.png
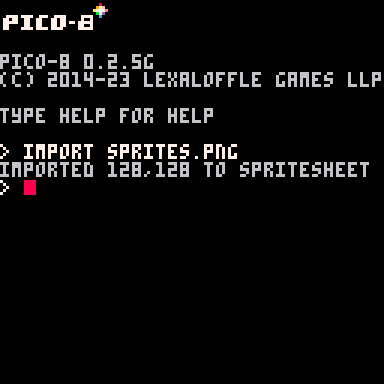
import filename.png
You can import a .png of any size and PICO-8 will write it onto the spritesheet, doing its best to convert to the PICO-8 palette and taking only the 128x128 pixels from the top left corner of your image.
Importing multiple spritesheets will overwrite the previous one.
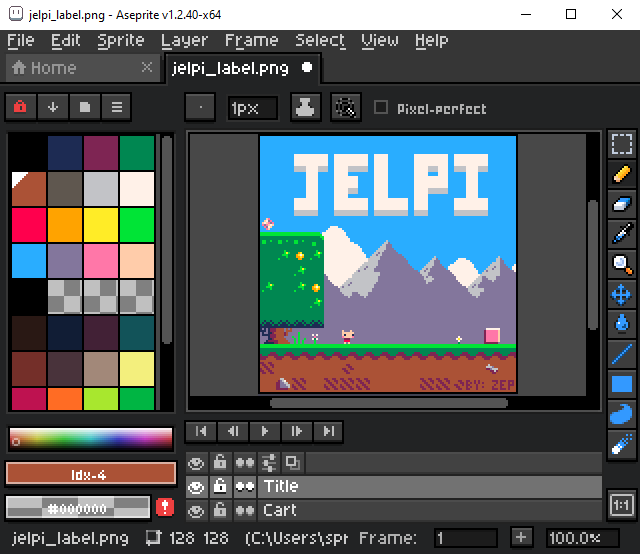
Drawing a spritesheet in an external tool (Aseprite)
![]()
using the import command
imported spritesheet
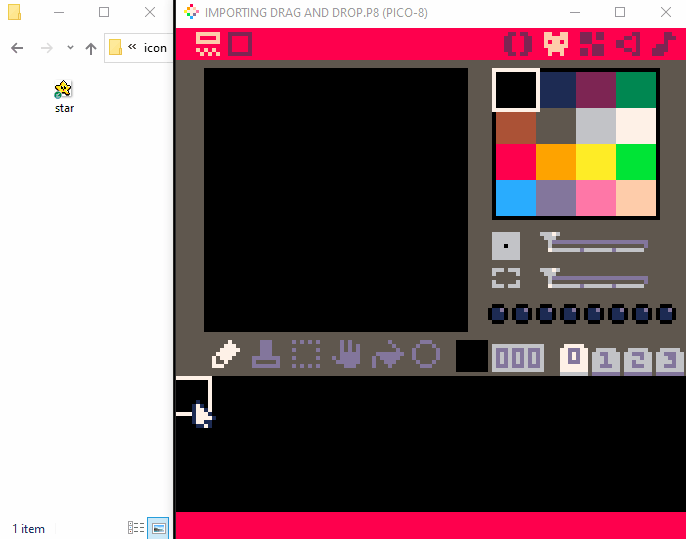
Importing by Drag and Drop
You can also drag and dop .png image files directly into the sprite editor. This will import the image file the same as using the import command but will use the currently selected position on the sprite sheet to be the top left corner of where to begin importing the file.
![]()
2860
6 May 2023
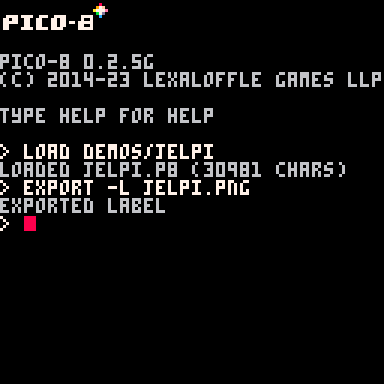
-l .png
export -l filename.png
The -l switch is used with the export .png command to export the cart label as a 128x128 image, instead of the sprite sheet.
![]()
1299
20 Sep 2024
-l .png
import -l filename.png
The -l switch is used with the import .png command to import the cart label.
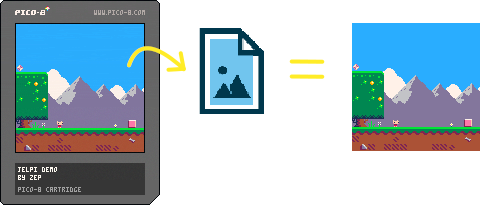
If you ever saw some great looking cover art for game carts and wondered how they did it, an easy way is to capture a screenshot label of your game using F7 (or ctrl/cmd + 7), then export the label as a 128x128 png image, then edit in an external program, then import your new label.
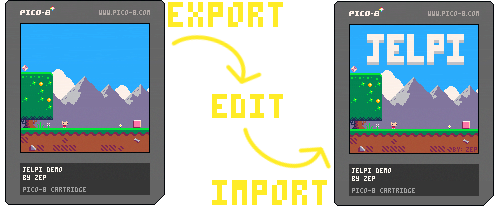
Edit Labels (not whole cart image) in an External Editor
![]()
1380
20 Sep 2024
.wav
export filename.wav
The export .wav command is used to save a single sfx or music pattern as a wav file. Which you save depends on the currently selected editor.
To export a single SFX pattern:
Navigate to the SFX Editor and select the SFX you want to export. Next, press ESC to return to the command line and type the above command. Your .wav file will be saved in the currently opened folder.
export filename%d.wav
To export all SFX patterns:
Use the %d control at the end of the filename to export all 64 SFX patterns as separate wav files, whether they are filled or empty. You must select the SFX editor first. If you have the Music Editor open before using this export command, it will include the %d in the filename and export the selected music pattern with that full filename.
![]()
1064
14 Jun 2023
.wav
export filename.wav
The export .wav command is used to save a single sfx or full music pattern as a wav file. Which you save depends on the currently selected editor.
To export an entire MUSIC pattern:
Navigate to the Music Editor and select the pattern you want to export. Next, press ESC to return to the command line and type the above command. Your .wav file will be saved in the currently opened folder.
If your music pattern loops infinitely, then it will save as a repeating loop until it reaches 4 minutes and 30 seconds.
![]()
1320
15 Jun 2023
.map.png
export filename.map.png
The export .map.png command is used to save a single large image of the entire map of your game as it is saved in the map editor.
| Map Image Dimensions | |
|---|---|
| 1024 x 512 | pixels |
| 128 x 32 | tiles |
For example:
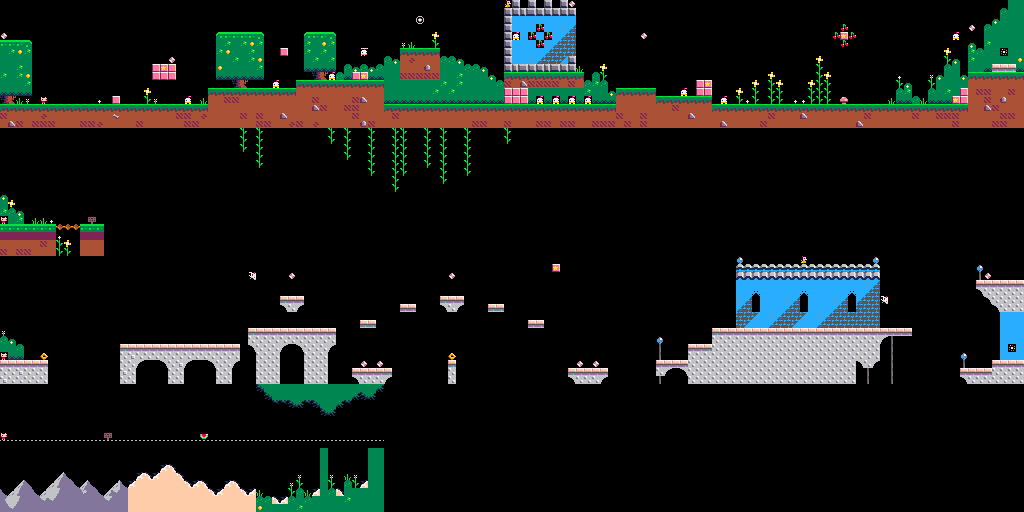
( Exported Map of "Jelpi" Demo Cart )
Remember that the bottom half of the map is shared with the bottom half of the spritesheet. So while Jelpi's map looks nice above, that same data appears in Jelpi's spritesheet as:![]()
![]()
1297
15 May 2023
.p8.png
save gamename.p8.png
The save command with the filetype of .p8.png or simply .png is used to save your game as a special image format. The game data is saved within the image and can be read by PICO-8 (including Education Edition). Once saved in this format, ctrl+s and subsequent saves will overwrite this same .png file. (See export below to avoid this.)
A .png file can be loaded into PICO-8 by load command, or by dragging and dropping the .p8, .p8.png, or .p8.rom file into PICO-8 (this also works in the Education Edition).
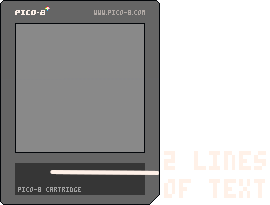
Cartridge Label
To create a good looking PICO-8 game cartridge, you will want to include an image of your game that will go in the center of the cartridge image.
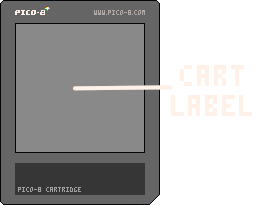
Press CTRL+7 or F7 to capture what is currently displayed on the PICO-8 screen as your catridges label. This saves a 128x128 image as PICO-8 graphics code and is only used when saving a .png cartridge.
If you do not capture a label before saving as .png, then your cartridge will be blank and PICO-8 will display: "Warning: Label is blank", however it will still save correctly and look like this:
![]()
See Save Label for more information.
![]()
Title and Author
It is possible to save text to the catridge image in the dark gray box below the label. This is customarily used to first write the title, then write the author (developer) name.
To do this, simply add two comments as the very first two lines of your game's code.
--[game title]
--by [author name]
For example, to create the game cartridge for one of our bite-size games like this, we used:

--fishy
--by nerdy teachers![]()
export gamename.p8.png
When you use export to save a cartridge to a .png format, it is the same as using save but without changing the active file you're currently working on. This is helpful when you want to create a copy of your work in a different format, like .p8.rom, to share with others without accidentally overwriting it later as you continue to work on the original .p8 file.
Tip: You can use this to backup versions of your project, keeping the main .p8 file as your current working file, and using export gamename_v1.p8.png and saving version numbers this way as you go.
![]()
Be careful of these similar saving options:
save .p8.png |
Creates or overwrites cartridge image file and makes that the active file. Subsequent saves (even CTRL+S) will overwrite this cartridge image. |
save .png |
Creates or overwrites cartridge image file and makes that the active file. Subsequent saves (even CTRL+S) will overwrite this cartridge image. |
export .p8.png |
Creates or overwrites cartridge image file and does not make that the active file. Subsequent saves (even CTRL+S) will not overwrite this cartridge image, but will overwrite the .p8 text file. |
export .png |
Creates a single sprite sheet image of all your sprite sheet tabs! |
![]()
4324
20 Sep 2024
.html
export gamename.html
This will create two files (gamename.html and gamename.js) in your currently opened folder. Use the Folder Command to open and view these files.
The HTML file is available under a CC0 license, and does not contain any of your game data. It contains the basic webpage code as well as the JavaScript that handles the web-player-specific interactions such as the button inputs (mouse & keyboard, touchscreen, gamepad support), dynamic screen sizing, side menu buttons, and detecting and interacting with the type of device, to name a few. It also contains the style of the web player and buttons, without an external CSS file.
The JavaScript file contains the PICO-8 web player and your game data, encoded as "var _cartdat" along with many functions to read the cart data, run the game, detect in-game keypresses and joystick/touchscreen motions, and audio handling, to name a few. It is not recommended to try to edit this file.
![]()
Export Options
export gamename.js
Use this command to export only the javascript file.
export -f gamename.html
Use this command to export the two files into a folder also named [gamename]. The .html file will also be named index.html instead of [gamename].html. This is handy if you are preparing to upload your game to a website such as itch.io which needs these changes.
export gamename.html -p filename
Use this command to export the game using a custom html template file. The file [filename] must be html and located in {application data}/pico-8/plates/filename.html to be used as the template. Use the special string ##js_file## to be automatically replaced by the .js filename, and the string ##label_file## for the cart's label image.
export -w gamename.html
Use this command to export the web version of your game with an additional .wasm ( Web Assembly ) file format. It may help to make your game smaller and faster.
![]()
Web Player Customization
The .html file contains some options you can change:
| p8_allow_mobile_menu | (default true) toggles mobile device display |
| p8_autoplay | (default false) if false: display blurred cart label and play button; if true: boots game cartridge automatically after page loads. |
You can find the style code for customizing the game page at the section <STYLE TYPE="text/css"> where you can customize the options for:
| .p8_menu_button | The buttons on the lower right of the web player; opacity, positioning, color, and size. |
| canvas | The image-rendering style, border (defualt 0), and cursor display (default none). |
| .p8_start_button | The base64 image to display if the player is not set to auto-play (default as cart label), and the cursor display (default pointer). |
| .button_gfx .button_gfx_icon |
The stroke and fill opacity and color settings. |
Just below that is the <body> opening tag with default styles. You can change the background-color and text colorof the page here.
Changing the background-color to match your webpage background will help to blend in your embedded game on the itch.io page for example so that the margins around the player don't appear black but still show the p8_menu_buttons. If your p8_menu_buttons disappear because of the background color change, be sure to simply add a background-color to the .p8_menu_button class in the <STYLE...> section above.
![]()
Default Menu Buttons
You can customize these Menu Buttons which are each a base64 image string by default. Search the .html file for p8_gfx_dat and change the "data:image..." strings to the image sources of your choice. Do not change the names of each button, such as "p8b_pause1", because they reference the button id in the .js file.
Default Mobile Buttons
You can customize the Mobile Buttons which are base64 image strings by default. Within the same p8_gfx_dat as the menu buttons, you will see the final two images are named "controls_left_panel" for the directional pad and "controls_right_panel" for the O, X, and menu buttons. You can change the image sources of these but do not change the name.
Default Play Button
You can customize this Play Button which is a base64 image string by default. Search the .html file for div id="p8_start_button" and change the image source.
![]()
3418
15 Aug 2023
.bin
export gamename.bin
This command is used to export your game as an executable file that can be run on Windows, Linux (64-bit), Mac and Raspberry Pi, without the need to upload to the web, nor load it into PICO-8. So people who do not have PICO-8 can still play your game this way.
This will create multiple files and folders in your currently opened folder. Use the Folder Command to open and view these files.
For example, if you export to the default carts folder, these are the folders and files that are created:
| carts | ||
| gamename.bin | ||
| linux | ||
| raspi | ||
| gamename.app | ||
| windows | ||
| gamename_linux | ||
| gamename_osx | ||
| gamename_raspi | ||
| gamename_windows |
It is recommended to distribute the zipped folders exactly as they are to ensure they are easily playable on other systems. See the manual for more information.
![]()
Custom Game File Icon
The default icon created for your game's executable file is the label that you saved with the cart.
When exporting to .bin, you may use these commands to customize the icon's sprite, size, and transparency.
-i |
n |
= Set the Icon as sprite index N |
-s |
n |
= Set the sprite size to NxN sprites |
-c |
n |
= Make colour N of the icon transparent |
(The default transparent color is black (#0). To set no transparent color, use 16.)
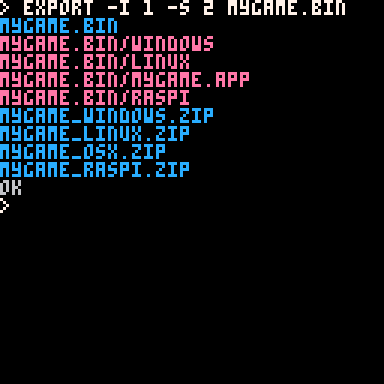
Example walk through:
Choose a sprite in the spritesheet to also use as the cart icon. Make note of the sprite number displayed, even if larger than 8x8 pixels. Here, the smiley face is sprite number 1, and has a size of 16x16 pixels which is 2x2 tiles. So we will use 2 for the icon size.
Use the command:
EXPORT -I 1 -S 2 MYGAME.BIN
to take sprite 1 with the size of 2x2 tiles to become the file icon. Press enter and PICO-8 will begin creating and displaying each folder and files as it goes. Wait for the "OK" to appear to know that it is finished.
And the icon appears next to the main executable file in your bin folders. You can pin this file to your start menu or taskbar, or make a shortcut, and your custom icon will be used in those places as well.
![]()
Include an Additional File
You may include one additional file with your game exported this way, so that when others download it, they can receive extra information or bonus content along with the game. Use -e and list one file you want to add before the .bin filename.
export -e gamename.bin readme.txt
You can include additional information about yourself the developer, the game, any licensing information, how to install, how to play, etc. in a simple text file, often named "readme".
export -e gamename.bin wallpaper.png
Another idea is including a large scale image such as art related to your game that can be used as a wallpaper for fans of your game and a gift for downloading. This could also be a scaled up version of the coverart that you include for people who want to put your game on a handheld device, or a printable sticker, etc. See Export Label to export your game label as a small image file, which you can then scale up in another program.
![]()
Share with Friends
![]()
You can place the Binary export file(s) on a Flash Storage Device (thumb drive, SD card, Micro SD card, etc.) for the appropriate Operating System, or just put them all on there and let your friend choose their OS.
Give this Flash Device to your friend, and they can plug it in, click on the game file and play your game without needing to own PICO-8 themselves and they don't need any internet connection.
These exported files package up a stripped down version of PICO-8 dedicated to playing your single game. On Windows, for example, copy all three files from the "Windows" exported folder to your Flash Device. To run the game, simply plug in the Flash Device, open it to view files, then double click on the file you named in the export. Our example above was titled "mygame" and the icon is a smiley face, and that is the .exe file to run the game. Easy as that.
![]()
![]()
2731
14 May 2025
It is now easier to export your game specifically to upload to websites like itch.io but you still need to follow some steps after exporting. These steps will allow you to export and upload so that your game can be downloaded or played directly in a web browser (a common requirement for game jams).
Step 1 - Set Game Label
Before exporting your game make sure you save a label, and it's recommended to add your title and name to the first two lines of your cart as comments.
You may also want to prepare screenshots and gifs of your gameplay to be displayed on the itch.io page now. Save these in a separate folder for later (Step 5).
Step 2 - Export as HTML Folder
Export your game as html but with the special command to save the .html and .js files in a folder.
Use the command export -f gamename.html (change "gamename" to the name of your game; this will become the folder name as well) then press enter.
The -f command will name the files specifically and place them in a folder. Do not rename the files within the folder; itch.io requires that the main file is named index.html and that file looks for the .js file with the default name, so don't change either.
Step 3 - Zip Game Folder
Navigate to your exported game folder. You can do this easily with the Folder Command in PICO-8. The exported folder should be named: "gamename_html" (gamename replaced with what you titled your game in the export command in Step 2). If you do not see this folder, then you probably forgot to use the -fcommand after export in Step 2.
Next, zip the folder. You may rename this zipped folder.
How to zip a folder: Windows / MacOS / Linux
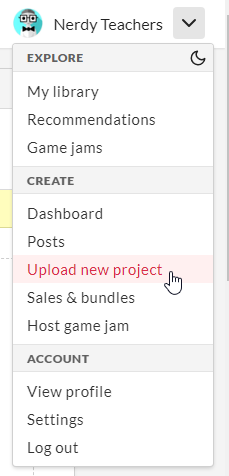
Step 4 - Create New Itch.io Project
Open itch.io in your browser, login or signup, and navigate to Upload New Project page.
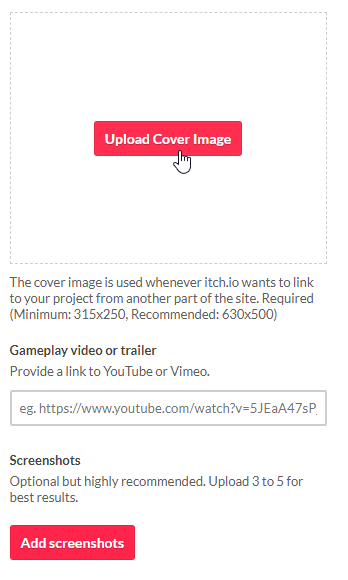
Step 5 - Fill in Upload Form
Begin to fill in the uploading form with your game's information: Title, Description, and Classification. You may also upload your screenshots, video, and cover art for your game page in the upper part of this form as well.
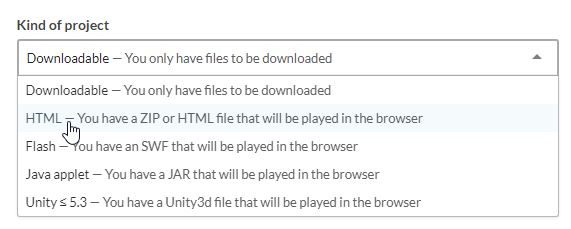
Kind of Project
When you get to the section "Kind of Project" in the form, open the dropdown menu and select: "HTML — You have a ZIP or HTML file that will be played in the browser". You can include downloadable files as well later.
Continue filling the form as you wish: Release Status and Pricing.
Uploads
When you get to the section "Uploads" click the red "Upload Files" button and navigate to your zipped game folder from Step 3. Select only that zipped folder to upload here.
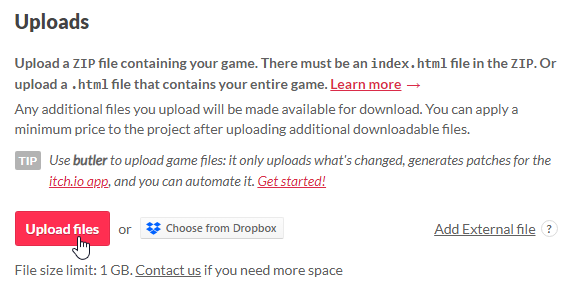
Check the box, "This file will be played in the browser."
If you want to include the cartridge image or the standalone game as downloadable files, you can export those from PICO-8 and upload them as well here. Upload each file individually.
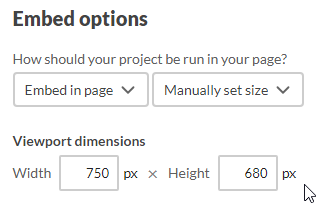
Embed Options
Under "Embed Options" section, leave the dropdown on "Embed in Page" and "Manually Set Size". ".leave the dropdown on "Embed in Page" and "Manually Set Size".
Under "Viewport dimensions" the suggested setting for the PICO-8 player is: Width: 750px × Height 680px
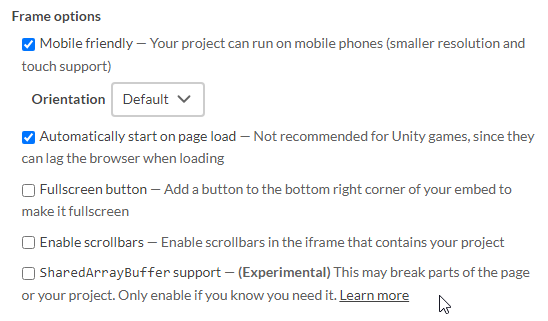
Frame Options
Under "Frame Options" section, click the checkboxes for "Mobile Friendly" and "Automatically start on page load." Leave the rest unchecked.
Finish the Form
Complete the rest of the form as you wish, entering the page content under "Details", the genre of your game, tags for searching for your game (make sure you include "pico-8" as a tag)
It is recommended to write a detailed How To Play description in the Details section to teach players how to control and win in your game. You can also use screenshots and images in this section to create a legend of the characters and symbols they should understand while playing. (You can always edit and add to this later)
When everything is ready, click the red "Save and view page" button at the bottom to begin uploading and creating the page.
Step 6 - Customize your Page
When you are viewing your game's page, you should see an Edit Theme button at the top. Click this to customize the page colors, banner, background and page borders.

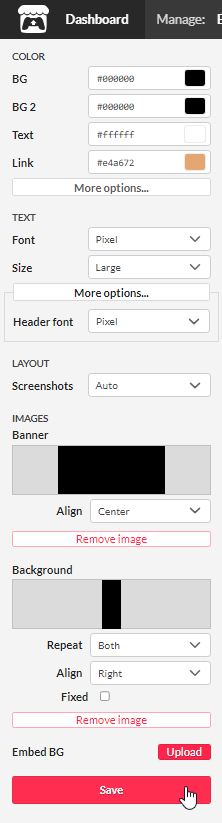
To best match the embedded PICO-8 player, it is suggested to set the background (BG2) to a dark color such as #232323 and the text to a light color such as #cccccc. But you are free to get creative and match your game's color style however you'd like.
![]()
If you would like to further customize the embedded PICO-8 web player with custom buttons and styles, see Export As Webpage for details.
2237
16 Jun 2023
export gamename.html file1.p8 file2.p8
or
export gamename.bin file1.p8 file2.p8
This command is used to export your game as a standalone .html or .bin file, with the data of up to 16 other .p8 files. Those multicart files must be locally stored and referenced correctly in the export command.
For example, if you have organized your multicart folders like this:
| carts | ||
| main.p8 | ||
| multicarts | ||
| cart1.p8 | ||
| cart2.p8 |
Then you will need to export them with the folder names:
export main.html multicarts/cart1.p8 multicarts/cart2.p8
Or you can load the main cart, change directory to make your multicarts folder active, and then export without the need for the folder name.
load main.p8
cd multicarts
export main.html cart1.p8 cart2.p8
(The names of folders and files used here are purely for example and you are free to name them however you'd like.)
![]()
To change between carts, you can load one of the other carts in your game code with, for example:
load("cart2.p8")This also works for loading specific sprite sheets, maps, sfx, or music from other carts, using RELOAD().
Note: The exported multicart will not be able to load from the BBS using load("#bbs-game")
![]()
The multiple files are condensed within the usual standalone files, not as separately referenced files. For the HTML export, the JavaScript file will list each cart name in its first line:
var _cartname=[`main.p8`, `cart1.p8`, `cart2.p8`];
The main cart and multi-carts are all stored within the cartdat variable:
var _cartdat=[ ... ]
![]()
2459
14 Apr 2025
@url
save @url
This command is used to save your game as an encoded link, not as a file. Once saved in this format, any subsequent saves with Ctrl+S will not update the URL, and instead will overwrite the active file (.p8, .p8.png, or .p8.rom). So you must use the save @url command each time to get an updated URL.
When using this command in PICO-8, the URL link is copied directly into your clipboard, ready for pasting. When using the Education Edition, the URL is updated in the browser address bar and not copied into your clipboard automatically.
Here is an example link, try it out:
![]()
First introduced in changelog for version 0.2.4c.
- Can only hold up to 2040 characters.
- Only the code and graphics data are encoded into the URL, not the SFX nor music.
![]()
Link to a Preloaded Cart
If you want to avoid the limitations of the @URL link, you can also use the PICO-8 Education Edition via link to auto-load a cart that is already uploaded on the BBS. There are no commands for generating the link but it is easy to write the URL yourself.
www.pico-8-edu.com + ?cid= + [insert cart ID here]
You may need to include the "https://" to the start depending on where you are sharing it so that it is recognized as a link. To find the cart ID, go to the game's page on the BBS, and look at the bottom left corner, just after the cart icon. Example:

Remove the hashtag (#) from the beginning, and the dash and version number from the end (unless you want to link to a specific version). The cart ID is in between those and by itself will automatically load the latest version of the game. This example shows #puzzlesofthepaladin-3. It shows that way so it is easy to use with the Load Command. The cart ID is just puzzlesofthepaladin. So to auto load this full cart, with sound effects, music, and all, it would be:
![]()
1133
10 Oct 2024
.rom
save gamename.p8.rom
The .p8.rom or simply .rom command is used to save your game as a raw 32k binary format, not as an image. Once saved in this format, ctrl+s and subsequent saves will overwrite this same .rom file. (See export below to avoid this.)
A .rom file can be loaded into PICO-8 (by load command). So far, these does not load into the Education Edition.
The changelog for version 0.2.3 zep introduces the .p8.rom format with this:
This isn't a very useful feature unless you are manipulating PICO-8 cartridges with external tools, but it has always irked me that it is not possible to write 32k of PICO-8 cartridge to a file that is 32k!
![]()
save -t gamename.p8.rom
Adding the -t to the command saves your game as a tiny cartridge with only the code data and not as an image.
The changelog for version 0.2.4c zep introduces the .p8.rom format with this:
You should get a file that is exactly as large as the compressed code size reported by INFO. When using LOAD, that file will be loaded into the code section, and the other sections reset to their default states.
There isn't much practical use for tiny .P8.ROM files, but I think it is nice to be able to store a tiny program in its true tiny form on disk.
![]()
export gamename.p8.rom
When you use export to save a cartridge to a .rom format, it is the same as using save but without making the cartridge you're currently working on the one that's being saved. This is helpful when you want to create a copy of your work in a different format, like .p8.rom, to share with others without accidentally overwriting it later as you continue to work on the original .p8 file.
![]()
1564
15 Apr 2023
.lua.png
export filename.lua.png
The export .lua.png command is used to save the entire code of your game as a single large image of all tabs in the code editor.
Any code that trails off the right beyond 192 pixels will be cropped out. That is 64 pixels beyond the single visible PICO-8 screen of 128 pixels. It will fit about 48 characters wide in a single line.
Tabs will be reduced to single character width spaces regardless of your tab_width config setting. However if you have the draw_tabs config setting turned on, then the tab lines will be included in the export.
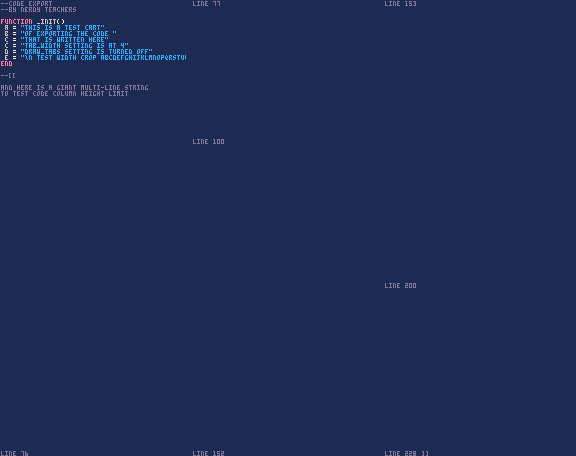
Example of a full size code image (shrunk to fit webpage, real size: 1920x1314 pixels):
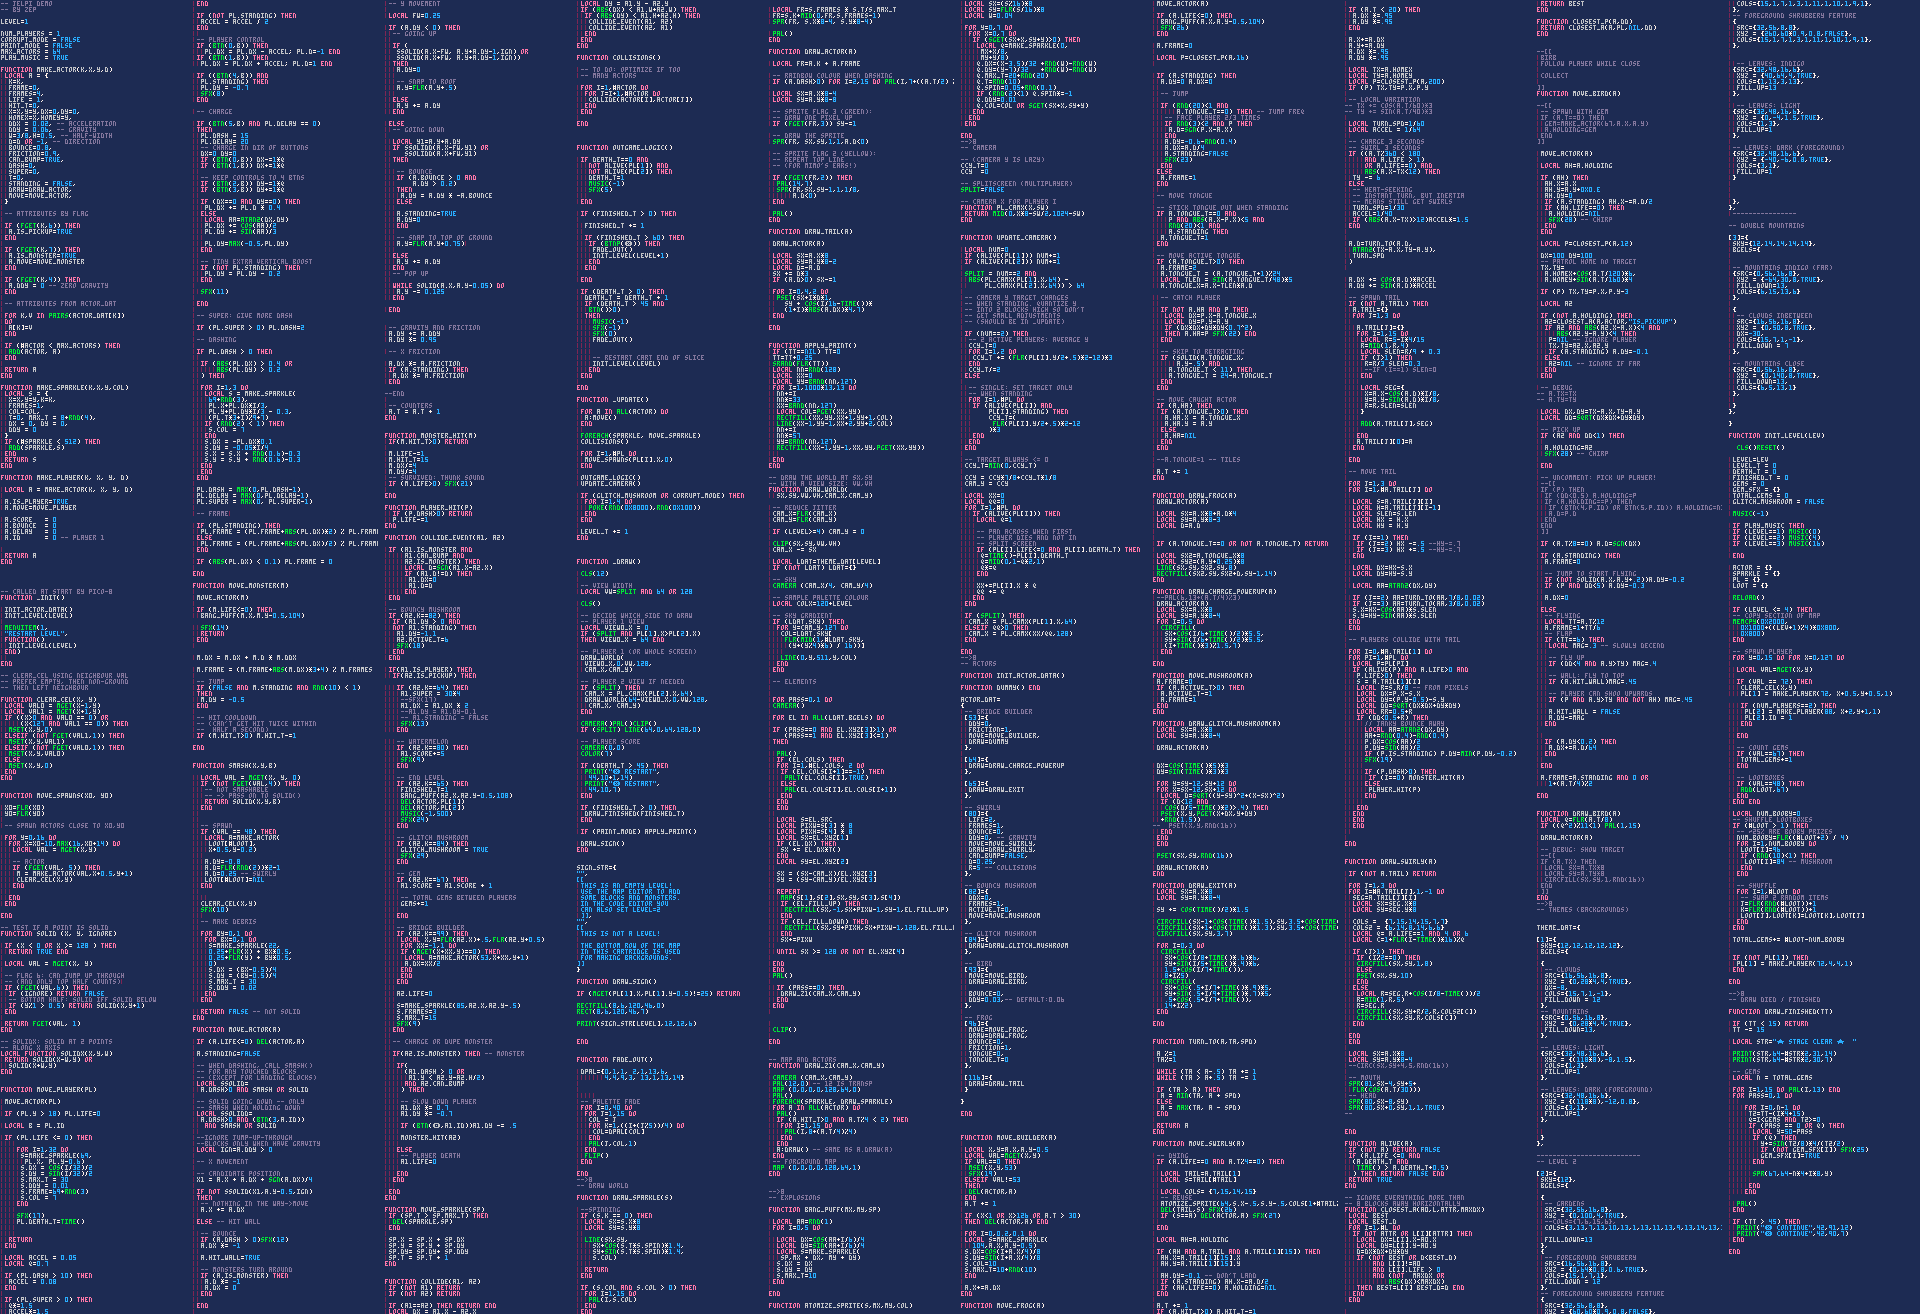
( Exported Code of "Jelpi" Demo Cart by Zep )
Example of how having a small amount code will auto crop the image (displayed as real size: 192x66 pixels):
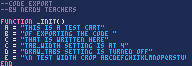
The height of the image is adjusted to break into columns of code. The breakpoint is not a fixed pixel nor line number. And as you can see below, the export will respect the whitespace (spaces, tabs, new lines) of multi-line strings.
Why would you want this?
Certainly not to share your code with others! Oh, no, no no. But what if you are quite proud of the very first game you ever make in PICO-8, or the largest or most popular game project you have made? Well imagine exporting the full code as an image, printing it out, framing it, and hanging it on your wall! Now that is a beautifully nerdy trophy if we do say so ourselves!
Speaking of art hanging on your wall, just imagine the ascii art you could create inside of the code editor and export it at a resolution much larger than the PICO-8 screen!
![]()
1563
17 May 2023