PICO-8
Guide
Guide Categories
Beginner Friendly Browsing
Audio Colors Commands Controls Debug Editors Getting-started Loops Lua Maps Math Save-export Screen Shapes Sprites System Tables Variables
The Official Manual is provided here for quick access. Our specific guide pages will also direct you to specific relevant sections of the Official Manual.
screen
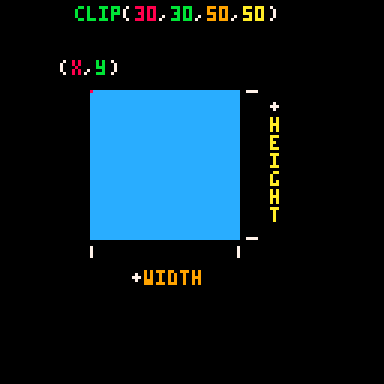
clip
clip( x, y, w, h, [clip_previous] )| clip | "clipping rectangle" aka "crop" |
| x | the X position of the top left corner of the clipping region |
| y | the Y position of the top left corner of the clipping region |
| w | the Width of the clipping region |
| h | the Height of the clipping region |
| clip_previous | (optional) set to true to combine new region with last region (explained more below) |
The clip function is used to restrict the region on screen for anything being drawn after setting the clipping region. You can reset it back to full screen by calling clip() with no arguments.
![]()
Example:
clip(30,30,50,50)         --restrict drawing region
rectfill(0,0,127,127,12)  --draw full screen blue
Reset Clipping Region
clip()Calling clip with empty parentheses resets the drawing region to full screen.
Clip Previous Argument
The clip_previous optional argument is a boolean. If true is passed, then the new clipping region is also clipped by the old clipping region, so that the draw region is the overlap of both clipping regions.
For example:
clip(30,30,50,50)        --first clip
rectfill(0,0,127,127,1)  --dark blue

clip(x,y,50,50,true)     --second clip
rectfill(0,0,127,127,14) --pink 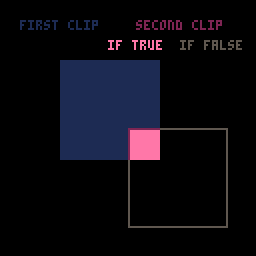
The pink filled rectangle is only visible where the two clipping regions overlap, even though it is being drawn the exact same size and position of the dark blue rectangle.
![]()
1980
17 Sep 2024
pset
pset = "pixel set"
pset( x, y, [color] )| x | the distance from the left side of the screen. |
| y | the distance from the top side of the screen. |
| color | (optional) a color number |
This function will draw a single pixel to the (x,y) coordinate specified. You can specify the color as a number (0-15) according to the palette. The default color is the current draw color (last color set by either color() function or by a drawing function's color argument).
![]()
Example:
pset(10,20,8)    --draw at (10,20), a red pixel
pset(20,30)      --draw at (20,30), still red

color(12)        --set draw color to #12, blue
pset(30,40)      --draw at (30,40), a blue pixel

circ(40,50,5,10) --draw circle at (40,50) with radius of 5, and #10 yellow
pset(40,50)      --draw pixel at center of circle, still yellow
As you can see, you can specify the draw color multiple ways. In the first example we use the argument in the pset function the first line and the same color is carried over to the second pset. In the second example, we set the color first with the color function which is also carried over to pset. And in the third example, we use the color argument of the circle function which is carried over to pset.
![]()
2046
3 Oct 2023
pget
pget = "pixel get"
pget( x, y )| x | the distance from the left side of the screen. |
| y | the distance from the top side of the screen. |
This function will return the color number (0-15) of a single pixel currently drawn at the (x,y) coordinate specified. If you request a pixel that is outside of the screen, then pget will return 0 (zero).
![]()
Example:
pset(10,20,8)              --draw at (10,20), a red pixel
pixel_color = pget(10,20)  --returns 8 (red)
![]()
1440
14 Oct 2023
print
print( string, [x, y], [color] )| string | the string you want to print |
| x | (optional) a number |
| y | (optional) a number |
| color | (optional) a color number (0-15) |
The print() function is used to write strings to the game screen at the (x,y) position and in the color you specify. The default position is automatically set to the next line of the current cursor position. The default color is the current draw color set by either color() or any draw function with a color argument given. The default draw color when you startup PICO-8 is #6, light gray.
![]()
For example:
print("1 hello world")
print("2 hello world",10,10)
print("3 hello world",20,20,8)
print("4 hello world",12)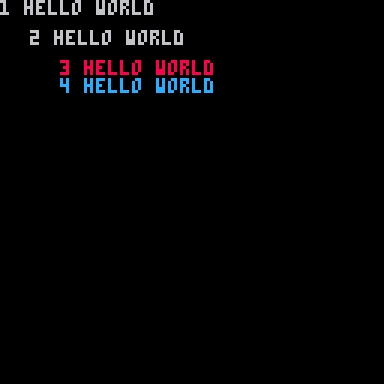
These four lines of code show the different arguments you can pass to the print function.
Line #1, we only pass the string, "1 hello world" and PICO-8 will print that at the default position (0,0) and default color (#6).
Line #2, we also pass the (x,y) coordinates of (10,10) so it prints there and still with the default color (#6).
Line #3, we pass the string and the X and Y coordinates of (20,20) and also include the color argument, setting the color to red (#8).
Line #4, we do something interesting and pass the string plus one more argument, which you might assume would be the X coordinate. However, PICO-8 is smart enough to accept this argument as the color, not the position! So it prints at a default position of the next line down from our last print (where the cursor left off) and in the color blue (#12) which we specified.
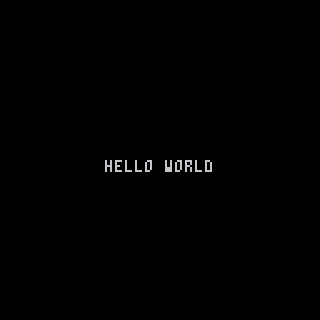
Using Print's Return Values
The print function returns 2 values, the X and Y coordinates of the bottom right pixel after the last printing.
x,y = print("hello world")
--x = 44
--y = 72
This can be useful for finding the width of the string that you want to print in order to do various things such as: animate it, center it properly, make sure it doesn't print outside of your dialog box, etc. In many of those cases, you will want to get the returned X value (essentially the width of the string) before actually printing the string to the screen, and to do that you can print your string off screen once, starting at an X position of 0 and a negative Y position.
string="hello world"

--print off screen to get width
width = print(string, 0, -10)

--print centered using width
print(string, 64-width/2, 64)
Advanced
Another use for this could be to print each character of the string independently so that you can animate the character's position or color. What is nice is that the returned X value is the exact position you would want to print the next character.
function _draw()
    cls()
    local string = "hello world"

    --wavy text
    local x = 0
    for char in all(string) do
				y = 10+sin(time()-x/40)*2
        x = print( char, x, y, 6 )
    end

    --colorful text
    local x = 0
    for char in all(string) do
				c = 10+sin(time()-x/40)*2
        x = print( char, x, 20, c )
    end
end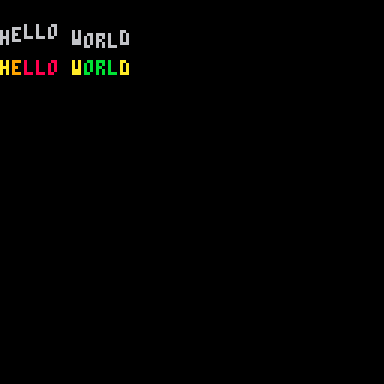
![]()
3339
9 Aug 2024
cursor
cursor( x, y, [color] )| x | the distance from the left side of the screen. |
| y | the distance from the top side of the screen. |
| color | (optional) a color number |
This function will set the position of the cursor (used by the print function), for where to begin writing a string on the screen. The string will be written to the right of the (x,y) coordinates specified. Including the optional color argument will set the draw color, same as calling the color() function.
![]()
cursor( 10, 20 )- set the cursor to coordinates (10,20).
cursor( 30, 40, 5 )- set the cursor to coordinates (30,40) and set the draw color to #5 (dark gray).
cursor( )- reset the cursor to coordinates (0,0).
![]()
Important to know:
- When you call cls(), the cursor is reset to (0,0) but does not reset the draw color.
- When you call print(), with the x and y arguments specified, the cursor is set to those coordinates.
- The cursor is also adjusted after any call to print(), to be at the same X coordinate but the Y coordinate is shifted down 6 pixels to start the next line down. This allows the subsequent calls to print to begin at the same left-side margin, but on a new line.
![]()
![]()
1647
10 Oct 2023
cls
CLS = "Clear Screen"
cls( [color] )| color | (optional) a color number |
This function will erase the entire game screen and fill it with a default color of black (#0). Including the optional color argument will fill the screen with the color specified.
Note: Using this function resets the cursor position to (0,0). See cursor and print for more about cursor position.
![]()
![]()
1495
14 Oct 2023
camera
camera( x , y )| x | the amount of horizontal offset. |
| y | the amount of vertical offset. |
This function will offset the position of all drawing operations ( all Shapes, Print, Sprites, and Maps ). It will offset previously drawn elements as well, unless camera was called earlier.
![]()
Examples:
cls()                    --clear screen
rectfill(0,0,127,127,2)  --dark purple background
rect(0,0,127,127,8)      --red outline
print("camera(0,0)",2,2)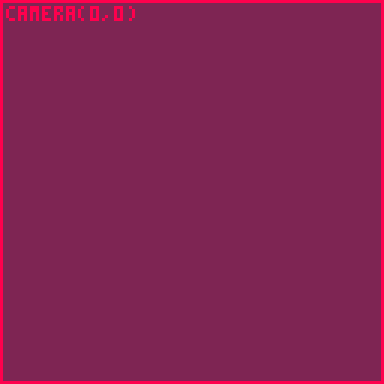
This first example clears the screen, then draws a filled rectangle the same size of the viewable screen, then draws a rectangle in red to outline the viewable screen. We do not call the camera function yet, so everything we draw is using the default camera offset of (0,0), meaning no offset.
cls()                    --clear screen
rectfill(0,0,127,127,2)  --dark purple background
rect(0,0,127,127,8)      --red outline
print("camera(0,0)",2,2)

camera(63,63)                 --start camera offset
rect(63,63,127+63,127+63,11)  --new camera outline
print("camera(63,63)",136,182)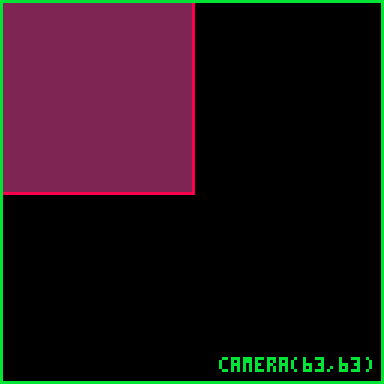
This second example we then start to use the camera function with an offset of (63,63), which you could imagine moves the camera's top-left corner to the point (63,63), however it actually subtracts the X and Y offsets from all draw operations.
We draw a new rectangle, in green this time, to outline the new viewable screen adjusting for the camera offset.
Notice that the previously drawn elements (before calling camera) has been shifted up and to the left. They have been affected by this new camera offset even though they were already drawn.
cls()
camera()                 --set first camera
rectfill(0,0,127,127,2)
rect(0,0,127,127,8)
print("camera(0,0)",2,2)

camera(63,63)            --set second camera
rect(63,63,190,190,11)
print("camera(63,63)",136,182))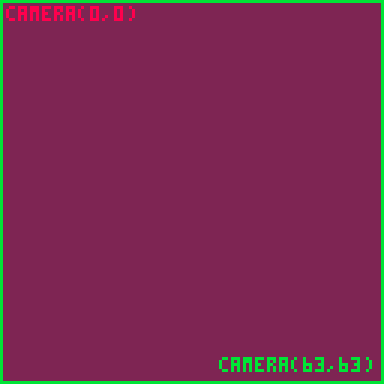
This third example adds a camera right after clearing the screen, and sets the default offset of (0,0). The rest of the code is the same as the second example. However, you'll notice that the first set of draw operations (the dark purple and red outlined rectangle) is no longer being offset by the second camera. They have been locked into position by the first call to camera().
Using two cameras this way is useful when you want to create a game screen that is offset using the camera function, and then draw a locked overlay such as health, points, etc. that is not affected by the main camera offset.
![]()
![]()
2253
14 Oct 2023