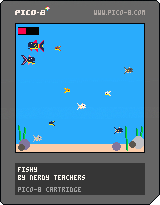
bitesize games:
Fishy
![]()
Explanation of Code!
Before you start making this game, you should know some of these basics of coding.
1. Variables
2. If Statements
3. Tables
4. Custom Functions
This game uses tables to hold many of the variables. So it is important to either already be comfortable reading and writing code with tables, or at least be prepared to focus on learning that here.
You will see a table for the player, and the enemies. These each hold similar information about each of those game objects, such as the position (x,y), the sprite number, and the size.
First, let's start with the _init() function.
PICO-8 runs _init() ("initialize") as the first function, before even _update() or _draw().
--init
function _init()
    --player table
    ...

    --game settings
    ...
end
The first variable we put inside _init() is the player table that will hold all of the player's variables as keys.
We can imagine this player table like this:
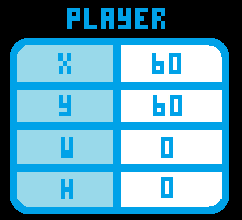
This is the full list of variables that we will store inside of a player table.
player |
a table that holds all of the data specific to the player's cell. |
x |
the position on the X axis (the number of pixels from the left) on the game screen. |
y |
the position on the Y axis (the number of pixels from the top) on the game screen. |
w |
("width") the inner circle color of the player's cell. |
h |
("height") the outer circle color of the player's cell. |
size |
a number to compare the player size with the enemy size and set the correct fish sprite. |
sx |
a number used for the sprite X position on the sprite sheet |
sy |
a number used for the sprite Y position on the sprite sheet |
dx |
("delta X") or ("change in X") a number for the X axis momentum on the player's fish to move left and right. |
dy |
("delta Y") or ("change in Y") a number for the Y axis momentum on the player's fish to move up and down. |
speed |
how much we will add to the player's momentum every time a button is pressed. |
flp |
("flip") a boolean (true or false) variable that will know whether to flip the sprite left or right. |
Most of those are self explanatory, but DX and DY are often harder to understand if you are using them for the first time. They are well explained in the Platformer Tutorials (#3 and #5).
In this game, they are used for keeping track of the current direction and speed of the player.
DX : if positive, then the fish is moving right. If negative, then the fish is moving left.
DY : if positive, then the fish is moving down. If negative, then the fish is moving up.
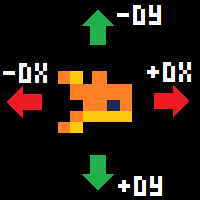
The DX and DY are not only positive or negative, but also can be different amounts, which means how fast the fish is moving.
If DX is close to zero, then the fish moves slowly left or right.
If DX is far from zero, then the fish moves quickly left or right.
If DY is close to zero, then the fish moves slowly up or down.
If DY is far from zero, then the fish moves quickly up or down.
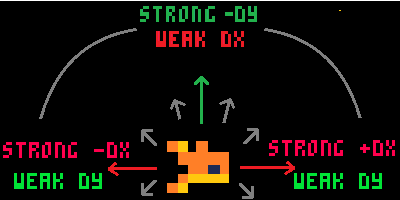
When the DX and DY work together at different amounts, it creates a fish that can swim around in any direction, making the player movement more interesting.
Immediately at the end of the player table, we call a function to run called set_sprite() and pass the whole player table to that function.
We will explain and write the function later but just know that it will calculate which fish sprite to set the player to and set the w, h, sx, and sy variables inside the player table. If you want to know now why we need to use those variables to draw a sprite of any size in our PICO-8 Guide.
The next section of the _init() function are the variables that control the game settings.
Now let's write the code for the player table. This will prepare all of the variables we need for the player's fish.
--player table
player={
    x = 60,
    y = 60,
    w = 0,
    h = 0,
    size = 2,
    sx = 0,
    sy = 0,
    dx = 0,
    dy = 0,
    speed = 0.08,
    flp = false
}
player = set_sprite(player)
Even though _init() is optional, in these bite-size games, we often use it to set up the game variables and create a good point to reset the game each time we want to play a new round.
Inside of the _init() function, we will create most of the variables of the game, and what numbers things should start at in the beginning of each game when we reset everything.
Let's prepare two sections inside of the _init() function. First, the player table and second the game settings.
This is the _update() function of the game. It is where we will do all of our logic to change things based on what is happening in the game.
--update
function _update()
    --player controls
    ...

    --player movement
    ...

    --screen edges
    ...

    --enemy update
    ...

    --win
    ...
end
Our _update() function has 5 sections within: (1) Player Controls, (2) Player Movement, (3) Screen Edges, (4) Enemy Update, (5) Win.
We will go over all the code that goes in each section below:
Update Section 1 - Player Controls
--player controls
if btn(⬅️) then player.dx -= player.speed player.flp=true end
if btn(➡️) then player.dx += player.speed player.flp=false end
if btn(⬆️) then player.dy -= player.speed end
if btn(⬇️) then player.dy += player.speed end
The ⬅️ is made in PICO-8 by pressing Shift+L.
The ➡️ is made in PICO-8 by pressing Shift+R.
The ⬆️ is made in PICO-8 by pressing Shift+U.
The ⬇️ is made in PICO-8 by pressing Shift+D.
This part handles the player controls. The player only uses four buttons in this game for moving in 4 directions.
We first check if the player presses left. If so, then we subtract the player speed from the player's current DX amount. And set the flip variable to true, meaning the fish sprite will flip to face left.
We also set the flip variable back to false if the player presses direction right.
Remember that DX is the player's momentum moving left or right. So if the DX is positive, that means the player is moving to the right, and so we subtract to slow it down. If the DX is already negative then subtracting is also good because it will speed up the movement to the left.
Then we check if each direction button is pressed and either add or subtract from the DX or DY. Compare this code with our explanation of how DX and DY work when we created the player table above to fully understand each step, and why we should be adding or subtracting based on the direction the player presses.
Update Section 2 - Player Movement
--player movement
player.x += player.dx
player.y += player.dy
This part applies the player's momentum to the player's position. So after we adjust the player's momentum based on the player's button presses, we add the new momentum to the player's position.
We can simply add the DX and DY, even if they are negative because adding a negative number will subtract. And that is exactly what we want it to do. Really understanding how negative numbers work, helps us simplify a lot of math in our code. So it is very useful!
Update Section 3 - Screen Edges
--screen edges
if player.x > 127 then player.x = 1 end
if player.x < 0 then player.x = 126 end
if player.y+player.h > 120 then
    player.y = 120-player.h
    player.dy = 0
end
if player.y < 0 then
    player.y = 0
    player.dy = 0
end
This code is used to check if the player runs off the edge of one side of the game screen and resets the player position to the opposite side of the screen. This creates the look and feel of a player running on a space that wraps around, instead of being walled in.
The PICO-8 game screen is 128 pixels wide by 128 pixels tall. But remember that the first pixel in the top left corner is 0, not 1. So that means the game screen starts at 0 and ends at 127, for both width and height.
The second part of this check is for the top and bottom edges of the playable area. Since we will draw some sand and rocks at the bottom, then the bottom edge will be around 120 instead of 127. And to compare the bottom edge with the bottom of the fish, we have to take the player.y and add the player.h which changes depending on the fish size.
We also want to kill the vertical momentum (DY) when the player hits the top or bottom edges. So we just reset DY to zero.
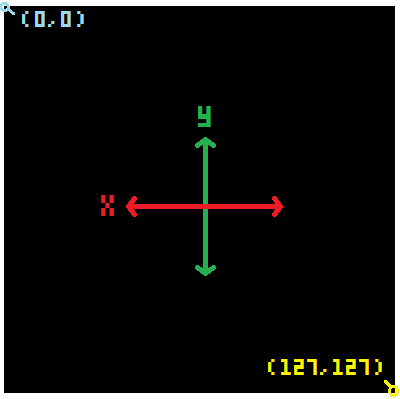
Update Section 4 - Enemy Update
--enemy update
create_enemies()
for enemy in all(enemies) do
    --movement
    enemy.x += enemy.dx

    --delete enemies
    if enemy.x > 200
    or enemy.x < -70 then
        del(enemies,enemy)
    end

    --collide with player
    if collide_obj(player,enemy) then
        --compare size
        if flr(player.size) > enemy.size then
            --add to player based on size
            player.size += flr((enemy.size/2)+.5)/(player.size*2)

            --set sprite based on size
            player = set_sprite(player)

            sfx(0)
            del(enemies,enemy)
        else
            sfx(1)
            _init()
        end
    end
end
In the "enemy update" section we will write the code for creating, deleting, moving, and checking collision of the enemy fish.
We are going to save one complicated part of this game for later because we will build a custom function named create_enemies(). For now, let's just add it here because this is where we want that function's code to run.
It will simply add fish in random places and random sizes and speeds inside of two spawn zones either to the left or right. And we want it to run every time in case the player eats some fish or some enemy fish move too far outside the game screen and get deleted. So we will want to constantly replace with new enemy fish.
After creating all the enemies in the create_enemies() function, we will update each enemy fish.
To focus on each enemy inside of our enemies table, we will need to cycle through ("iterate") each entry of the table. We do that with a for entry in all(table) do loop. In this case, each entry is a single enemy fish, and the table name is enemies. So we write it like this:
for enemy in all(enemies) do ... end
After the do we can now use the variable we named enemy to refer to the currently selected entry of the table, and it will repeat over each and every entry in the table until the last.
Funny thing is, each entry of the enemies table, will be ANOTHER table! But don't worry! It sounds more complicated than it actually is. And this should help you understand what we are about to do.
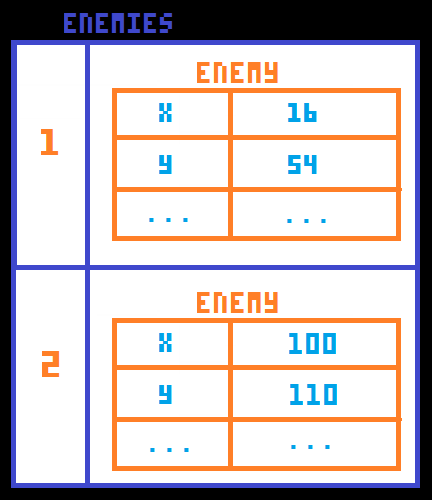
(Inside Enemy Update)
--movement
enemy.x += enemy.dx
The first thing we do to each enemy is the same thing we do to the player's movement: add the DX to the X.
Each enemy will have its own momentum (DX) variable and this is just applying the momentum to the enemy position.
(Inside Enemy Update)
--delete enemies
if enemy.x > 200
or enemy.x < -70 then
    del(enemies,enemy)
end
The next thing we want to do for each enemy is to detect if the enemy moves too far outside of the game screen. The enemy fish will never turn around, so they would move away from the game screen forever. So we should delete them from the enemies table.
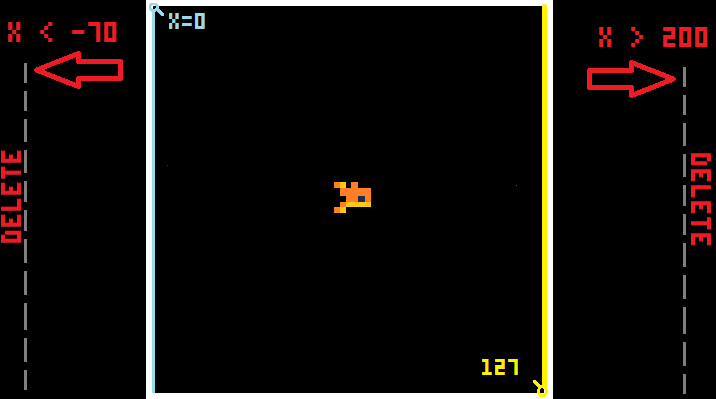
(Inside Enemy Update)
--collide with player
if collide_obj(player,enemy) then
    --compare size
    if flr(player.size) > enemy.size then
        --add to player based on size
        player.size += flr((enemy.size/2)+.5) / (player.size*2)

        --set sprite based on size
        player = set_sprite(player)

        sfx(0)
        del(enemies,enemy)
    else
        sfx(1)
        _init()
    end
end
Here's another complicated part of the code that we are going to prepare here, but write as its own function later. It will be called collide_obj().
This will check collision of any enemy with the player, and we might as well do that here when we are already looping through each enemy in the enemies table.
if collide_obj(...) then will check if our future function named collide_obj will come out as true or false. If true, then we know the player collided. If false, then the player did not collide and we don't have to do anything.
We will need to give our collision function some information to calculate if the enemy and player have hit or not. That is why we pass the two tables inside the collide_obj's parentheses.
The collide_obj() function will need to know the player's position (X and Y), the player's size (W and H), and the same for the currently selected enemy's position and size.
Now let's talk about what will happen if the player and an enemy do collide! We will write what should happen next, after the then of this collision check.
The first thing we should know is if the player is larger or smaller than the enemy.
if flr(player.size) > enemy.size checks if the player's size (rounded down by flr) is larger than the enemy's size.
If that is true, then we add to the player.size. Now there is a bit of math here to figure out how much to add the player's size depending on the enemy size.
First we cut the enemy.size in half, then round it down using flr(), then add .5. Let's say the enemy fish's size is 1. So half of 1 is .5, round it down to 0 and that's not good so that's why we add a .5 at the end to be our minimum.
After we do those enemy size calculations, then we will divide it by double the player's size.
We know that the player's size is more than the enemy size, so by dividing the smaller number by the larger number, we know we will get a decimal between 0 and 1. We want that because we want to add somewhere between 0 and 1 to our player's size so they need to eat more than a few fish at each stage before they grow the next level with is the next whole number.
If we simply add 1 to the player's size, then eating one fish will make the player jump up to the next size level. And if we don't think about enemy size, then the player will have to eat for example 4 of any size fish to reach the next level.
That doesn't make much sense when the player gets to size 6 and only eats 4 tiny size 1 fish, right? So instead, this math makes it so that the size of the eaten fish becomes a smaller decimal, the smaller it is compared to the player's size.
We encourage you to take the math, and plug in some enemy size and player size numbers, and see what each one calculates out to be. You may even find a way to improve the math here to make the game's difficulty progression even better.
![]()
Let's continue...
After adding to the player's size, we reset the player's fish sprite in case the player grew enough to become a larger fish.
And we play a sound effect (#0) which will be a happy sound.
And we delete that enemy, using del(table,entry) function, because it has been eaten.
![]()
Sound Effects:
Here is how we created the eating sound effect #0:
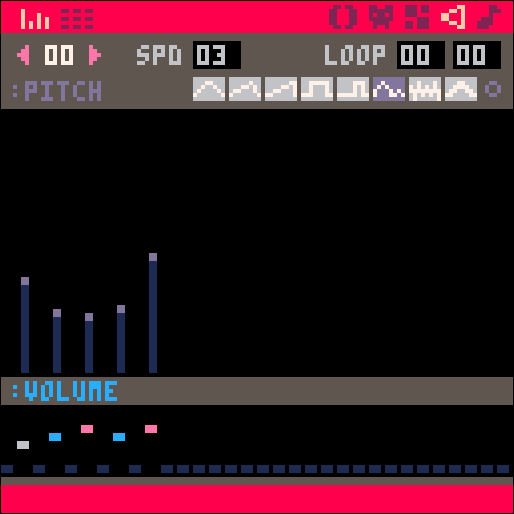
Next, something very different should happen if the player is NOT larger than the enemy. So we can add an else to the check because we know the player did collide, but is not larger.
If this happens then the player should be eaten and the player loses the game. So we play sound effect (#1) which will be a sad sound. And simply restart the game by calling the _init() to run again and reset all the game variables.
Here is how we created the sad sound effect #1:
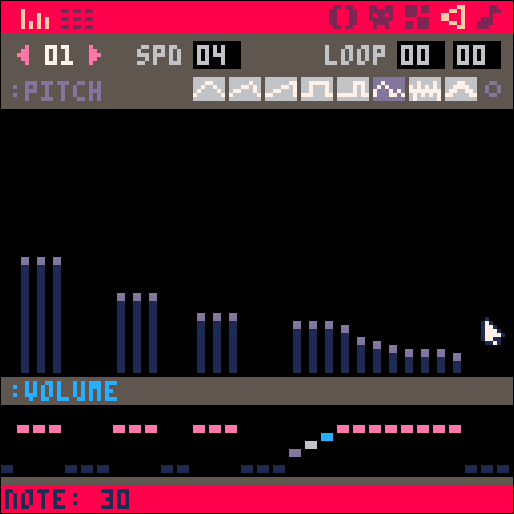
![]()
Update Section 5 - Win
--win
if player.size > win_size then
    if btn(4) or btn(5) then _init() end --reset
end
The last part of the _update() function is what to listen for if the player wins.
So if the player size is more than the game setting variable win_size then we want a way for the player to reset the game on their own. So we can check if player presses the X or O buttons (Z or X on the keyboard) and they are numbered 4 and 5. And if so, then call _init() to reset the game variables and restart the game.
![]()
--draw
function _draw()
    cls(12)
    --sand
    ...
    --seaweed
    ...
    --rocks
    ...

    --player
    ...

    --enemies
    ...

    --player size
    ...

    --win
    ...
end
This _draw() function will handle everything that is seen on the game screen.
cls() = clear the screen
It is common to clear the screen before drawing the updated game objects every frame. You can best understand why this is important to do by simply deleting it from the code, and running the game. You should see all the cells leaving a trail behind them, because where they were is not being erased, so the game screen quickly gets filled with color.
You can include a color number inside of the cls() parentheses to set the color of the cleared screen to that color. We do this with the number 12 which is the light blue and will be our water background.
The following pieces of code are the sections that should go inside of the _draw() function.
--sand
rectfill(0,120,127,127,15)

--seaweed
...
--rocks
...
Here we will draw the rest of the background: sand, rocks, and seaweed.
rectfill() will draw our sandy bottom as a rectangle filled with color #15.
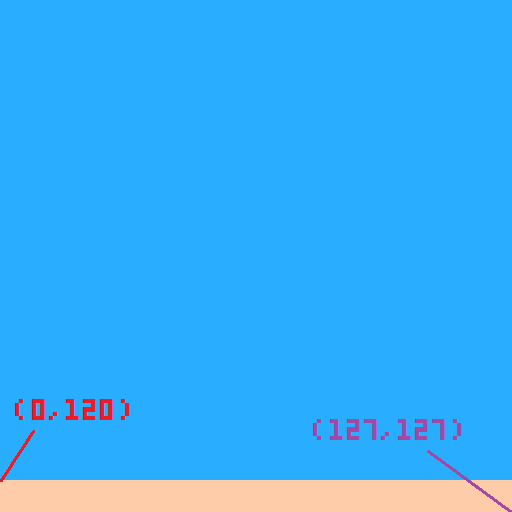
The seaweed is next so that it is in front of the sand but behind everything after it, such as the rocks and later the fish.
--sand
...

--seaweed
for weed in all(weeds) do
    line(weed.x1,weed.y1,weed.x2,weed.y2,3)
    line(weed.x1+1,weed.y1+1,weed.x2+1,weed.y2+1,11)
end

--rocks
...
Remember at the start we prepared our seaweed in a table named weeds, and also filled that table with smaller tables to hold the coordinates of each line of seaweed.
So let's draw a line for each of the entries in the weeds table. We will use the for entry in all(table) do loop to repeat over each entry.
Inside of this loop, we start by drawing a line at the x1, y1, x2, y2, coordinates of each inner table we called weed at the start of this loop. This first line will be the color dark green which is #3.
Then we will draw a second line to give the seaweed some thickness and add 1 to each coordinate to set it one pixel lower and to the right. We will also draw this second line as a light green which is color #11.
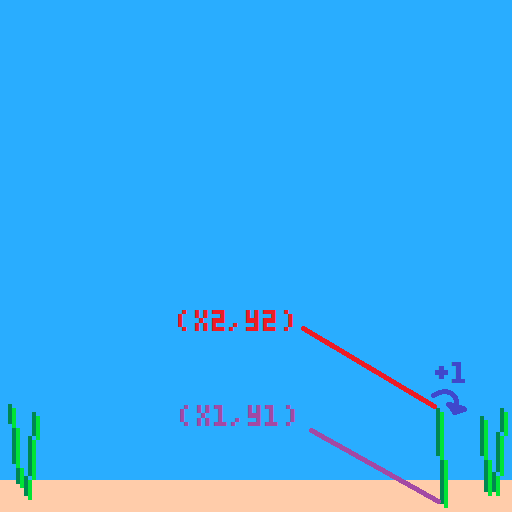
The last background objects we draw are the rocks as circles of different colors.
--sand
...
--seaweed
...

--rocks
circfill(8,120,5,13)
circfill(5,123,3,5)
circfill(100,122,4,13)
circfill(122,118,6,6)
circfill(116,120,3,5)
circfill() = "circle filled" draws a circle filled in with color.
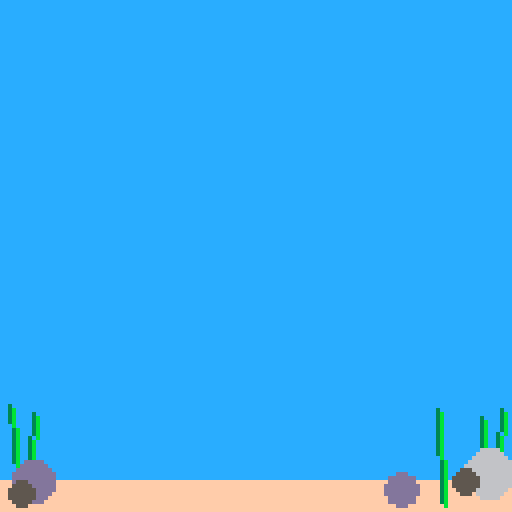
![]()
--player
sspr(player.sx, player.sy, player.w, player.h, player.x, player.y, player.w, player.h, player.flp)
That is one looooong line of code because we have to dig out each variable from the player table and rewrite the name of the table every time. So let's simplify the code just for us to read it easier here by removing the table name, and just remember that each variable we pass inside the parentheses are coming from the player table. Here we go removing each "player.":
--player
sspr(sx, sy, w, h, x, y, w, h, flp)
Now compare that with our PICO-8 guide on how to draw a sprite of any size using the SSPR() function:
Each variable in the player table is named the exact same as the variables needed for this sprite drawing function. That's just to make things easier, but of course variables can be named anything you want.
Here's how it works:
We start by drawing different size fish all lined up in our sprite sheet.
![]()
sx (Sprite X) is the number of pixels from the left of the sprite sheet.
sy (Sprite Y) is the number of pixels from the top of the sprite sheet.
w (Width) is the number of pixels to the right of sx that we want to use.
h (Height) is the number of pixels down from the sy that we want to use.
![]()
Now that we can grab the exact sized sprite out of the sprite sheet, we set it on the game screen with the next variables in the SSPR() function, which is the x and y coordinates.
x is the number of pixels from the left of the game screen.
y is the number of pixels from the top of the game screen.
The next two variables are w and h, but we already used those right? Well this function allows you to set a different draw size than its sprite sheet size. So you could take a sprite out of the sprite sheet and draw it at double size or even shrink it using these second two width and height arguments (passed variables).
w is the number of pixels to the right of x on the game screen.
h is the number of pixels down from y on the game screen.
But we want to draw it the same size that it appears on the sprite sheet, so we simply use the same variables for width and height as we did with the sprite sheet size.
flp is a boolean (true/false) variable that flips the sprite on the X axis (left/right).
This flip variable will tell the drawing function whether to leave the sprite as it was drawn in the sprite sheet, or to flip it to face the opposite direction. So since we drew the fish facing right, then when flp is set to false, then the fish remains drawn facing right. But when flp is set to true, then the fish is flipped to face left.
That's why we set this variable true or false depending on if the player presses buttons left or right.
![]()
Next, is how we draw the enemies:
--enemies
for enemy in all(enemies) do
    pal(9,enemy.c)
    sspr(enemy.sx, enemy.sy, enemy.w, enemy.h, enemy.x, enemy.y, enemy.w, enemy.h, enemy.flp)
end
pal()
Since the enemies are each organized in tables and all of them are organized further into one large table named enemies, we can cycle through the whole enemies table the same way we did in _update(), using the for entry in all(table) do loop.
for enemy in all(enemies) will loop through each entry of the enemies table and set the entry as a local variable that we named enemy right there after the "for". That means inside of this table loop, we can access each inner table properly as "enemy", and access the keys or variables of each enemy's table by using enemy.key.
Inside the loop, the first thing we do is access the palette function, pal().
This function lets us swap colors around. So even if we drew all of our fish orange in the sprite sheet, we can swap orange for another color before drawing to the game screen. This is how our enemies are going to become drawn a variety of colors.
pal(9,enemy.c) takes color #9, which is orange, and swaps it with the random color in the enemy table. Don't worry, we didn't get to setting that up yet and we will do that when we build the create_enemies() function. For now, just know that we will set a random color for each fish and save it to the enemy table as c for color.
After that, it is as simple as using the same SSPR() function as we did with the player to draw the enemy fish onto the game screen. Except now they won't be orange and instead all of the orange will be some other color.
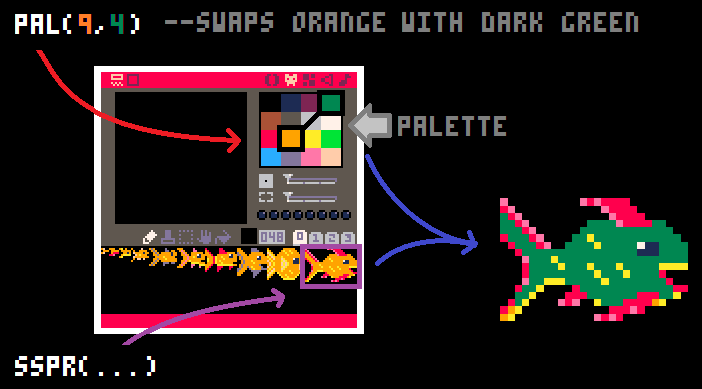
We should reset the palette after drawing each fish or later things we draw may come out strange colors!
To do that we just call pal() again but leave the parentheses empty and it will reset all colors to the original numbers.
![]()
Next, we draw the player size indicator on the screen.
--player size
rectfill(2,3,22,10,0)
rectfill(2,4,2+(player.size-flr(player.size))*20,9,8)
We are going to build a progress bar to show how close the player is getting to reaching the next fish size.
First we draw a rectangle in the upper left corner of the game screen that will be black (color #0). Notice that the X starts at 2, just away from the edge of the screen, and ends at 22. The Y starts at 3 and ends at 10, but the height doesn't really matter.
The next rectangle we will draw right on top of that black one will be red (color #8). Notice that its Y starts one more than the first rectangle, and ends one pixel less so that a 1 pixel frame will remain as the red rectangle grows.
The red rectangle's X starts at 2, and then we do some fancy math to figure out how to calculate the player's size percentage and display that as a progress bar as the player's size changes.
Let's take out that part of this code and just look at the math:
2+(player.size-flr(player.size))*20
We start with 2 because that is the minimum we want the X to be. If it is less than that, then the rectangle will be drawn to the left.
Then we add a number based on the player's size. Inside the first parentheses there, we take the player's size and subtract the rounded down player's size.
So if the player's size is 2.4, then we take 2.4 and round it down to 2, then subtract that: 2.4 - 2 = .4
That's great because now we are able to ignore the player's current fish size, and focus on how close they are to the next size up by only having the decimal! In that example, the player is .4 or 40% on the way. So we want to draw the red rectangle 40% of the way on the black rectangle.
The final math we do is multiply the player's progress (the decimal we just found) by the number of pixels of the black rectangle's width.
So since our black rectangle is 20 pixels wide, then we multiply by 20, and that will end the red rectangle at the correct player progress width of the black rectangle! Pretty cool!

![]()
--win
if player.size > win_size then
    rectfill(0,55,127,75,10)
    print("congratulations!!!",28,56,1)
    print("you became",43,63,1)
    print("the biggest fish!",20,70,1)
end
The last thing to draw would be a message if the player manages to win the game by growing larger than the win_size in the game settings.
if player.size > win_size then will check if the player size is greater than the win setting.
rectfill(0,55,127,75,dgray) will draw a yellow (color #10) banner in the middle of the screen.
print("congratulations!!!",28,56,1) will write the word "congratulations!!!" in dark blue (color #1) over the rectangle.
And two more print functions to write "you became the biggest fish" on two separate lines.
![]()
--collision
function collide_obj(obj, other)
    if  other.x+other.w > obj.x
    and other.y+other.h > obj.y
    and other.x < obj.x+obj.w
    and other.y < obj.y+obj.h
    then
        return true
    end
end
This is an object collision function that we use to detect if the enemy fish collide with the player. This function is very easy to use in any sprite to sprite collision.
You just need tables to hold your game objects information and it must have x, y, w, h. Lucky for us, that is how we set up the player and enemy tables.
function collide_obj(obj, other) creates the custom function with the name "collide_obj" (obj meaning object) and then inside the parentheses, we prepare the function for what variables it should expect to receive and what those variables will be named locally, inside of this function.
You could add a comment to the function that obj and other must be tables with X, Y, W, and H keys.
This collision function has only one complicated check, and returns true if all of the requirements are met.
if other.x+other.w > obj.x begins the check by comparing the right side of "other" with the left side of "object".
and other.y+other.h > obj.y also compares the bottom side of "other" with the top side of "object".
and other.x < obj.x+obj.w then also compares the left side of "other" with the right side of "object".
and other.y < obj.y+obj.h finally also compares the top side of "other" with the bottom side of "object".
Together, these four checks are asking if the first object is inside of the second object. This may help you visualize it:
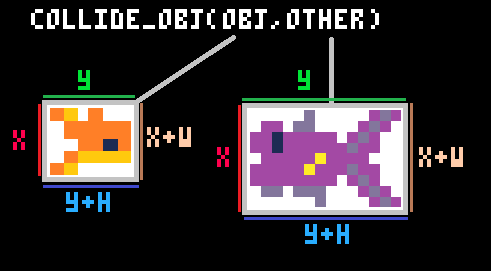
So using this image, you can see which sides are being compared and if all checks are true, then we return true to say that the two objects have collided.
We don't actually have to return false if the check fails because if the function returns nothing, it will be interpreted as false.
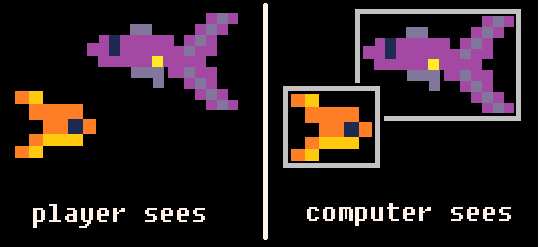
You could improve this function by using another table within each object's table and set each object to have a specific hitbox size that matches the true sprite size better than the entire sprite's rectangle that we are drawing. But this one is good enough for our purpose and we drew the fish to be as rectangular as possible to fill in most of the collision area.
To test out what we are talking about here, try drawing your fish with a small pointy nose and big tail. Now when you play the game, it will probably tell you that you collided with that fish, but it did not look like you touched it becuase the pixels of the sprite did not fill the full sprite size which is used as the collision rectangle.
--enemies
function create_enemies()
    if #enemies < max_enemies then
        --local variables
        ...

        --random start position
        ...

        --make enemy table
        ...

        --set sprite based on size
        ...

        --add it to enemies table
        ...
    end
end
First we make another custom function named create_enemies(). We leave the parentheses empty because this function doesn't need to be given anything and it will run the same way every time.
Then we only need to create enemies when the number of enemies is less than the game settings variable: max_enemies.
So we check if #enemies < max_enemies
The # sign in front of our enemies table is an easy way to get the total count of entries in the table. So that code reads as "if the total number of entries in the enemies table is less than the maximum enemies number..." then we want to create more enemies!
But if the number of enemies reaches the maximum, then we just skip all the rest of the code inside this function and don't create any more enemies.
--local variables
local x = 0	 local y = 0
local dx = 0
local size = flr(rnd((max_enemy_size+player.size)/2))+1
local flp = false
local c = flr(rnd(7))+1
Next, inside of the first check, we need to set some local variables that we will use only inside of this function.
x and y will be the enemy fish's position.
dx will be the enemy fish's speed and direction of movement.
size will be the enemy fish's size (1-10 assigned to each fish size).
flp will be whether or not to flip the enemy fish's sprite to face left or right.
c will be the enemy fish's color.
Let's look at the math for a random size.
flr(rnd((max_enemy_size+player.size)/2))+1flr() is used to round down.
rnd() is used to get a random number between 0 and the number inside the parentheses.
+1 is at the end because we don't want a circle with a radius of 0, it should be at least 1.
(max_enemy_size+player.size) is used to create a maximum size for the random generator based on the player's size. This is so that as the player gets bigger, so do the enemies. But we also divide that very large number by 2 /2 to bring the max enemy size back to a number not too much bigger than the player's current size.
Lastly, lets look at the math for a random color.
flr(rnd(7))+1flr() is used again to make sure we end with a whole number and not a decimal.
rnd(7) is inside of that to get a random number between 0 and 7. If we stop here, then the enemy fish would be any color between black (#0) and white (#7).
But we don't want a fish to be black because that is the default transparent color, so outside of all parentheses, we finish by adding 1. That means we will end with a number between 1 and 8.
We stop there because we don't want to allow for number 9, which is orange, because that is the color we drew all the sprites as, and we will use that as the player color. The player should be the only orange fish so that it is easy to see which fish they are.
--random start position
place = flr(rnd(2))
if place == 0 then
    --left
    x = flr(rnd(16)-64)
    y = flr(rnd(115))
    dx = rnd(max_enemy_speed)+.25
    flp = false
elseif place == 1 then
    --right
    x = flr(rnd(48)+128)
    y = flr(rnd(115))
    dx = -rnd(max_enemy_speed)-.25
    flp = true
end
The player will start in the middle of the game screen, and enemies will spawn from the sides and move across the screen left or right.
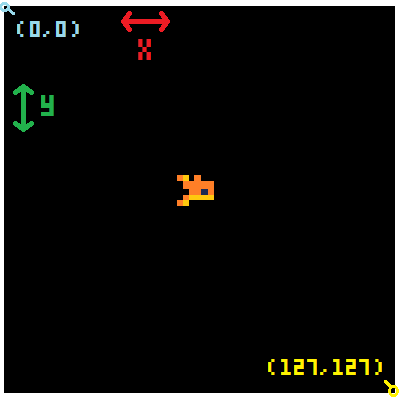
We need the enemies to spawn in one of two places: left or right
So let's first create a random number between 0 and 2 to represent each side.
place = flr(rnd(2)) will find a random number between 0 and 2 and then round down so it will be one of these numbers: 0 or 1)
Then we check if place == 0 or 1 using an elseif check.
It's basically like flipping a coin to choose which side of the screen the enemy will start at!
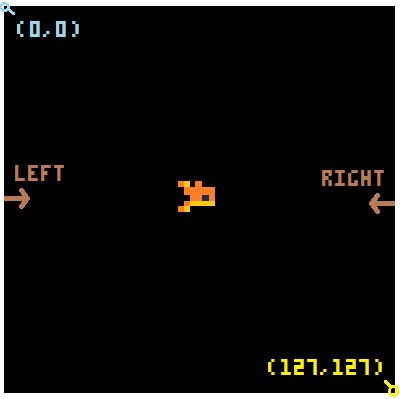
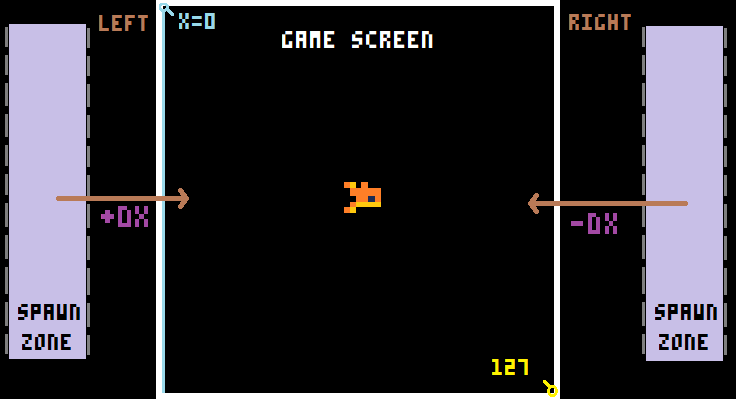
Inside of each of those checks we will set the X, Y, DX, and DY with random numbers but controlled slightly to make sure the enemies are moving in a direction across the screen, not away from it.
Let's look closer at just the first set.
***Keep in mind, this is for an enemy that will start on the left side of the game screen and move right.***
x = flr(rnd(16)-64
This will set the X position to be a rounded down random number between 0 and 16 but minus 64.
In the end, that means X will be a number between -64 and -48.
Where will that be on the game screen? Well if the left side of the game screen is where X = 0, and this will be a negative number, then that means the enemy fish will start to the left of the visible screen. That is a good thing because as it moves towards the screen, it will appear a little at a time instead of suddenly.
So for both sides of the game screen, we want to start the enemy fish off of the screen.
y = flr(rnd(115))
The Y for a left side enemy is easy because it can start anywhere from the top of the screen to the sand. And we know that the top of the screen is pixel 0 and the bottom of the screen is around pixel 115.
So we just need to get a random number between 0 and 115 and round it down.
dx = rnd(max_enemy_speed)+.25
Since this enemy starts on the left, the DX (momentum left or right) is simple. We want the enemy to move toward the right. So any positive number between 0 and the maximum enemy speed will work. However, the speed may be too close to 0, and so the fish will move way too slow.
So we do +.25 to the random number to make .25 become the minimum speed.
--make enemy table
local enemy = {
    sx = 0,
    sy = 0,
    x = x,
    y = y,
    w = 0,
    h = 0,
    c = c,
    dx = dx,
    size = size,
    flp = flp
}
After we have set up all of the enemy variables, we can neatly store them inside of a table. We create a table named "enemy" with local enemy = { ... }.
Inside of the curly braces { } we list the local variables in the order of key = value.
So inside this table, there will be a key named X and it will hold the value of whatever the local variable named x became from our random number generating earlier. And so on for each of the enemy data, all the way to its flip setting.
Now some of those enemy variables stored in the table are only set to 0, but we need to set them to some numbers based on which size fish they turned out to be.
--set sprite based on size
enemy = set_sprite(enemy)

--add it to enemies table
add(enemies,enemy)
As the comment title of this section describes, we will be setting the sprite of the enemy fish based on its size.
enemy = set_sprite(enemy) will save the enemy table to whatever is returned after we give the enemy table to the function named set_sprite(). We will go into detail about that custom function in the next major section of this tutorial. Here, we are just calling it to run, but we haven't actually built the function yet.
Lastly, we want to add each enemy table to the larger enemies table to keep them all organized together.
--sprites
function set_sprite(obj)
    if flr(obj.size) <= 1 then
        obj.sx = 0 obj.sy = 0 obj.w = 4  obj.h = 3
    elseif flr(obj.size) == 2 then
        obj.sx = 5 obj.sy = 0 obj.w = 4  obj.h = 4
    elseif flr(obj.size) == 3 then
        obj.sx = 9 obj.sy = 0 obj.w = 6  obj.h = 5
    elseif flr(obj.size) == 4 then
        obj.sx = 15 obj.sy = 0 obj.w = 9   obj.h = 7
    elseif flr(obj.size) == 5 then
        obj.sx = 24 obj.sy = 0 obj.w = 14  obj.h = 9
    elseif flr(obj.size) == 6 then
        obj.sx = 38 obj.sy = 0 obj.w = 14  obj.h = 10
    elseif flr(obj.size) == 7 then
        obj.sx = 52 obj.sy = 0 obj.w = 16  obj.h = 12
    elseif flr(obj.size) == 8 then
        obj.sx = 68 obj.sy = 0 obj.w = 15  obj.h = 15
    elseif flr(obj.size) == 9 then
        obj.sx = 83 obj.sy = 0 obj.w = 19  obj.h = 16
    elseif flr(obj.size) == 10 then
        obj.sx = 102 obj.sy = 0 obj.w = 26  obj.h = 17
    else
        obj.sx = 102 obj.sy = 0 obj.w = 26  obj.h = 17
    end

    return obj
end
function set_sprite(obj) creates the function, names it "set_sprite" and expects to receive 1 variable that will be locally named "obj".
Inside of this function is just one long IF statement with many ELSEIFs.
The whole point of this function is to take the size of a fish (player or enemy) and determine which fish that should be in the sprite sheet. Then set that player or enemy fish's sprite variables to the correct numbers.
if flr(obj.size) <= 1 thenThis is the opening of the check. It first checks if the rounded down fish size is less than or equal to 1.
Remember that the player's size will almost always be a decimal so we round it down here to ignore the decimal and get the correct fish size. Then we compare it to the smallest fish size: 1
If that is not true, then the function moves to the next elseif and comapres with 2, 3, 4, etc. all the way up to size 10 which is the largest fish that we drew. But you could keep drawing more, and simply add more elseif checks and raise the max_enemy_size variable.
The final else check is for any fish larger than 10. We didn't draw any larger fish so we will just set them as size 10 fish.
How do we set the sprite sizes?
Once we know the size number of the fish, then we have to look at the sprite sheet.
This shows the numbers that we have to find and set them to the correct variables: sx, sy, w, and h.
To find the SX, we count the number of pixels from the left of the sprite sheet.
To find the SY, we count the number of pixels from the top of the sprite sheet.
To find the W, we count the number of pixels to the right of X.
To find the H, we count the number of pixels down from Y.
To make it easier, hover your mouse on the pixel in the sprite sheet and look at the lower left corner. It will tell you what pixel number the X and Y positions are of your mouse cursor.
![]()
--init
function _init()
    --player table
    player={
        x = 60,
        y = 60,
        w = 0,
        h = 0,
        size = 2,
        sx = 0,
        sy = 0,
        dx = 0,
        dy = 0,
        speed = 0.08,
        flp = false
    }
    player = set_sprite(player)

    --game settings
    enemies = {}
    max_enemies = 15
    max_enemy_size = 10
    max_enemy_speed = 1
    win_size = 10
    weeds = {
        {x1=4,y1=120,x2=2,y2=101},
        {x1=6,y1=123,x2=8,y2=103},
        {x1=110,y1=125,x2=109,y2=102},
        {x1=121,y1=122,x2=120,y2=104},
        {x1=123,y1=122,x2=125,y2=102},
    }
end

-->8
--update
function _update()
    --player controls
    if btn(⬅️) then player.dx -= player.speed player.flp=true end
    if btn(➡️) then player.dx += player.speed player.flp=false end
    if btn(⬆️) then player.dy -= player.speed end
    if btn(⬇️) then player.dy += player.speed end

    --player movement
    player.x += player.dx
    player.y += player.dy

    --screen edges
    if player.x > 127 then player.x = 1 end
    if player.x < 0 then player.x = 126 end
    if player.y+player.h > 120 then
        player.y = 120-player.h
        player.dy = 0
    end
    if player.y < 0 then
        player.y = 0
        player.dy = 0
    end

    --enemy update
    create_enemies()
    for enemy in all(enemies) do
        --movement
        enemy.x += enemy.dx

        --delete enemies
        if enemy.x > 200
        or enemy.x < -70 then
            del(enemies,enemy)
        end

        --collide with player
        if collide_obj(player,enemy) then
            --compare size
            if flr(player.size) > enemy.size then
                --add to player based on size
                player.size += flr((enemy.size/2)+.5) / (player.size*2)

                --set sprite based on size
                player = set_sprite(player)

                sfx(0)
                del(enemies,enemy)
            else
                sfx(1)
                _init()
            end
        end
    end

    --win
    if player.size > win_size then
        if btn(4) or btn(5) then _init() end --reset
    end
end

-->8
--draw
function _draw()
    cls(12)
    --sand
    rectfill(0,120,127,127,15)
    --seaweed
    for weed in all(weeds) do
        line(weed.x1,weed.y1,weed.x2,weed.y2,3)
        line(weed.x1+1,weed.y1+1,weed.x2+1,weed.y2+1,11)
    end
    --rocks
    circfill(8,120,5,13)
    circfill(5,123,3,5)
    circfill(100,122,4,13)
    circfill(122,118,6,6)
    circfill(116,120,3,5)

    --player
    sspr(player.sx, player.sy, player.w, player.h, player.x, player.y, player.w, player.h, player.flp)

    --enemies
    for enemy in all(enemies) do
        pal(9,enemy.c)
        sspr(enemy.sx, enemy.sy, enemy.w, enemy.h, enemy.x, enemy.y, enemy.w, enemy.h, enemy.flp)
    end
    pal()

    --player size
    rectfill(2,3,22,10,0)
    rectfill(2,4,2+(player.size-flr(player.size))*20,9,8)

    --win
    if player.size > win_size then
        rectfill(0,55,127,75,10)
        print("congratulations!!!",28,56,1)
        print("you became",43,63,1)
        print("the biggest fish!",20,70,1)
    end
end

-->8
--collision

function collide_obj(obj, other)
    if  other.x+other.w > obj.x
    and other.y+other.h > obj.y
    and other.x < obj.x+obj.w
    and other.y < obj.y+obj.h
    then
        return true
    end
end

-->8
--enemies

function create_enemies()
    if #enemies < max_enemies then
        --local variables
        local x = 0	 local y = 0
        local dx = 0
        local size = flr(rnd((max_enemy_size+player.size)/2))+1
        local flp = false
        local c = flr(rnd(7))+1

        --random start position
        place = flr(rnd(2))
        if place == 0 then
            --left
            x = flr(rnd(16)-64)
            y = flr(rnd(115))
            dx = rnd(max_enemy_speed)+.25
            flp = false
        elseif place == 1 then
            --right
            x = flr(rnd(48)+128)
            y = flr(rnd(115))
            dx = -rnd(max_enemy_speed)-.25
            flp = true
        end

        --make enemy table
        local enemy = {
            sx = 0,
            sy = 0,
            x = x,
            y = y,
            w = 0,
            h = 0,
            c = c,
            dx = dx,
            size = size,
            flp = flp
        }

        --set sprite based on size
        enemy = set_sprite(enemy)

        --add it to enemies table
        add(enemies,enemy)
    end
end


-->8
--sprites

function set_sprite(obj)
    if flr(obj.size) <= 1 then
        obj.sx = 0 obj.sy = 0
        obj.w = 4  obj.h = 3
    elseif flr(obj.size) == 2 then
        obj.sx = 5 obj.sy = 0
        obj.w = 4  obj.h = 4
    elseif flr(obj.size) == 3 then
        obj.sx = 9 obj.sy = 0
        obj.w = 6  obj.h = 5
    elseif flr(obj.size) == 4 then
        obj.sx = 15 obj.sy = 0
        obj.w = 9   obj.h = 7
    elseif flr(obj.size) == 5 then
        obj.sx = 24 obj.sy = 0
        obj.w = 14  obj.h = 9
    elseif flr(obj.size) == 6 then
        obj.sx = 38 obj.sy = 0
        obj.w = 14  obj.h = 10
    elseif flr(obj.size) == 7 then
        obj.sx = 52 obj.sy = 0
        obj.w = 16  obj.h = 12
    elseif flr(obj.size) == 8 then
        obj.sx = 68 obj.sy = 0
        obj.w = 15  obj.h = 15
    elseif flr(obj.size) == 9 then
        obj.sx = 83 obj.sy = 0
        obj.w = 19  obj.h = 16
    elseif flr(obj.size) == 10 then
        obj.sx = 102 obj.sy = 0
        obj.w = 26  obj.h = 17
    else
        obj.sx = 102 obj.sy = 0
        obj.w = 26  obj.h = 17
    end

    return obj
end

7767
28 Sep 2022
