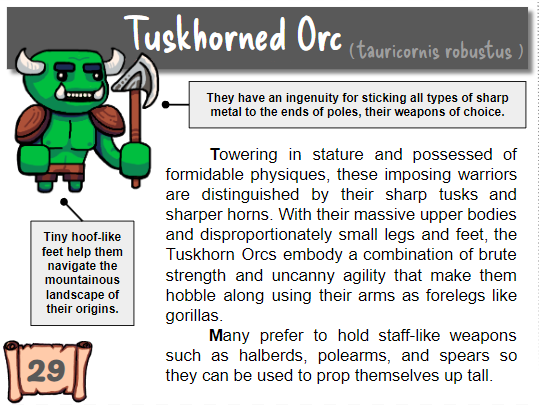
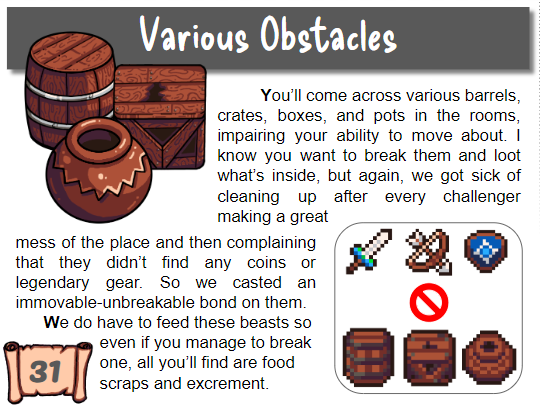
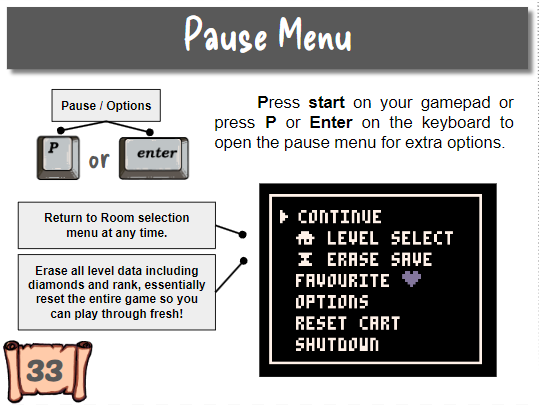
PICO-8
Nerdy
Hardware
hardware:
Game Dev Extras
Are you proud of the game you created and want to take it a step further?
Here is a collection of ideas and examples of ways you can get creative beyond pure game development that will help bring your game to life. Many of these ideas can be used as promotional material for your game too, but they don't have to be stressful marketing actions, they can be fun creative activities too!
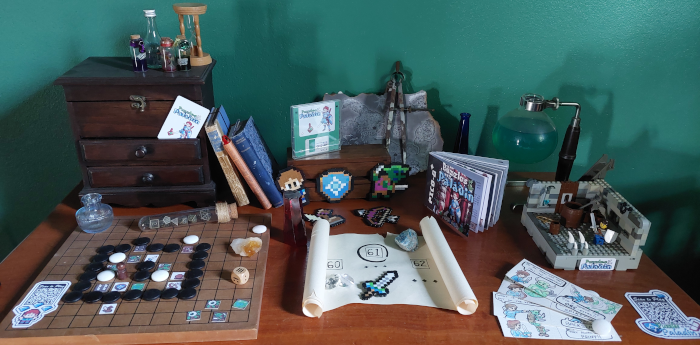
While working on my game, I spent so much time at the computer that my eyes hurt from the screen and I felt isolated in a single room for too long. I knew I needed a break but I also wanted to keep progress moving forward. So when I got to a point in development to design levels, I decided to create a physical version of the game that I could use to build levels easily away from the computer.
First, I exported the spritesheet of my game and printed it out. Then I looked for a board with squares from games like Chess or Go.
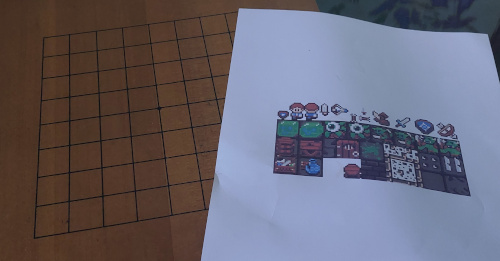
Then I glued the printed sprites to some card paper to give it some thickness and durability. I thought also of glueing them to some wooden bases with small slits that they could stand vertically in but I wanted to be able to look down on the board and see all the sprites easily.
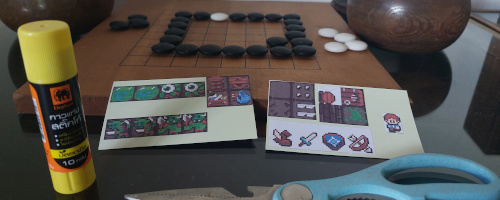
After cutting out each sprite, I decided to save myself the extra work of printing, cutting, and glueing many wall sprites so instead I used my Go pieces for the walls
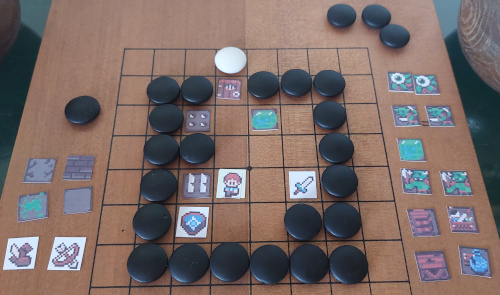
This was enough to start designing levels and it was a really enjoyable experience to see my game have a physical presence, to be able to manipulate the pieces easily with my hands (surprisingly easier than in the map editor), and I was able to do this work anywhere I felt comfortable away from the screen.
I even asked my wife to playtest these physical levels before I finalized them. I was able to make changes immediately and have her try again which would have taken much longer if I made those changes in the game itself.
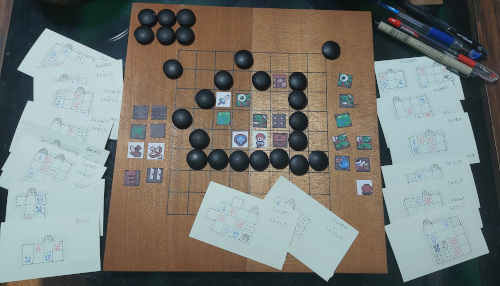
When I found a level design I liked, I drew it down on an index card, and that was great too because after I had a stack of levels on cards, I could study them, lay them out, and rearrange the order before I build them into the map!
Create large scaled wallpapers for yourself and your game's fans! It's a great additional gift to provide with your game download, or as an additional free download.
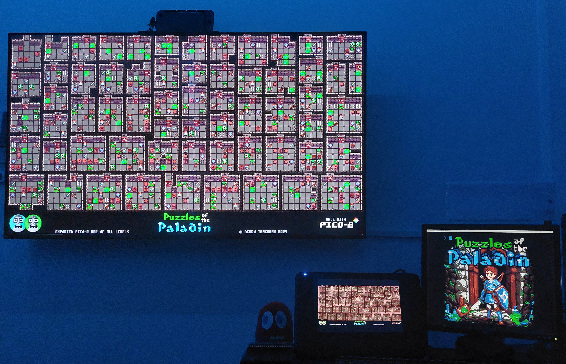
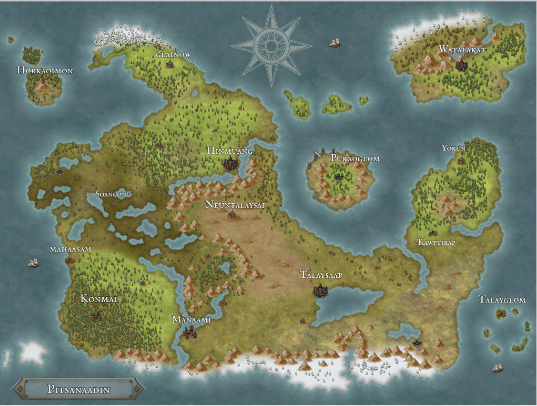
Since my game used the entire map and I caught myself staring in awe while it slowly grew in complexity, that it would make for a great single image poster or desktop background. I imagined if my game released physically in the 90's, this map poster would come folded up in the manual or in a gamer magazine.
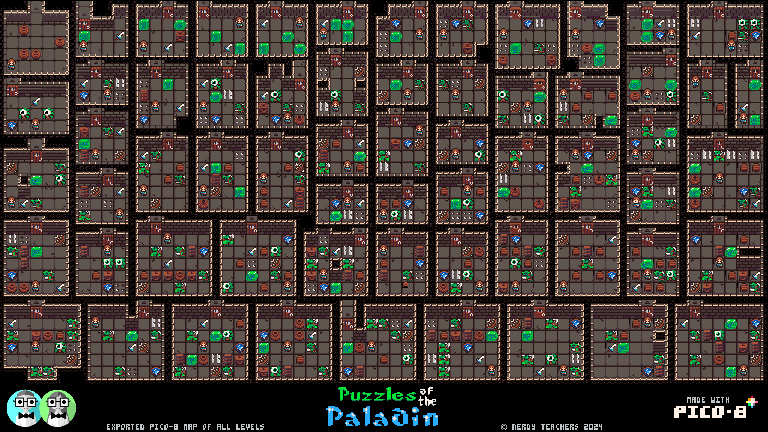
PICO-8 makes it easy to export your game's map as an image, and that's what I did. Then I just scaled it up to 2556x1440 pixels, and added the title and details along the bottom margin.
It doesn't have to be complex either, especially for a desktop background. I personally prefer minimalist wallpapers so I can see my shortcuts easily. So you can also make a few versions using your sprites or other art like this.

If you are a cartophile like me, staring at a beautiful fictional map is like reading a detailed fantasy novel and the imagination can fill in all the geography with history, culture, commerce, and conflicts.
Drawing maps can be even more enjoyable than studying them and with many Dungeons & Dragons gamers out there building maps for their world, there are many useful tricks and even map making tools online like Inkarnate, which I used to make this for my game:

Even if your game doesn't have an overworld (my doesn't) you can have fun expanding beyond your game's scope to imagine what the rest of the world looks like. It will make your game feel like the first book of an entire saga. And who knows, maybe you will make a sequel or two to your game and now you have a whole world to expand outwards to.
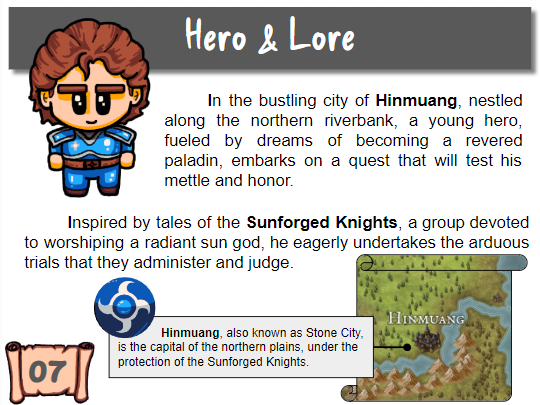
This little blue square below shows where my game is located in the world I created, just a single city and mountain range. And that is purely in the lore of the game, not even shown or mentioned within the game itself!

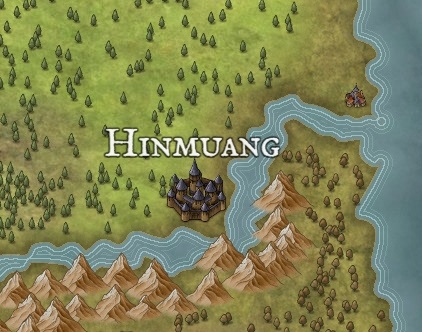
So don't be afraid to let your imagination expand on your game world as much as you want. Gamers love lore and hidden secrets, and we developers love creating them. If you really enjoy this topic, you should know that this is an entire community called "World Building" with information for game developers, writers, dungeon masters, and other creatives to learn how to shape realistic or fantastic worlds.
What's better than a digital map? One that you can hold in your hands, roll up like a scroll, and make it look aged, worn, and partially burnt!

This is a partial image of the photo shoot (explained later) that we set up. One of my favorite parts of the scene is this map and a couple of cartography tools we happen to have recently found at a second-hand store. I'm assuming we've all made an old looking pirate's treasure map before right?
Well just in case you haven't yet and are looking to increase your nerdy status, here's how to age paper:
1) print your map, I suggest in grayscale or sepia;
2) boil some water and either use coffee beans or black tea to turn the water dark;
3) after the water cools, give the paper a dip and then let dry.
4) do this several times or use a paintbrush to get the brown stains darker where you want them.
5) optionally take a small flame to the edges of the page, letting it catch fire, but quickly put it out. Repeat where you want the burnt edges.

When I knew I had finalized the graphics of my game, I exported the sprite sheet, and dedicated some of my relaxing time to drawing the important game objects at a higher resolution in another medium I enjoy.
![]()
original sprites pixel art
high resolution version
There are so many wonderful styles you could choose from. I chose this style because it's relatively easier for me to draw in it and keep them consistent looking. But I could have gone with any number of unique and interesting art styles that I also like such as pencil sketches, graffiti, ink and watercolor, painterly, old book illustrations, flat illustration, on and on.
So other than pixel art, what medium or style do you like to create with? Players love seeing the little pixels come more to life in another medium. Just take a look at any old game manual and you'll find high resolution images of those pixelated characters. It really helps us to inject our imagination into the little screen and see something much more vivid and detailed while playing the game.
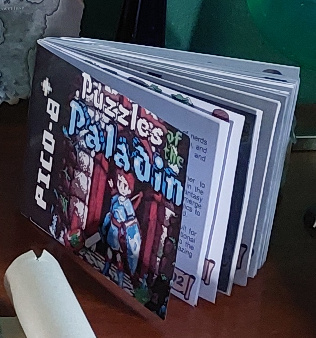
After having completed the high resolution art for the game, it was time to put them to good use, in an instruction booklet!
I must say, I rarely long for the days-gone-by because there is just so much to be grateful for today, but why in the world did we stop making beautiful physical game manuals and instruction booklets that come in the inside cover of a game box?? It breaks my heart every time I open a Nintendo Switch game, see the little arms for holding a manual and nothing is there.
So I do miss that deeply because I have such fond memories of studying those booklets as if they were ancient tomes holding secrets and strategies. Whether it was quickly looking up tables of stats while I paused the game, or reading all the lore during break times at school, I carried around my current game's instruction booklet everywhere just so I could dive back into the world even without my console.
So let's bring that back shall we??
Booklet Preview Slideshow:


I made sure to produce this before the release of the game for several reasons:
1) I wanted to make the booklet available to players via download right away.
2) I could use screenshots of certain pages on the game's webpage to both draw player's eyes and teach how to play, which saved me from making a tutorial in the game, saving precious tokens.
3) It gives the game itself a feeling of higher quality, showing the love and effort put into it.
Of course, I had to print out the booklet and make a physical copy just for myself. But I must warn you, making a booklet (digital or physical) comes with a lot of complexity. For example, you have to consider page sizes and orientation, page order when making a readable PDF v.s. when printing front and back and stapling along the seam at the fold, what type of binding and paper, and if it is color or black and white, etc., etc.
So it was very important to think ahead as much as possible and figure those details out before creating the pages. By the way, I designed my booklet entirely in Google Slides, and that made some things easier such as editing, keeping consistent sizing and theme, as well as downloading in multiple formats.
First things first, prepare your website post so you know the eventual URL that your QR code will point to. This can be a little tricky, but I know that both the BBS and itch.io allow you to create your page unpublished and set up the url name so that when it publishes, that name won't change.
Once you have the URL, you can find a friend who knows how to make QR codes and let them offer to do it for you (thanks TerrorBytez91), or you could try out an online tool such as QR Code Generator.
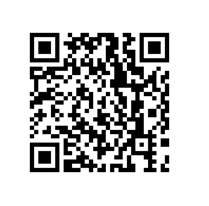
There's even a Pixel Art QR Code Generator that will merge the QR Codes with your images and it still works, test this out with your phone's camera:
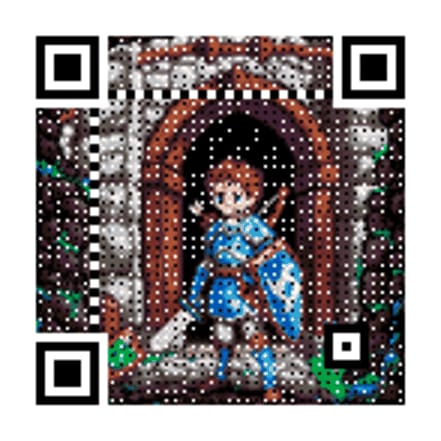
Once you have your QR Code image, you can take either your sprites or high resolution art and design around it. It is a good idea to add some words to the image to make it clear that this is a safe link to a game. I went with "Scan to Play" but "Free Game" or simply "Scan Me" is common. Also, it's interesting that you can overlap and hide a bit of the QR Code and it will still work, just make sure you test it out while you adjust your art overlay.
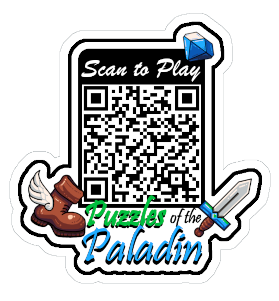
Once I had the digital designs, I printed them out on glossy sticker paper, and cut around the outer edge. I made sure to draw the thick black border around the entire outside to really give it that sticker look, then again with a lighter thinner border as a guide for cutting out the stickers.

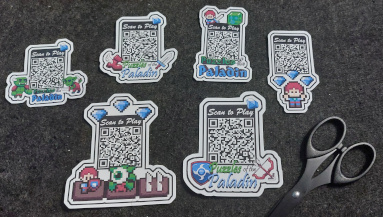
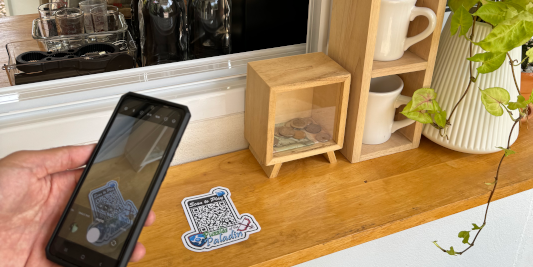
I was nervous cutting them by hand, but they came out really clean and professional! I couldn't believe how nice they looked! And so they were ready to head out into the wild and catch players. First, I thought of public spaces that would welcome a sticker to a free game; such as cafe bulletin boards, a friend's shop, a local park or library. I headed out to town to a friend's cafe who was generous enough to let me place it right at the checkout counter.
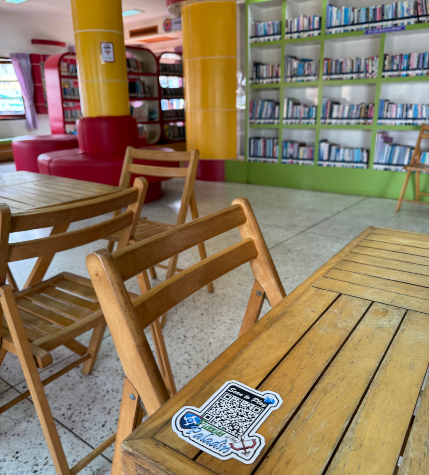
Then I went to the public library and showed the librarians and asked if I could put one somewhere, and they were also happy to help and encourage kids to try it out since my game is kid friendly and a strategic puzzle game, good for their little brainz.
Another way to share your game quickly and easily to smart phones is with Near Field Communication (NFC) chips. This Reddit post by Mr3Sepz inspired me to try it out for myself. You can buy blank cards cheap, and use a free phone app to read and write what you want to the cards.
Unlike QR codes, you don't need your camera to read an NFC card. The data transfer gets triggered by being close to your phone, so hovering your phone over a card will briefly power the card enough to send its data to the phone. The phone then notifies you of the data it has received and you can choose to open it in various ways.
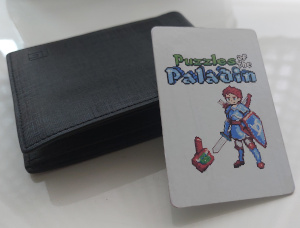
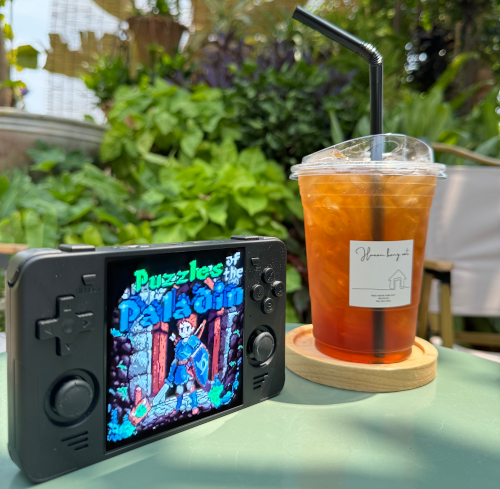
The simplest data to put on an NFC card is a link to your game's webpage URL. I did this with Puzzles of the Paladin, and keep it in my wallet. Any time I meet friends or get into a conversation about games with anyone, I can simply take out the card, and amaze them with how simple it is to bring up my game on their phone and start playing!
You can also buy NFC readers for your computer if you want. This would allow you to create a PICO-8 collection of games in "physical cartridges" that are cards. Like the reddit post, you can even find a card collecting binder or case and keep them tidy there.
Label Tip: I printed the card's design on sticker paper and tried a few methods. It's quite difficult to line up the label with the card, and looks poor quality if it is off-center or not cut symmetrically. What worked best for me was to design the label without a border nor background color. This way, the white background allowed me the freedom to place the label art as close to the middle of the card as possible and not worry about the edges. Then after sticking it to the card, I trimmed the excess edges so that the label perfectly matched the size of the card itself and didn't look like a label at all. It looks like the design was printed directly on the card!
There are also a variety of NFC chips available such as white cards, black cards, wood cards, white or black circles, stickers, rings, even within fake nails. When I saw all the many options, I had to buy some circular chips, which can also come with plastic cases to protect them and create a sturdy base for something like an Amiibo! So stay tuned for a PICO-miibo example below, coming soon!
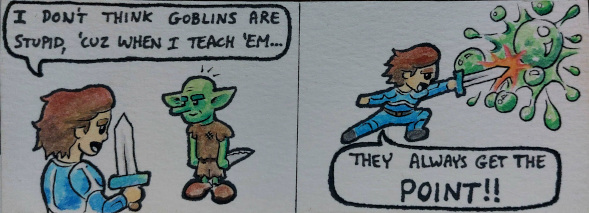
I don't think of myself as all that funny, but I do sometimes really get a kick out of making myself laugh! Like many of these activities I made them purely for my own enjoyment first and if others also like them, then that's a bonus!
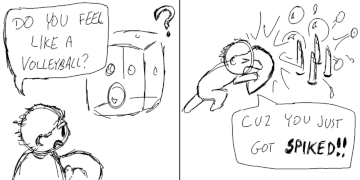
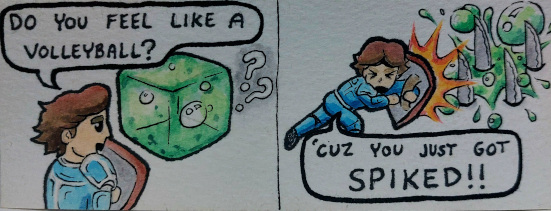
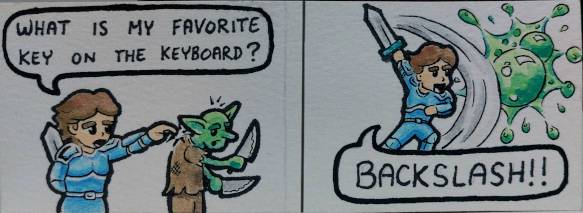
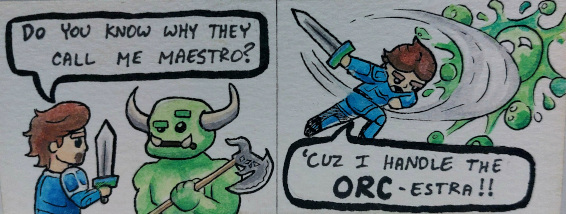
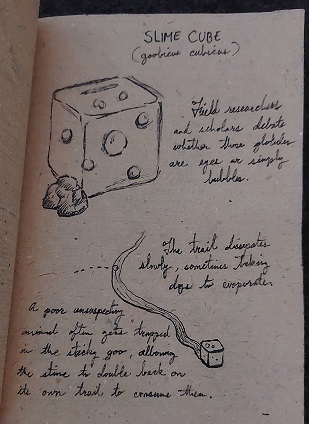
Bring a little humor into your project, even if your game is serious and the joke is just on the side. The simplest jokes for me to create are dad-jokes with puns. And I had the idea that the main character is going to ask rhetorical questions to the monsters just before killing them, when he hits them with the punchline.
This brings a lighthearted personality to the character (not in the game itself), and makes fun of the stupidity of the monsters (who don't defend themselves in the game). It also lets you know that you don't have to sympathize with the monsters even though they are dumb and cute. Instead, these show that the character has slayed hundreds of these monsters and in his boredom comes up with entertaining ways of dispatching them. Oh, and it also makes fun of the fact that all monsters in the game explode into a green gooey mess, whether they are slimes or not!
After brainstorming a list of 2-scene comic puns, I started with digital sketches:
I had planned to refine the sketches digitally, but I felt the need to step away from the screen and give myself a break from the computer. I also couldn't shake the desire to get back into watercolor painting. So even though I knew I should really make these digitally since I could easily edit and reuse parts of the drawings, I also knew that if I followed my heart and motivation, then I would be much happier in the process and therefore also in the result.
So dumb I love it and it still makes me giggle with delight.
I actually had many more planned but stopped when I had my fill of watercolors and my motivations lead me elsewhere, and I'm perfectly fine with that. The point was to have fun and once it stops being fun, move on to something else and create there.
I do sort of wish I did them digitally and before the instruction booklet because they would have made for great additions either as a break between informational pages, or just at the back of the book. It really adds so much personality to my otherwise mute game characters, so I will definitely do this again in future projects.
Many know these by the brand name "Perler" who made fuse beads popular. They make perfect low resolution sprites that you can hold in your hand, throw at your friends, dangle on a bag, or put up on your wall as art! If you google it, you'll find a lot of pokemon sprites as bead art, and so why not your own game's sprites!?
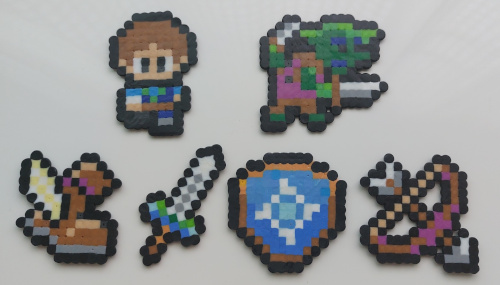
The craft can be quite a relaxing activity as the tiny beads force you to be calm and patient in order to handle them well. To fuse them you just need an iron and some ironing paper. This website has a lot of basic tips to get you started. And there are some tutorials out there for how to turn 2D sprites into 3D voxel models using just these fuse beads!

How much you iron them will be up to you. Many people like to just iron them just enough that they fuse together, but you will still see the circular shape of the beads with holes in the middle. I prefer to really melt my beads until they become squares and look just like the digital sprites in the game. This also has the benefit of making the bead sprites more durable.
It takes longer and you have to be extra careful not to overdo it but they turn out really nice.
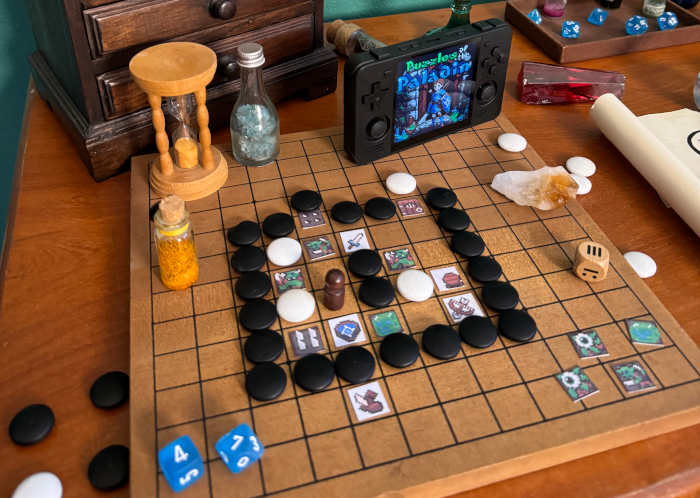
After you have created some specific physical objects of your game, you can put them together to create a neat scene full of interesting detail and make your game look like it jumped out of the screen and into the real world!

I do admit that I have a little unfair advantage at this being a collector of a wide variety of nerdy interests like old board games, gemstones, crystals, glass bottles, old books, pen quils, old wooden boxes, and mathematical instruments....so you can imagine the fun I had grabbing anything and everything that could fit the game's fantasy medieval theme. I left this scene up in the house for over a week I enjoyed it so much. Eventually I caved to the curious looks of people wondering if I was performing witchcraft, but I'll always have these pictures!
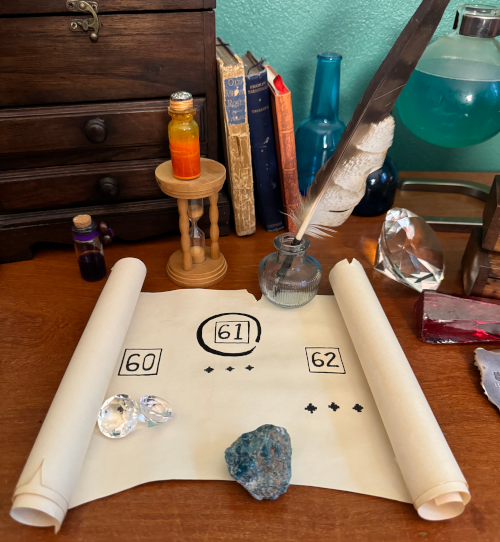
This scroll is straight out of my game's menu and level select screen. I had fun trying to get every detail of the number of rolls on the sides and the damaged cuts. The game has a floating pen quil and when you select a level, it circles the number, so I added that on level 61. I chose to show levels 60, 61, and 62 because there are 62 levels in the game so this is a person who has almost completed the game.
Finding ways to hide easter egg details in the scene was extra fun. I actually took the time to choose a real level from my game and prepare this physical version to match it, then I set the dice to 47 because it is actually level 47! Not only that...but the out of focus blue dice in the upper right are also showing significant numbers; all together they read the BBS PID, the unique id number of my game's post on the BBS: 140488 (I know, I'm insane, and I love it!).
You don't have to go as crazy and detailed as that either...
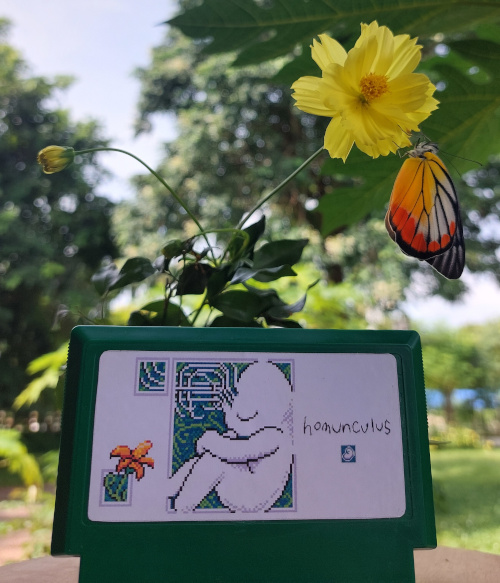
A simple beautifully framed shot of your game playing on a handheld device or something you made like this famicon cartridge of my older game Homunculus, looks just as striking.
I hear you asking, "But how did you get the butterfly in the picture??"
Well, one of my nerdy hobbies is to always keep an eye out for butterfly eggs or caterpillars, raise them protected from predators, then release them as butterflies. I couldn't believe it myself because it was a complete coincidence that the butterfly I raised hatched that day and was the perfect combo of colors to match my game. Since butterflies are very docile when they first hatch, she was willing to hang out long enough for a photo shoot before taking her first flight.
Now I can treasure that image not only for the memories I had making the game, but also of that wonderfully magical day.
How cool would it be to have your own game represented on your own clothes?? You don't need a huge fan base and followers to make merchandise for yourself! Just imagine the delightfully nerdy conversation it starts:
"Oh that's a cool design, what game is that from?"
"Oh this? It's actually from a game I made."
"You made a game?? Where can I play it?"
*whip out an NFC card and hold it under their phone*
"Where is your crown because you are the king of nerds! All hail!"
*achievement unlocked*
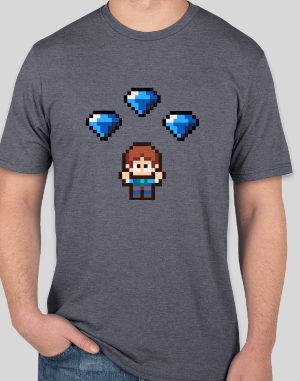
Even if you don't have the resources to buy or screenprint your own T-shirts, you can easily make one of these mockups on any number of websites that let you design your own shirts before ordering them to be printed. Use the design tools and save the digital images for free!
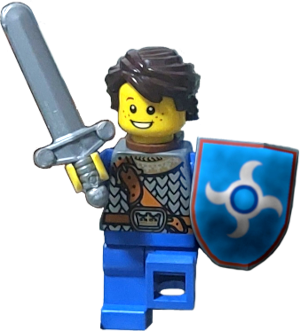
That's right! You have a good excuse to break out your old LEGO pieces, or steal from your kids, because you can definitely reimagine your game in the world of LEGO. I didn't dare go as far as stop animating mine....yet! For all I wanted was a diorama of a single dungeon room in my game.

It was a ton of nostalgic fun to dig around LEGO boxes to find just the right unique pieces that could fit the theme of the game and make do with the closest I could get. Unfortunately I wasn't happy with any of the enemies I tried making so...looks like I'll need to buy more! hehe
The plan was just to build it and take pictures of it, but I love looking at it so much that it is still set up on my desk.
The main character has gone through so many makeovers during the process of redrawing and recreating the game in different styles that they all sort of merge together as one in my mind. So far, this LEGO version is the most real, and I'll sometimes take him out of the diorama so he can sit on my computer desk, and politely listen to me vent my frustrations over the latest bugs.
If you love pixel art, then you must also love voxel art! There are some great voxel art programs out there. I tried a few and settled on magicavoxel as being the best for me. You can easily drag and drop your 2D sprites into the editor, and it will convert that image into voxels with a depth of 1 voxel. From there, you can shape your sprite into a 3D character much easier than trying to do it from scratch.
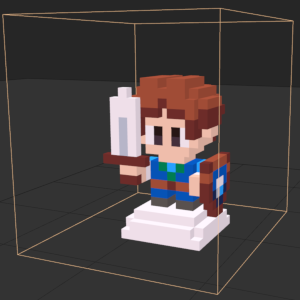
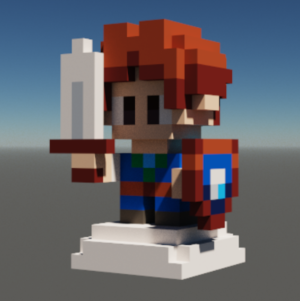
It makes drawing, rendering, and even animating very easy. You will have to spend some time learning the program itself and all the tools and options you have available, but at least for me, it was very intuitive and I was able to pick it up really quickly and produce some stunning results.

You may remember that I made a "What's Inside" series of voxel art animations, the first from my older game Homunculus, but I do plan to do another for Puzzles of the Paladin.
Whether you have a Floppy Disk reader or not, creating a physical cartridge for your game can be a very cool and retro way to display your game. There were once millions and millions of Floppy Disks around the world, and so many of them are already useless, but they don't have to be trash!
The Floppy Disk is still a commonly used icon for saving, and so they will continue to be a visually important symbol long after their original use has been forgotten. So it should be pretty easy to find an old broken Floppy, and turn it into a modern relic of your PICO-8 game.

Of course, if you are interested in making a working PICO-8 Floppy Disk console like we did, you can follow our tutorial and actually put your game data on there to be used as a working physical cartridge!
If you played PC games in the 90's you'll remember the common README.txt file that came with your software that could help you install, give you version information, and accredit developers. It was basically a digital text-only instruction manual.
Since they were text-only, the developers had to get creative to make the file more interesting to read, and so many used what is now referred to as ASCII art such as this:
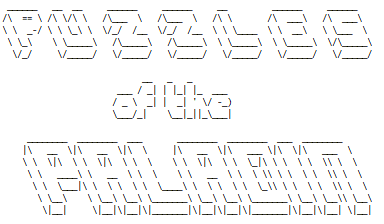
Usually only the title was done like this, but sometimes, very creative readme writers would also include ASCII art of the game characters or installation diagrams. It was really impressive to see because you know it took a lot of time and effort to use text characters row by row to create these images.
Well it doesn't have to be so hard anymore as there are multiple websites that will help convert your text into multiple styles of ASCII art automatically.
| Ascii Flow | Draw flow charts and diagrams. |
| Text Ascii Art Generator | Over 100 style options for ASCII text. |
| AsciiArtGenerator.org | Convert text or images! |
| Image to ASCII | Convert images into a variety of styles. |
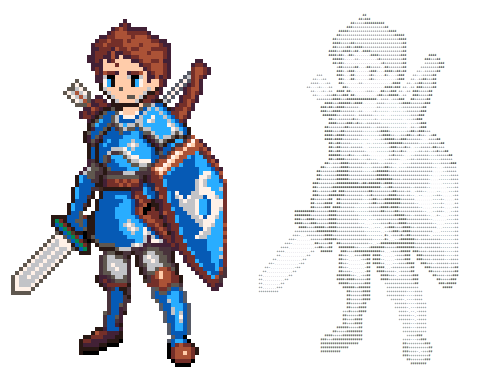
The image to ASCII works surprisingly well! This will really step up your README files. Here's an example of how I converted my character from the cart label art into an ASCII image.
You can export your code as an image with PICO-8. This is a neat feature that is not so useful in sharing your code, but does allow for more creative uses of displaying your game's code!
For example, you could export the code as a large image, get it printed and framed and hang it on your wall. The PICO-8 text colors make a nice design, and it will surely spark questions among your friends who see your code hanging as art.
You can take it a step farther and with some layering and masking tricks, overlay your title or game art on top. This creates an epic design where the code appears to be revealing the game within! I love it!
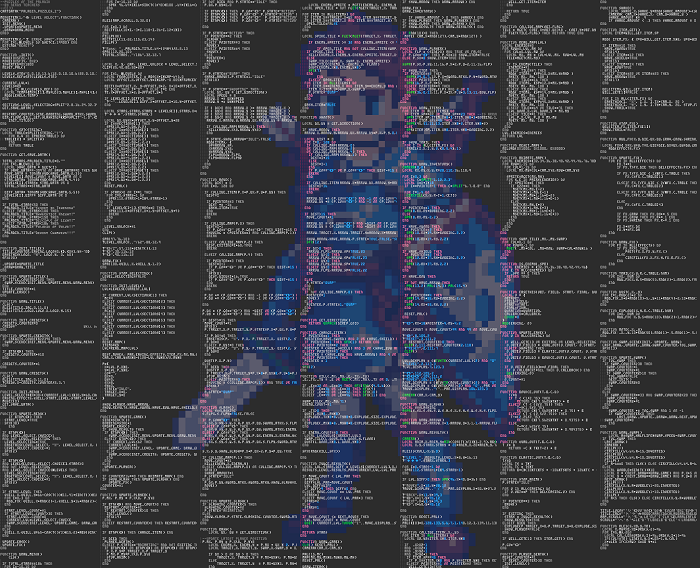
How did I do this?
I took my character from my cartridge label art, overlayed it on top of my exported code image, then duplicated the code image so that there was one layer in color, and another layer in grayscale. Then I masked my character outline and applied that mask to the grayscale code layer, so that the color layer would show through only where the character stood. Finally I made the layer with the character art only 10% opaque.
After creating the photo-shoot scene, I left it up for as long as I could to simple enjoy it, and that made me want to create a shelf for all the neat physical memorabilia I have created and gathered as a tribute to my game.
(I'm planning to redesign my computer room with some nice displays and shelves, so one shelf is already dedicated to this. Will update when complete.)
Do you have a cool notebook lying around that you don't know what to do with yet? I do, and I love drawing and journaling fictional worlds as if they are a fieldbook by an explorer taking notes on the creatures and landscapes they come across.
Since I already made the map of the world, and figured out a lot of the lore of the game while writing the instruction booklet, I can have fun in my spare time slowly writing and drawing a handmade book of lore to go with my game.
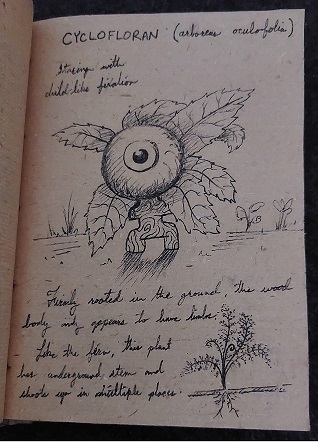
You could fill the book with lore from each of the games you create! What a wonderful keepsake you will have as you develop more and more games. Maybe you can even find a way to weave all your games into the same world and share lore in some magical or interdimensional way.
Have you seen some of the fantastic Video Game Trailers that were made in the community?? It is always very cool to see an epic trailer for a PICO-8 game. It takes a ton of work to do it well! But there are many ways you can make it fun. Play with the nostalgia of this fantasy console by mimicing a style of trailors from the 80's and 90's. Do your best deep voice narrator or a more cartoonish squeeky high voice.
Make sure you show some gameplay but if you are doing any of these other ideas first, especially the photo-shoot scene, you can take a video then as well and then edit a voice-over on top and add epic music to create a really neat looking video trailer.
(We've thought ahead enough to record the video during our photo-shoot, but we still need to fit in the time to edit the video together. This will be a good way to dust off our video editing skills before we start video tutorials again.)
If you've already turned your game sprites into voxel models, then you can export those models into a format like .obj that can be converted into a 3D print prepared model and you can 3D print your game's characters!
Depending on how detailed and large you make them, you can essentially create tiny figures or large statues of your game's characters and items.
You can take 3D prints in many creative ways. You can edit existing 3D print designs such as mobile toys, plant pots, wall hooks, and then customize them with your design.
Mix your NFC chips with your 3D prints to create an Amiibo figure that looks great on your desk, and has the function of being able to scan it to open your game!
(I have the pieces to create this, but it's still in progress. Will update soon!)
Another great way to turn your game art into wearable art is to bring your design to a shop that can sew patches for you! Some online stores also offer custom patch designs and could even sew it onto a shirt or hat for you, but that will get pricey.
(I know of a local shop like this near me so when I get a chance I will stop by one day, get a quote and hopefully give it a try! I can't wait to customize my hats and bags to represent PICO-8 and my games!)
One more way to turn sprites into good looking physical art is to do cross-stitching! This is a way of creating small art or even large scenes by sewing X's of different colors into rows and columns on a special fabric that helps you keep everything lined up.
The end result is a great looking embroidery design that looks a lot like pixel art!
(I need to gather the supplies for this but my wife used to enjoy doing cross-stitch embroidery, so I hope to get her to help me create some examples for this soon!)
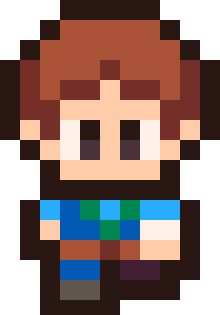
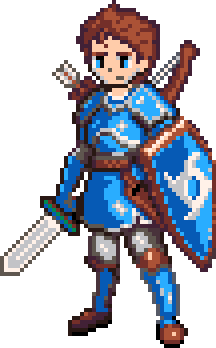
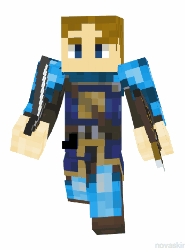
If you, your children, your friends, or your fans play games where you can customize the look of the character like Minecraft or Roblox, why not offer them a way to bring your game's character into other games with custom skin designs!
Minecraft, for example, have many simple skin editors online that you can use to design your character and make it easy to share that design with others and update their skin with it. We made our paladin hero and even gave him a sword and bow like our game.
Minecraft can be used as a 3D pixel art software!
Back when we only had colored wool to work with, I had a lot of fun building pixel art sprites of my favorite game characters floating in the sky above my houses. But today, there are many more colored blocks you can use like concrete and clay which have more solid textures and turn out more traditional looking pixel art.
Made in Minecraft by Shrimpcat.
![]()
If you have any other ideas for more arts, crafts, hobbies, etc. that we can do with our games beyond game development, please share with us. Post it on the BBS, Discord, and Reddit and feel free to tag @nerdyteachers to make sure you get our eyes on it.
We've had a ton of fun getting back into our many hobbies and interests and finding creative ways to align them with our passion of PICO-8, so we will definitely continue this project and add to this list of ideas and examples.
4966
8 Apr 2024