PICO-8
Nerdy
Hardware
hardware:
Raspberry Pi Console
![]()
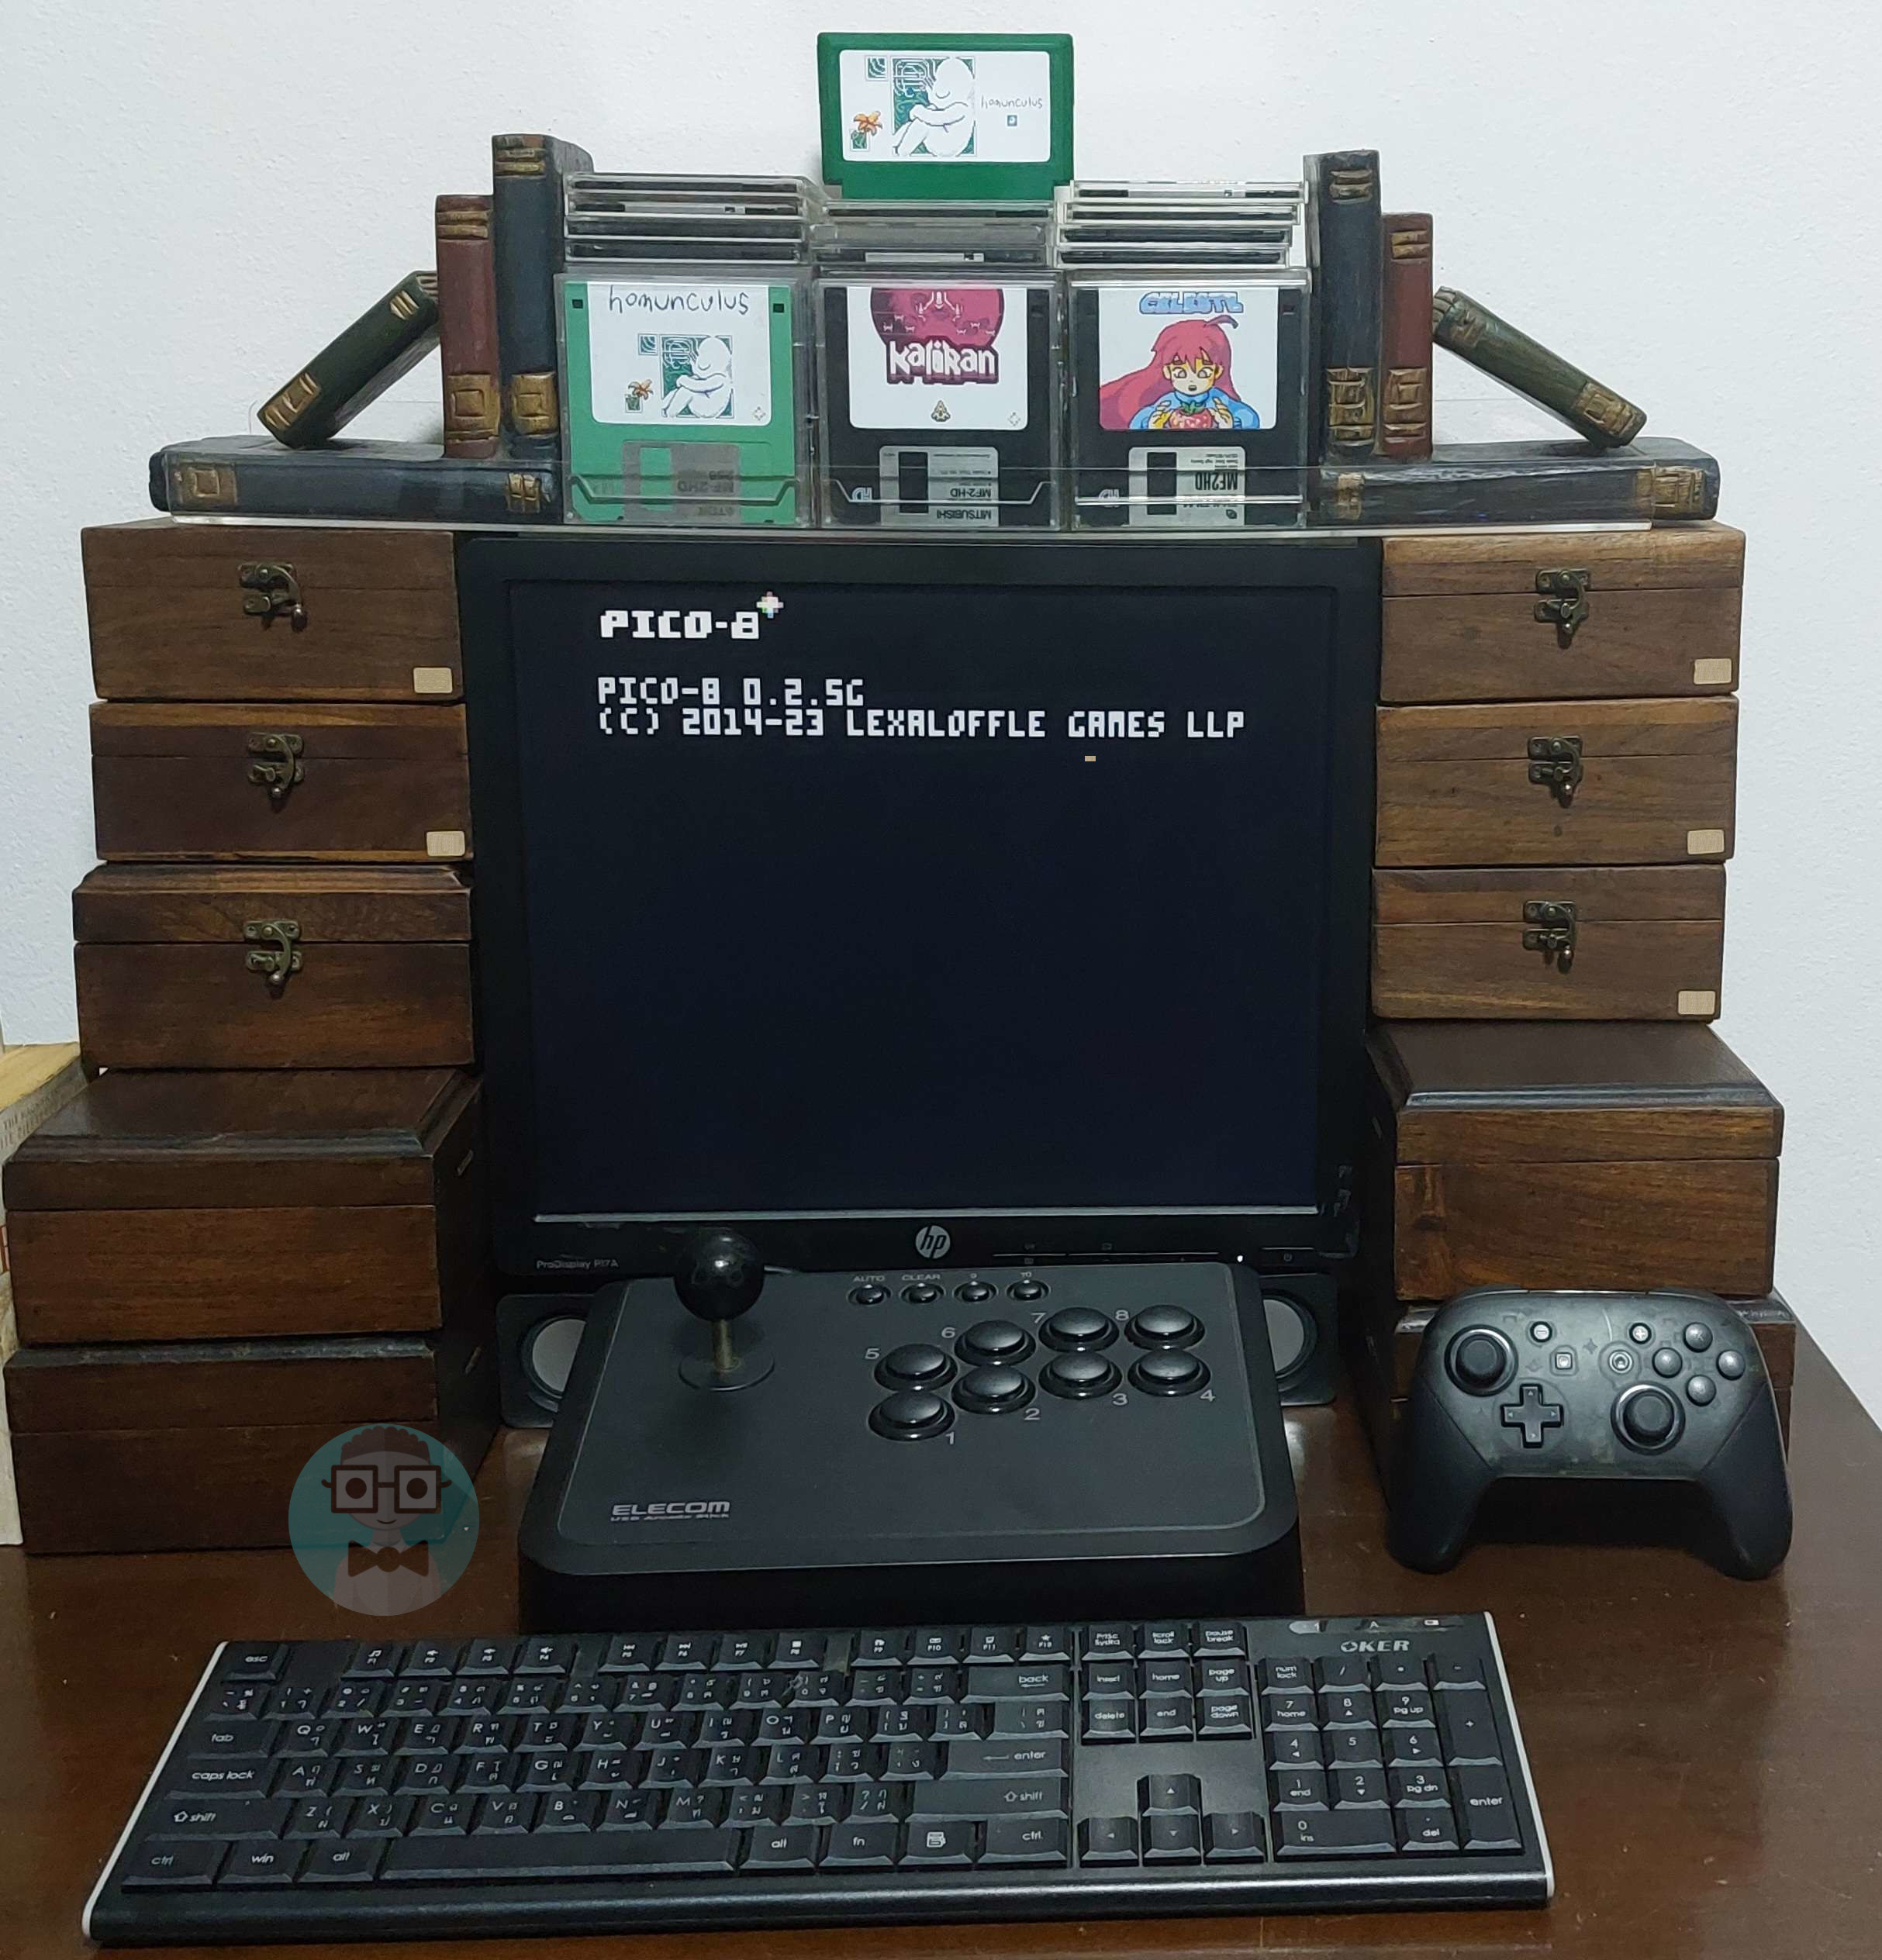
This tutorial will help you build your own PICO-8 dedicated Arcade or Console using a Raspberry Pi. It includes the options for Wifi or Offline, as well as booting games from physical Floppy Disks if you want to have a physical console with large physical game cartridges.
Prerequisites:
- Raspberry Pi (any version except Pi Pico - WIFI optional)
- SD Card
- SD Card reader/USB adapter
- Monitor and Keyboard for Raspberry Pi
- (optional) USB Floppy Disk Drive
- (optional) Floppy Disks
- (optional) USB or Bluetooth Controller
Note: This tutorial describes the process using Windows but it can be done on MacOS, Linux, etc. with small adjustments where appropriate.
![]()
This tutorial was written in collaboration with Pico-8 Gamer and by extension Grhmhome.
Related Tutorials: How to Save PICO-8 Games on Floppy Disks
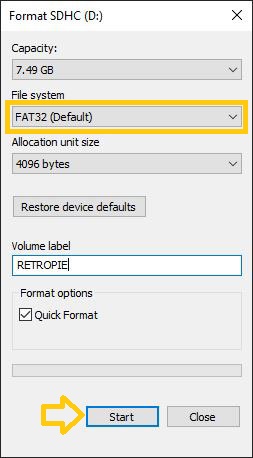
1-1. Connect your SD Card to your computer and navigate to the SD Card drive. It could be D: or E: or F:, depending on how many drives you have and how you've plugged it in.
1-2. Right click on the correct drive and click Format... which should bring up this window. Select FAT32 and give the SD Card a label that will help it stand out among others. In our example we have named it RETROPIE, but RASPI, or PICO8 will do just as well. Click Start and wait for it to finish.
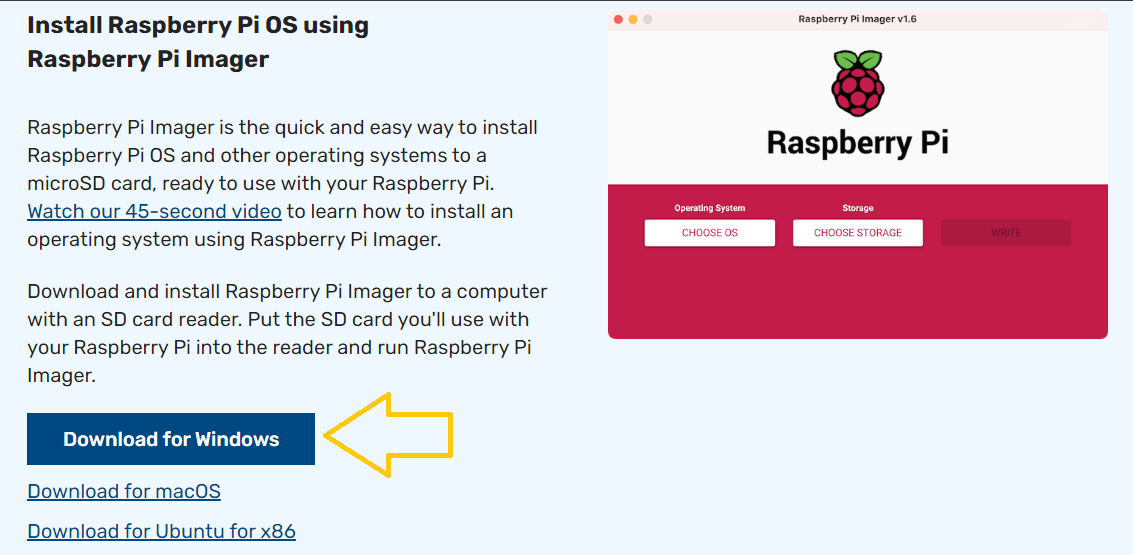
2-1. Go to RaspberryPi.com/Software/ to download the Raspberry Pi Imager from their main site. Click the Download button for your system. (We will be showing Windows installation in our examples)
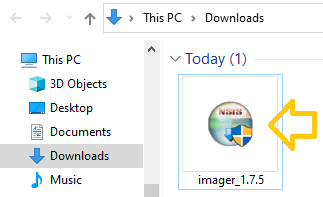
2-2. Navigate to your downloads folder and find the imager file. Double click this file to run the installer.
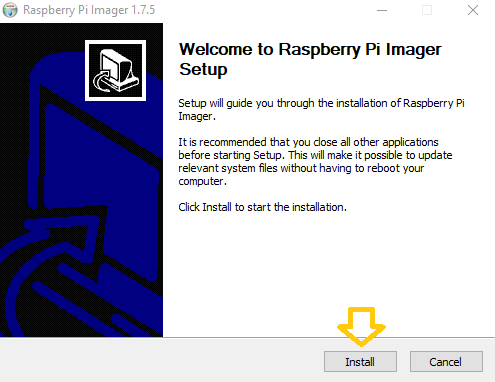
2-3. Install.
You should see this popup installation window. Click Install.
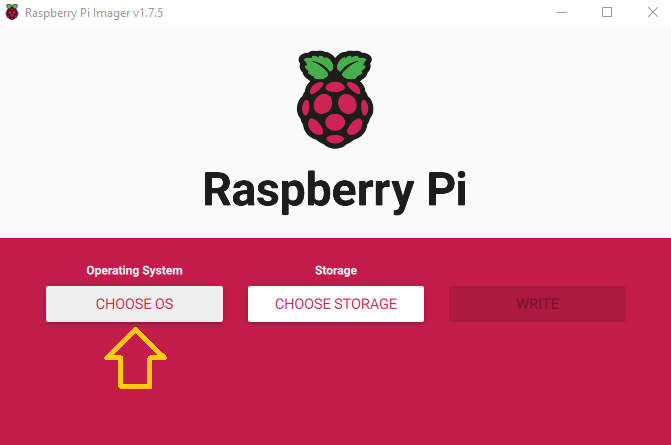
3-1. After clicking Install for the imager, you will then be brought to this window. Click CHOOSE OS.
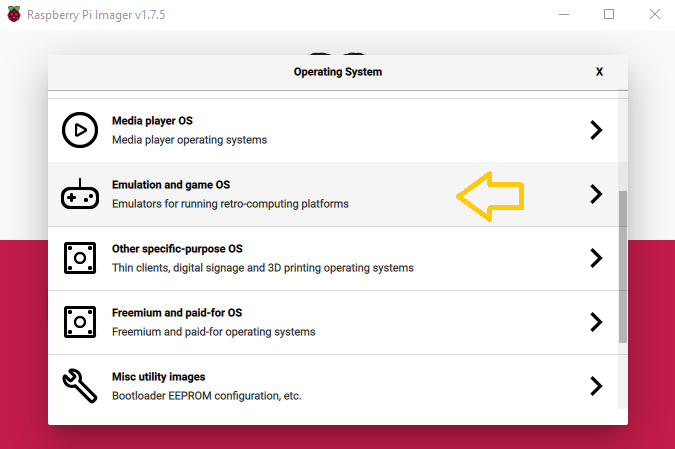
3-2. Select "Emulation and game OS" from the list of options.
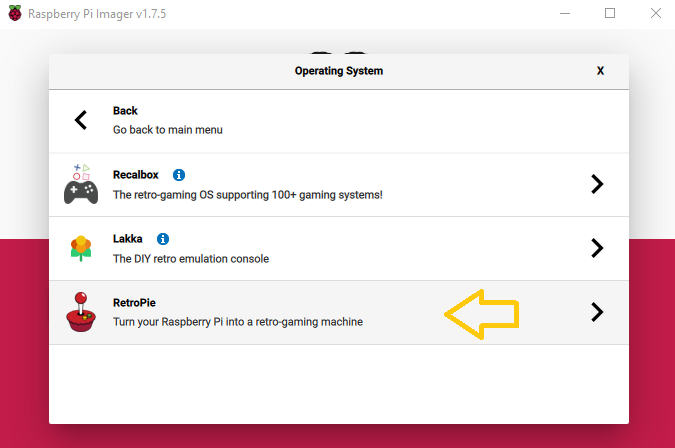
3-3. Select "RetroPie" under the next list of options.
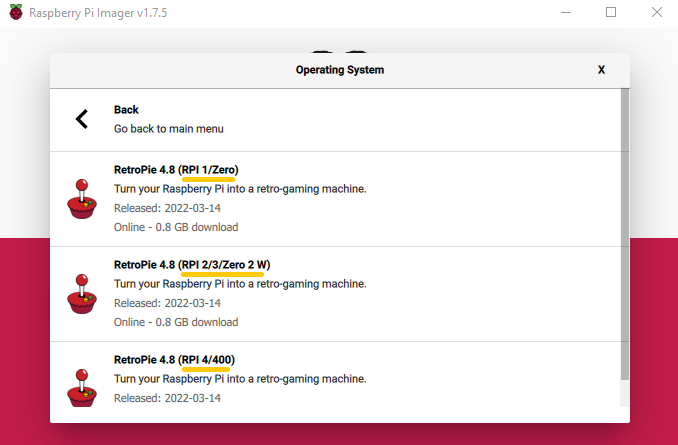
3-4. Choose the version of RetroPie that matches the Raspberry Pi Model you own (model compatability shown in the parentheses).
3-5. Plug in your SD card if you haven't yet. ClickCHOOSE STORAGE next. Select your SD card from the popup menu.
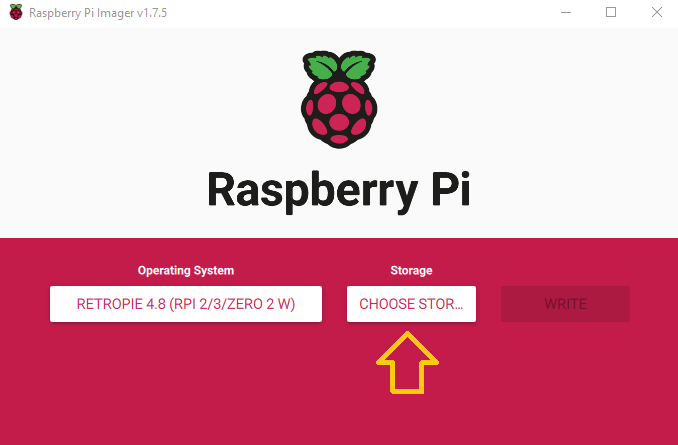
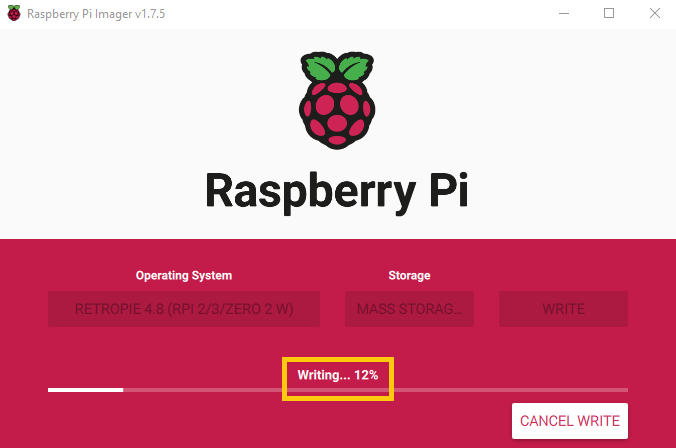
3-6. Click WRITE and wait for the progress bar to complete.
After installing RetroPie on your SD Card, you need to add the Raspberry Pi version of PICO-8.
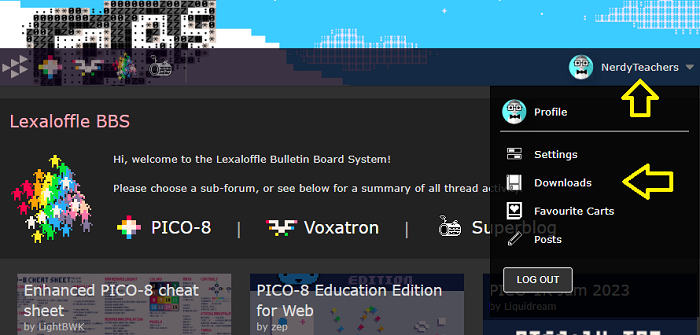
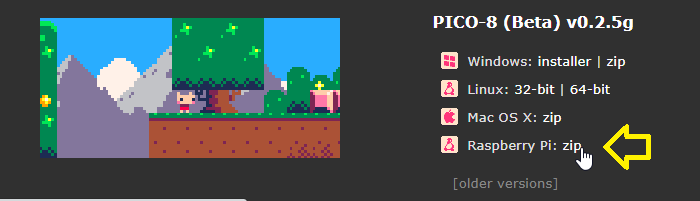
4-1. Go to Lexaloffle.com, log in to your account, and click on your user icon at the top right. Then click "Downloads" in the dropdown menu.
4-2. Look for PICO-8 among the available games you can download, and under that find "Raspberry Pi: zip". Click on the word zip to download the Raspberry Pi version of PICO-8 in a zipped folder.
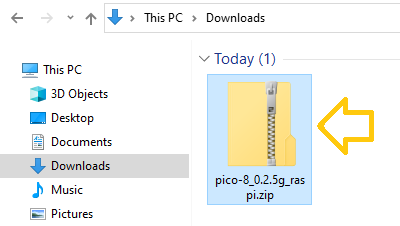
4-3. Navigate to where you downloaded this file and double click on it to open it up or right click on this file icon and you should see an option for "Extract All".
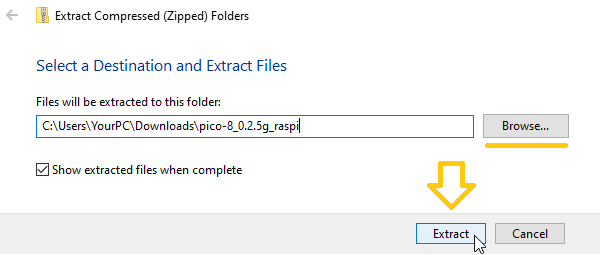
4-4. Click Extract All to extract the entire contents of this zipped folder. Remember where you extract it to so that you can open it in the next step. You can also check the box that says "Show extracted files when complete" to automatically open it.
Click Extract and wait for it to finish.
4-5. Navigate to the newly extracted folder. Inside there should be a folder named "pico-8". Copy and Paste (or simply Drag and Drop) the "pico-8" folder into your SD Card's root folder.
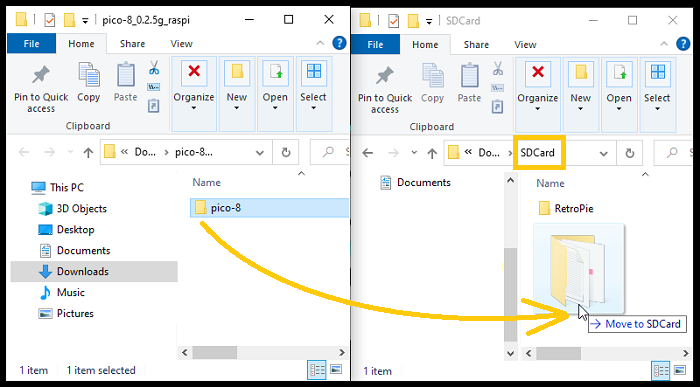
(Your SD Card may look different from this example after installing RetroPie.)
After fully preparing your SD Card, safely remove it from your computer and put the SD card in your Raspberry Pi. Connect your Raspberry Pi to a monitor and keyboard, then turn it on. The following steps are done within the terminal (command line) of your Raspberry Pi.
5-1. After fully booting your Raspberry Pi into Retropie. Exit RetroPie by pressing the F4 key to access the Terminal.
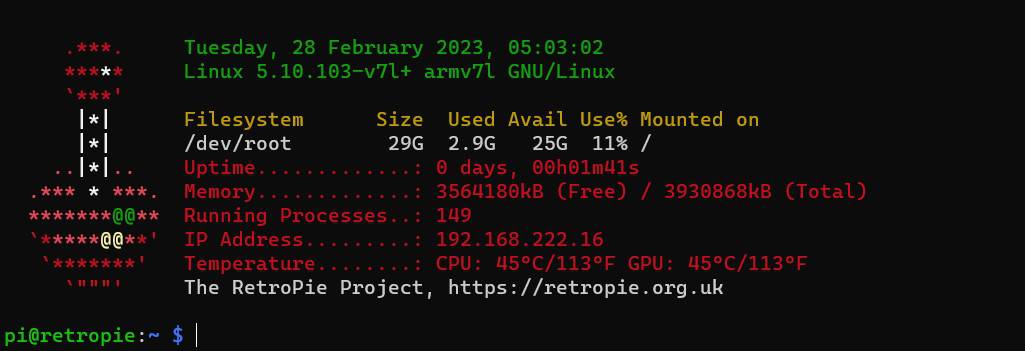
5-2. Type this command to open your Raspberry Pi Configuration Settings and press Enter.
sudo raspi-config
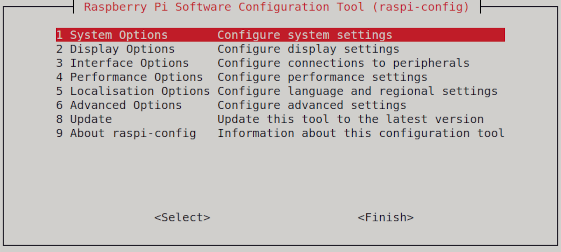
5-3. Set up your keyboard and language.
In this Config menu, navigate to and select "Localisation Options" then "Keyboard Options". Select the keyboard that you are using, it may already be correct as the default (highlighted in red), press Enter. Next, select "Other", then select your language.
In the following options select "Default", then "No Compose", then press Enter.
Wifi-1. Open the Config menu again with:
sudo raspi-config
Wifi-2. Select System Options, then Wireless LAN.
It will first ask for your SSID (the name of your WIFI connection), and then the password to that WIFI.
Floppy-1. Connect your Floppy Disk Drive to your Raspberry Pi via USB. In the Raspberry Pi Terminal, enter:
sudo lsusb
This should show that the Floppy Drive is connected. Insert a floppy disk into the drive and test if it reads data from the floppy by entering:
sudo fdisk -l
This should show something like fdisDisk /dev/sda which means it is able to read the floppy in the floppy drive.
Floppy-2. Create a Floppy Directory by entering:
sudo mkdir /media/floppy
You can name this new directory anything you want such as /picoconsole or /floppydrive. Just remember what you name it for the following steps and replace any /media/floppy with the directory name you chose.
Floppy-3. Mount the Floppy Directory by entering:
sudo mount /dev/sda /media/floppy
Floppy-4. After preparing a playable PICO-8 game on a Floppy Disk (see Floppy Disk tutorial), test-run the game from the floppy drive by entering:
/boot/pico-8/pico8 -root_path /media/floppy -run /media/floppy/run.p8.png
Change run.p8.png to the title you saved the PICO-8 cart in your floppy disk. We name all of our floppy disk game files as the same filename ("run"), to make it easier for the Raspberry Pi to automatically find and run across different floppy disks. The different floppy disks simply save a different game under the same filename. So you can name them what you'd like as long as you keep it consistent.
Floppy-5. Prepare a file that will automatically run on startup of your Raspberry Pi, and either run the game in the floppy or open PICO-8 in Splore. We are going to use the built-in text editor called "nano". In the terminal enter:
nano
This will open a blank, unnamed file. In this file, type in each line of this code:
#!/bin/bash
sudo mount /dev/sda /media/floppy
if [ -f "/media/floppy/run.p8.png" ]
then
exec /boot/pico-8/pico8 -root_path /media/floppy -run /media/floppy/run.p8.png
else
exec /boot/pico-8/pico8 -splore
fi
exit 0
Don't forget to make the appropriate changes if you named your directory or files differently in earlier steps. Possible changes in the above code are /dev/sda and /media/floppy and run.p8.png; but if you have been following along with this tutorial exactly, then you don't need to change anything.
When you finish, press Ctrl+O to save the file and name it run.sh which we will use as the startup program.
Then press Ctrl+X to exit the text editor and return to the terminal.
Floppy-6. Make this run.sh file an executable file by entering:
chmod +x run.sh
Floppy-7. Copy the run.sh executable file into the local binaries folder by entering:
sudo cp run.sh /usr/local/bin
Floppy-8. Edit the bootup script named rc.local by entering:
sudo nano /etc/rc.local
Erase all the text in this file and replace it with:
#!/bin/ sh -e
exec run.sh
exit 0
Save with Ctrl+O and exit with Ctrl+X. Enter Y for "yes" if it asks you to confirm overwriting the file. This will have your Raspberry Pi bootup using the run.sh file we created earlier, which will check if a floppy disk is in the floppy drive to automatically load and run that game.
Autostart-1. Open the RetroPie bootup script named autostart.sh by entering:
sudo nano /opt/retropie/configs/all/autostart.sh
Next, you will edit this file to specify exactly how you want your Raspberry Pi to startup and how it should automatically load PICO-8. You have 3 options, A, B, or C:
Autostart-A. If you want to automatically startup PICO-8 normally, then erase all the text in this file and replace it with:
/boot/pico-8/pico8 #auto
Autostart-B. If you want to automatically startup PICO-8 in Splore, then erase all the text in this file and replace it with:
/boot/pico-8/pico8 -splore #auto
Autostarting in Splore is a good idea if:
- You only want controllers connected to your PICO-console, no keyboard.
- You have Wifi connected and want to use your PICO-console mainly for playing games via the online library, Splore.
- You want to play from a local selection of games and use Splore to easily select which game to play with a controller.
Autostart-C If you are using the Floppy Disk setup to play games and have already gone through the Floppy Disk Setup section, then erase all the text in this file and replace it with:
run.sh #auto
Autostart-2. After editing this file with your preferred way to startup your Raspberry Pi, save with Ctrl+O and exit with Ctrl+X. Enter Y for "yes" if it asks you to confirm overwriting the file.
6-1. Test out the speed of your autostart and witness the various boot sequences that your Raspberry Pi and RetroPie goes through before eventually starting PICO-8.
6-2. Disable Rainbow Splashscreen
sudo nano /boot/config.txt
Navigate to the bottom of the file and add this line:
disable_splash=1
Press Ctrl+O to save, then Ctrl+X to exit, and press Y to confirm overwriting the file.
6-3. Disable Intro Text
sudo nano /boot/cmdline.txt
Navigate through the file, changing each of these lines:
console=tty becomes console=tty3
loglevel=x becomes loglevel=3
Then at the end of the file, add logo.nologo quiet fastboot. When you are done, the file should look similar to this:
console=serial0,115200
console=tty3
root=x
rootfsttype=x
fsck.repair=x
rootwait
loglevel=3
consoleblank=x
plymouth.enable=x
logo.nologo quiet fastboot
Press Ctrl+O to save, then Ctrl+X to exit, and press Y to confirm overwriting the file.
6-4. Disable Unnecessary Services
Type each of these commands into the terminal and press ENTER. This will help shave off more seconds of the bootup time and get you into PICO-8 quicker.
Tip: You can use the up arrow to automatically rewrite the last command which you can then edit before pressing ENTER. This is so that you don't have to manually type the repeating parts of the commands below:
sudo systemctl disable dhcpcd.service
sudo systemctl disable networking.service
sudo systemctl disable raspi-config.service
sudo systemctl disable dphys-swapfile.service
sudo systemctl disable apt-daily.service
sudo systemctl disable hciuart.service
sudo systemctl disable avahi-daemon.service
sudo systemctl disable triggerhappy.service
sudo systemctl disable smbd.service
sudo systemctl disable nmbd.service
sudo apt purge --remove plymouth
sudo apt remove --purge x11-common
sudo apt autoremove
And that is it! Reboot your Raspberry Pi and have fun with your new PICO-console!
DEBUG!
If you need to return to the terminal to make further changes, but it automatically boots into PICO-8, then
(1) open the PICO-8 terminal with ESC
(2) type "SHUTDOWN" and press ENTER in the PICO-8 terminal
(3) as your Raspberry Pi reboots, press ENTER when you see the RetroPie logo. This will stop the autostart process and leave you in the Raspberry Pi Terminal.
![]()
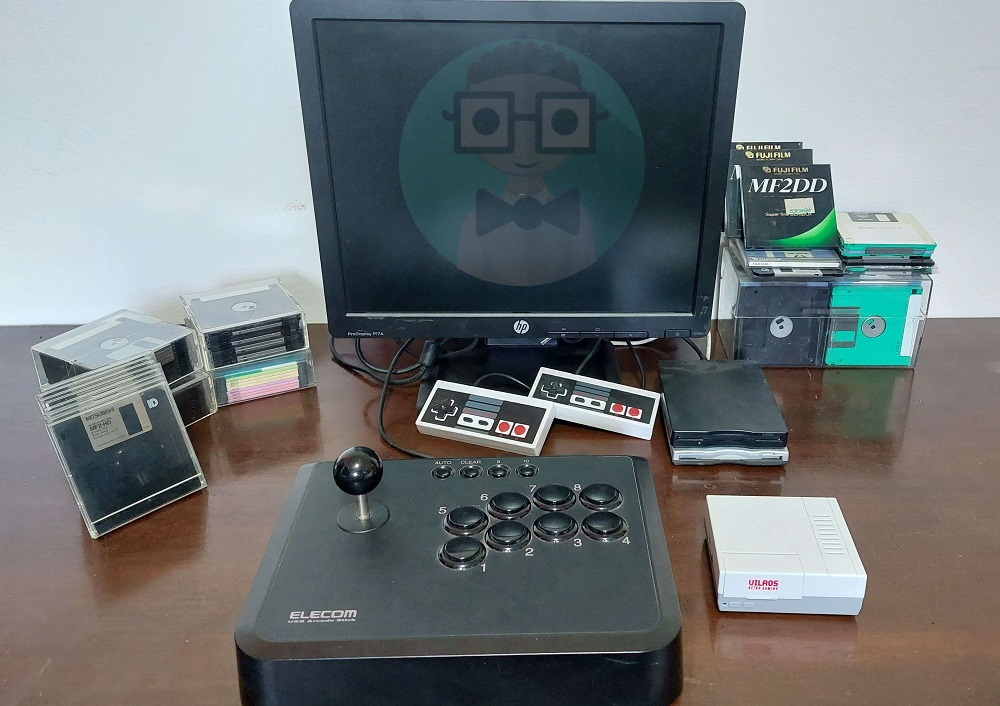
Components of this build
12444
5 Oct 2023