PICO-8
Nerdy
Game Mechanics
game mechanics:
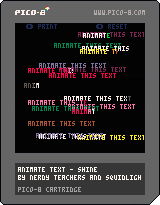
Animate Text - Shine
![]()
Shiny Wipe Effect!
This is a more advanced text animation that builds off of the Wipe animation. Read and understand the tutorial about how to Animate Text - Wipe Effect before adding this shine effect to it.
What we will be building in this tutorial:
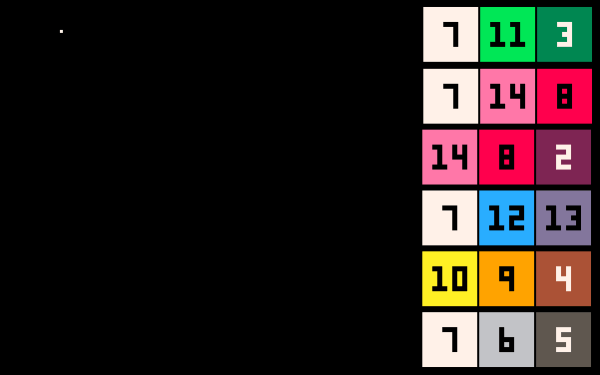
To add a "shine" to the text we need to think about colours. There are several light to dark gradients that are available in pico-8.
We like using the white (#7), green (#11), dark green (#3) gradient for the feeling of old consoles however there are many other gradients that work.
Some that work well are:
At the end of this tutorial, try to play around with the PICO-8 palette to find the right combination of colors to fit your game. You will be able to add more than 3 as well so you'll be able to get really creative.
At the end of the Wipe animation tutorial, we have this draw_txt() function:
function draw_txt()
	for t in all(texts) do
		clip(t.x,t.y,t.curr_w,t.h)
		print(t.txt,t.x,t.y,t.c)
	end
	clip()
end
To quickly review what that is doing:
First, it loops through all entries of text information in the texts table and will treat each entry as T.
Second, it will clip the region of the screen just around the text we are about to write, and only as wide as curr_w will allow. Remember that curr_w will be updated to increase the width of this clipping region, and that is what reveals more of the text.
Third, it prints the full string of text at the (X,Y) position and in the color that was saved with the text string. Even though it tries to print the full string, the clipping region will prevent it all from being actually drawn.
Fourth, after we close the loop, and we have finished drawing all of the text in the texts table, we reset the clipping region with clip() so that other things can be drawn on the screen.
Printing Layers of Text
Now all we have to do is print this same text more than one time in the same location, which will act like layers. We can change the color that each layer prints in and the clipping region also needs to be offset so you can see the other layers underneath.
Like this:
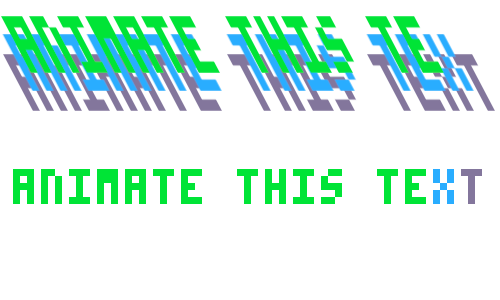
PICO-8 doesn't actually have layers on the screen, but whatever you print first in the code can be overwritten by the code after it. So by printing in the same location, we can think of them as printing in layers like the above image.
Now let's take the draw function and just print the same line 3 times:
function draw_txt()
	for t in all(texts) do
		--first
		clip(t.x,t.y,t.curr_w,t.h)
		print(t.txt,t.x,t.y,t.c+2)
		--second
		clip(t.x,t.y,t.curr_w-3,t.h)
		print(t.txt,t.x,t.y,t.c+1)
		--third
		clip(t.x,t.y,t.curr_w-6,t.h)
		print(t.txt,t.x,t.y,t.c)
	end
	clip()
end
We copied both the clip() and print() lines of code and then we subtracted from the curr_w to give that offset of each layer, and we also added to the color number as a simple way to change the color of each layer.
This leaves us with a problem however as the shine never leaves the text fully.
Exercises:
Try to solve the problem of the text not fully animating the upper layers all the way to the end.
Try to create a way to specify exactly which colors to use when we create the text.
(Try these exercises before moving on. Solutions in the next sections.)
First, let's quickly solve the problem of the animation layers not completing their line of text. This happened because of the -3 and -6 pixels we took off of the clip width.
If you tried to fix this by changing the width of the text, then that is exactly what we had in mind. We will do that in the create_txtfunction:
function create_txt(txt,x,y,c)
	--test print
	clip(0,0,0,0)
	local w,h=print(txt,0,0)  --get width, height
	clip()

	--store text data
	local text={
		txt=txt,
		x=x,
		y=y,
		w=w+6, --added 6 here
		h=h,
		c=c,
		curr_w=0
	}
	add(texts,text)
end
This is where we set up the wipe text in the other tutorial. This function takes a string ( txt ), a position ( x , y ), and a single color ( c ). It then calculates the width and height of the full string with an invisible test print (Explained in the Text Wipe Tutorial). It prepares all of this data into a local table of text data and adds that to the global texts table to be animated.
And by adding to the overall width of the text, this allows the clipping region to continue for all of the layers, so that the top-most layer ends at the actual ending of the full string.

Next we want to change this function from taking only one color, to being able to accept and store multiple colors. Your first instinct might be to just add more parameters to the function like this:
function create_txt(txt,x,y,c1,c2,c3) If we do this, then we can call create_txt()and add 3 colors for C1, C2, and C3. But what if we want more or less than 3 colors? We should try to build our functions as flexible as possible so that we can use them in more ways than one.
Instead of adding more parameters, we are just going to leave color ( C ) as a single parameter but change the type of variable it will expect to get. Right now, it expects a color number. But we want to pass it multiple color numbers and we can use a table to do that.
function create_txt(txt,x,y,c)
	c = c or { 7, 11, 3 }  --[1]

	--test print
	clip(0,0,0,0)
	local w,h=print(txt,0,0)
	clip()

	--store text data
	local text={
		txt=txt,
		x=x,
		y=y,
		w=w+(#c-1)*3, --[2]
		h=h,
		c=c,
		curr_w=0
	}
	add(texts,text)
end
[1] - c = c or { 7, 11, 3 }
This is how we prepare a function for having an empty parameter. You already know that the print() function has an optional color parameter that you can include to specify a color for the text, or ignore and it will use the default color. With this line of code, we are making the C argument optional. If C is included in the function call, then it will set to itself ( C=C ) OR if C is nil because nothing was sent, then we set C to be this default table: {7,11,3} You can change this default to whatever colors you want.
[2] - w = w + (#c-1) *3
We also had to change the width to be based on the number of colors we want to include. When we had 2 extra colors, and subtracted 3 from the clipping width for each, then we had to add 6 to make sure the final color layer ends at the end of the string. But what if we have 4 colors, or 5? Well then we need to do some math. So if we will subtract 3 pixels for every layer of color, then we need to reverse that. Take the width and add 3 pixels times the number of colors minus the first layer. That gives us: Width plus ( W+ ), the total number of colors ( #C ) minus 1 layer ( -1 ) times 3 pixels ( *3 ).
The last thing we have to do is prepare the draw function to deal with this table of colors, and simplify it to use a loop.
Exercises:
Try to make the draw code more efficient by using a loop instead of writing the same lines multiple times.
Try to make the clip() and print() calls based on the layer number you are looping through.
(Try these exercises before moving on. Solutions in the next sections.)
When we added more layers to the draw code above, we knew there would be only 3 colors but now we need to prepare it for a variety of amount of colors and still work correctly. For that, we will use a loop to print each layer of the text in a different color, for as many colors as we give it in the color table.
Note: Any time you find that you are copy/pasting your code, you should try to find a way to turn that repeated code into a separate function or loop.
We already use one loop ( for t in all(texts) ) to go through each text string in our texts table. Then, inside of that loop, we want to repeat clipping and printing each layer of text. So we will end up having a loop inside another loop! Check it out:
function draw_txt()
	for t in all(texts) do
		for layer=0,#t.c-1 do               --[1]
			clip(t.x,t.y,t.curr_w-3*layer,t.h) --[2]
			print(t.txt,t.x,t.y,t.c[layer+1]) --[3]
		end
	end
	clip()
end
[1] - for layer=0,#t.c-1 do
This is our inner loop that will handle repeating the clipping and printing for each color layer. layerwill keep track of which layer (and loop number) that we are on. We start it at 0 and it will automatically increase by 1 by default in a for loop. We need it to stop repeating based on the total number of colors we gave this text to be printed in. #t.C is the total count (#) of the text's (T) color table (C). Now be careful, because if there are 5 colors in the table, then the table count will be 5 but we actually want to stop at layer #4 because the first layer is layer #0. So we subtract 1 from the total count ( #c-1 ). After the layer count, reaches this color count, then the loop will stop printing layers.
[2] - clip(t.x,t.y,t.curr_w-3*layer,t.h)
Here we need to use some math to take the clipping width and subtract 3 pixels based on which layer we are printing. So t.curr_w - 3 * layerwill do that. Take a second to double check how that works by plugging in possible numbers for the clipping width and the layer number. For example: What if the current clipping width of each layer is 10, and there are 3 layers (#0-2). What will the clip width be for layer 0, 1, and 2? And does that create the offset we want to display a little of each layer?
[3] - print(t.txt,t.x,t.y,t.c[layer+1])
Here we are printing the layer of text, at the same (X,Y) position as the others, but now we are using the correct color based on the layer number. To get the color number out of the color table we do C[ index ]where the index is the number of the entry in the table. Lua tables start at an index of 1, so the first color in the table is C[1], and the second is C[2], and so on. We could do C[layer] if the layer number matched the index number, but remember that the first layer is 0 and the first color is index 1, so we need to add one to the layer number to get the correct index number: c[layer+1]
That is it! Have fun getting creative with using this text animation in your next project.

Bonus tip: What happens when you order the colors dark to light?
function _init()
	texts={}

	--demo color tables
	c_tables={
		--light to dark
		{7,11,3},
		{7,14,8},
		{14,8,2},
		{7,12,13},
		{10,9,4},
		{7,6,5},
		--dark to light
		{3,11,7},
		{8,14,7},
		{2,8,14},
		{13,12,7},
		{4,9,10},
		{5,6,7},
	}
end

function _update60()
	update_txt()

	--demo
	if btnp(➡️) then
		create_txt("animate this text",rnd(70),rnd(120),rnd(c_tables))
	elseif btnp(⬅️) then
		texts={} --reset
	end
end

function _draw()
	cls()
	draw_txt()

	--demo
	print("➡️ print",10,0,1)
	print("⬅️ reset",80,0,1)
end

function create_txt(txt,x,y,c)
	clip(0,0,0,0)
	local w,h=print(txt,0,0)
	clip()
	local text={
		txt=txt,
		x=x,
		y=y,
		w=w+(#c-1)*3,,
		h=h,
		c=c,
		curr_w=0
	}
	add(texts,text)
end

function update_txt(text)
	for t in all(texts) do
		if t.curr_w < t.w then
			t.curr_w+=1
		end
	end
end

function draw_txt()
	for t in all(texts) do
		for layer=0,#t.c-1 do
			clip(t.x,t.y,t.curr_w-3*layer,t.h)
			print(t.txt,t.x,t.y,t.c[layer+1])
		end
	end
	clip()
end
This tutorial created in collaboration with SquidLight.
4756
10 Mar 2023