PICO-8
Nerdy
Game Mechanics
Game Mechanics:
Animate Text - Wipe
![]()
Text Effect Introduction!
It is nice to add some text effects to our pico-8 games. They give a sense of life to our games. There are many ways to add effects, but here we will show you how to produce this effect:
function _draw()
cls()
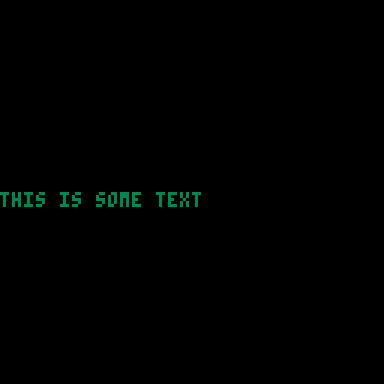
print("this is some text",0,64,3)
endThis is the basic way to print text on your game screen. First, we clear the screen to black with cls(). Then we print the text "this is some text" at the left vertical middle (0,64) in dark green (color #3).
The clip() command can be used to make sure that we are only drawing to a certain part of the screen. For example, in this gif we are clearing the screen, then clipping a region around the player, and then we draw everything else. And the only area anything is drawn to the screen is within the clipped region:
Here is the built-in clip function which does that:
clip( x, y, w, h, clip_previous )The arguments to clip are as follows:
x |
The x position that we will draw from. (left side) |
y |
The y position that we will draw from. (top side) |
w |
The width in pixels that we crop to. |
h |
The height in pixels that we crop to. |
clip_previous |
(optional) Not used in this project. If true then the current clipping region is the intersection between the previous clip command and the current clip command. Usually this is not necessary. |
After the clip command has been issued then all future graphics functions within the same frame are clipped to the region specified.
We can use the power of this command to give us the first part of our puzzle. How to draw a partial letter and how to increase the draw region.
Let’s change our listing to include a clipping region
function _draw()
cls()
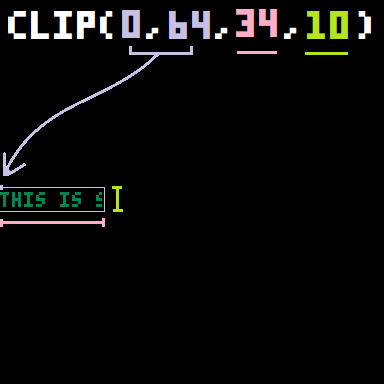
clip(0,64,34,10) --[1]
print("this is some text",0,64,3)
clip() --[2]
end
[1] - Set the clipping region to x=0 (left of screen) , y=64 (vertical position of text), w=34 (only draw 34 pixels of the text), h=10 (Only draw ten pixels high)
[2] - Resets the clipping region so no other graphics functions are effected.
As you can see this effectively cuts off what we print and is exactly what is needed to start producing our effect.
Exercises:
Try moving the clipping region so that you can only see the word "some".
Try clipping more than one line of text.
If you know looping structures, try making the clipping region start from nothing at the left gradually increasing per frame until it shows the entire text. Answer in next section
To animate the text slowly expanding we need to use variables.
We are going to do the following:
Set a global variable that sets the current clipping region.
Every frame increment this value until it reaches the right of the screen.
Change the clip to use this variable.
function _init()
	clip_width=0  --[1]
end

function _update()
	if clip_width<128 then --[2]
		clip_width = clip_width + 1 --[3]
	end --[4]
end

function _draw()
	cls()
	clip(0,64,clip_width,10) --[5]
	print("this is some text",0,64,3)
	clip()
end
[1] - Sets up a global variable to 0 for the clip width
[2] - Checks if the width is less than the full width of the screen.
[3] - Increments the clipping region
[4] - Ends the if condition
[5] - Now uses the clip_width variable to specify the height of the clipping
Result:

That animation is a little slow. We can make it faster and smoother by increasing the number of frames PICO-8 runs at.
To do this, we use _update60() instead to run the update and draw functions 60 frames per second instead of the normal 30. And this is what it looks like:

Exercises:
Try adding another text to animate.
The current listing clips to the full width of the screen. However, the text takes up less room than the full width of the screen. Try to get the full width of the text so you can animate up to that width instead of the whole screen.
The current listing has one variable for width. If you had more than one line of text how would you animate these separately?
Try repeating the clipping animation when finished.
Try reversing the animation once the full line is displayed.
Try changing the speed of the animation.
So far, the animation only works once, for one line of code. But now we are going to create 3 custom functions that will allow us to reuse this text animation as many times as we want, with as many lines of text as we want.
Before we can do anything, we will need to have an empty table to hold all of the data for multiple lines of text. So we will first create a global variable in the init function named "texts" and set it as an empty table using curly braces: "{ }"
function _init()
	texts={}
end
Now that the texts table is ready, we can create a custom function for preparing each string of text we want to animate. Eventually we will still use print() to write to the screen, so we will want to pass the same information to our custom function that we would normally pass to print. Let's name it create_txt.
To create this custom function we first write:
function create_txt(txt,x,y,c)

end
Note: This function will not replace print() and we only want to call it one time to prepare the text, not many times in _draw like you would with print().
The parameters inside of the parentheses are what we have prepared it to receive. They are just like print:
txt |
The string of text we want to print. |
x |
The x position that we will draw from. |
y |
The y position that we will draw from. |
c |
The color number of the text. |
And here is what we want to do inside of this function:
function create_txt(txt,x,y,c)
	clip(0,0,0,0)  --[1]
	local w,h=print(txt,0,0)   --[2]
	clip() --[3]
	local text={  --[4]
		txt=txt,
		x=x,
		y=y,
		w=w,
		h=h,
		c=c,
		curr_w=0 --[5]
	}
	add(texts,text)  --[6]
end
[1] - Clip to draw nothing becuase the width and height arguments for the allowed drawing area are both set to 0.
[2] - We do an invisible print because print() can return the bottom right pixel location after it finishes printing. If we print something starting at (0,0) then what print returns is the number of pixels wide and tall the string is. So we can store those as local variables w (width) and h (height)
[3] - Reset clip to allow drawing on the whole screen again.
[4] - Create a local table named "text" to hold the information we want to save about this text.
[5] - curr_w is the current width that the animation is on. This will keep track of how wide the clipping region is so we can extend it and reveal that specific line of text on the screen.
[6] - Add this local "text" table to the global "texts" table.
To help you visualize what we are doing here, here is an example of using this function for 2 different strings:
create_txt("hello", 63, 7, 7)
create_txt("world", 60, 17, 15)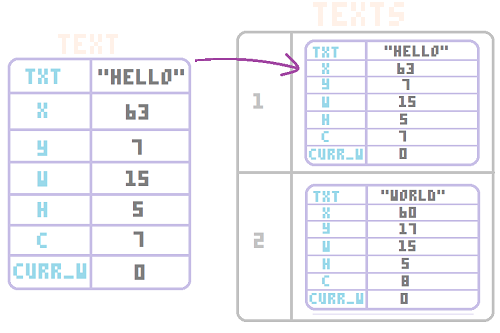
We set this "text" string and data to a table first, then we set that table inside of the "texts" table.
And each set of string data is saved this way inside of the global "texts" table.
In order to actually animate the text over multiple frames, we need to increase the curr_w variable of the text inside of our _update() or _update60(), but we will keep the main update function clean and organized by simply calling another custom function that will do the updating, named "update_txt".
function _update60()
	update_txt()  --[1]
end
[1] - This will call our soon-to-be update text function to run every updated frame of the game.
And now we will build that function:
function update_txt(text)
	for t in all(texts) do  --[2]
		if t.curr_w < t.w then  --[3]
			t.curr_w+=1  --[4]
		end
	end
end
[2] - This is a for variable in all(table) loop which we commonly use to loop through each entry in a table and give the entry our own local variable name inside of this loop. We use T for our local variable. Remember that "texts" is a table with tables inside of it. Each inner table has all the data for one string of text being animated. So each inner table can be referred to as just Tinside of this loop.
[3] - Here we check if the text's current width (t.curr_w) is less than the text's full width (t.w). We don't want to change anything if we have finished printing the whole line of text, so we make sure that we are not at the end before we do the next part.
[4] - Since we are not finished printing the whole line, then we want to increase the length of the displayed text by adding 1 to the current width (t.curr_w). Just like we showed earlier, we will be using the current width to determine where the clip should end each frame. So as the current width grows, so does the clip region, and so more text appears.
Just like update, we will also keep the main draw function clean by making a custom function and calling it inside of the main _draw() function.
function _draw()
	draw_txt()  --[1]
end
[1] - call the soon-to-be custom function named draw_txt to run every frame of the game.
function draw_txt()
	for t in all(texts) do  --[2]
		clip(t.x,t.y,t.curr_w,t.h)  --[3]
		print(t.txt,t.x,t.y,t.c)  --[4]
	end
	clip()  --[5]
end
[2] - To loop through all of the texts we use the same for variable in all(table) loop, just like in update.
[3] - Inside of that loop, we refer to each text as T and we begin by clipping the region we allow to print in. We start the clipped region at t.x and t.y and we end it at t.curr_wand t.h. This way, it will print only the width that the update_txt() function is allowing.
[4] - Here we print the text (t.txt) at X position (t.x) and Y position (t.y) and in color (t.c). We set all of these earlier when we created the text table in the function create_txt().
[5] - Reset the clipping region, once we have finished looping through all of the texts, so that the whole screen can be drawn on again.
And here is a slowed down visualization to help see how we are putting all of this together to use curr_w to animate the clipping region and make it look like we are animating the text.
function _init()
	texts={}

	--demo test with random position and color
	create_txt("animate this text",rnd(70),rnd(120),1+rnd(14))
end

function _update60()
	update_txt()
end

function _draw()
	cls()
	draw_txt()
end

function create_txt(txt,x,y,c)
	clip(0,0,0,0)  --[1]
	local w,h=print(txt,0,0)
	clip()
	local text={
		txt=txt,
		x=x,
		y=y,
		w=w,
		h=h,
		c=c,
		curr_w=0
	}
	add(texts,text)
end

function update_txt(text)
	for t in all(texts) do
		if t.curr_w < t.w then
			t.curr_w+=1
		end
	end
end

function draw_txt()
	for t in all(texts) do
		clip(t.x,t.y,t.curr_w,t.h)
		print(t.txt,t.x,t.y,t.c)
	end
	clip()
end
This tutorial created in collaboration with SquidLight.
7467
4 Mar 2023