bitesize games:
Nerdy Pong
![]()
Explanation of Code!
Before you start making this game, you should know some of these basics of coding.
1. Variables
3. Tables
This game uses tables to hold almost all of the variables. So it is important to either already be comfortable reading and writing code with tables, or at least be prepared to focus on learning that here.
You will see a table for the player, computer, and the ball. These each hold similar information about each of those game objects, such as the position (x,y), the size (w,h), and the color (c).
Before we write the init function, first we will set up the global variables of the game.
player_points = 0
com_points = 0
scored = ""
These are the first variables created for this game. By being written first, outside of any function, they will not be reset when the game resets each round. So the points will be remembered while playing multiple rounds.
player_points |
a number for the player's starting score. |
com_points |
a number for the computer's starting score. |
scored |
a word ("string") for who scored the last point. |
PICO-8 runs the _init() function (short for "initialize") as the first function to run in the game. Even though _init() is optional, in these bite-size games, we often use it to set up the game variables and create a good point to reset the game each time we want to play a new round.
function _init()
	  --variables

	  player={
		  x = 8,
		  y = 63,
		  c = 12,
		  w = 2,
		  h = 10,
		  speed = 1
	  }
	  com={
		  x = 117,
		  y = 63,
		  c = 8,
		  w = 2,
		  h = 10,
		  speed = 0.75
	  }
	  ball={
		  x = 63,
		  y = 63,
		  c = 7,
		  w = 2,
		  dx = 0.6,
		  dy = flr(rnd(2))-0.5,
		  speed = 1,
		  speedup = 0.05
	  }

	  ...
  end
There are 3 tables of data created and saved by the code above:
player
| Key | Value |
|---|---|
| x | 8 |
| y | 63 |
| c | 12 |
| w | 2 |
| h | 10 |
| speed | 1 |
com
| Key | Value |
|---|---|
| x | 117 |
| y | 63 |
| c | 8 |
| w | 2 |
| h | 10 |
| speed | 0.75 |
ball
| Key | Value |
|---|---|
| x | 63 |
| y | 63 |
| c | 7 |
| w | 2 |
| dx | 0.6 |
| dy | 0.75 |
| speed | 1 |
| speedup | 0.05 |
Inside each of those tables are similar keys that will be the variables used often in the code.
x |
the position on the X axis (the number of pixels from the left). |
y |
the position on the Y axis (the number of pixels from the top). |
c |
("color") a number from 0 to 15 that represents one of the PICO-8 color options. |
w |
("width") a number of pixels wide for a paddle or ball. |
h |
("height") a number of pixels tall for a paddle. |
speed |
a number for how many pixels a paddle or ball should move each frame. |
speedup |
a number for how much the ball should speed up by when it hits a paddle. |
dx |
("delta" change in X) a number for the X axis momentum on the ball to move left and right. |
dy |
("delta" change in Y) a number for the Y axis momentum on the ball to move up and down. |
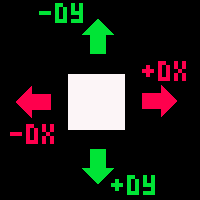
Most of those are self explanatory, but DX and DY are often harder to understand if you are using them for the first time. In this game, they are used for keeping track of the current direction and speed of the ball.
If DX is positive, then the ball is moving right. |
If DX is negative, then the ball is moving left. |
If DY is positive, then the ball is moving down. |
If DY is negative, then the ball is moving up. |
The DX and DY are not only positive or negative, but also can be different amounts, which means how fast the ball is moving.
If DX is close to zero, then the ball moves slowly left or right. |
If DX is far from zero, then the ball moves quickly left or right. |
If DY is close to zero, then the ball moves slowly up or down. |
If DY is far from zero, then the ball moves quickly up or down. |
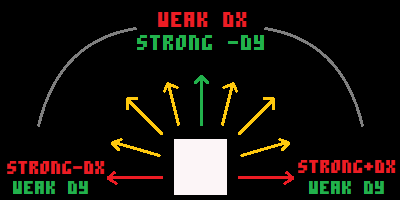
When the DX and DY work together at different amounts, it creates a ball that can bounce at different angles, making the ball movement more interesting.
Under all of those game variables, let's prepare the game to play a sound whenever the game restarts.
function _init()
	  --variables
	  ...

	  --sound
	  if scored == "player" then
		  sfx(3)
	  elseif scored == "com" then
		  sfx(4)
	  else
		  sfx(5)
	  end

	  ...
end
This code is also in the _init() function but checks the variable (scored) that was created outside of the function.
The code reads as follows: If the scored variable is the word "player", then play sound effect number 3 (happy sound). But if it is the word "com", then play the sound effect number 4 (sad sound). And if neither of those, then play sound effect number 5 (basic intro sound).
So this code checks who scored the last point, and plays the appropriate sound whenever the _init function is called to reset the game.
The last set of variables we will prepare will help define the boundaries of the court. This will make it easier to draw the court and update on collision.
function _init()
	  --variables
	  ...

	  --sound
	  ...

	  --court
	  court_left = 0
	  court_right = 127
	  court_top = 10
	  court_bottom = 127

	  --court center line
	  line_x = 63
	  line_y = 10
	  line_length = 4
end
court_left |
the number of pixels from screen left to the left side of the court. |
court_right |
the number of pixels from screen left to the right side of the court. |
court_top |
the number of pixels from screen top to the top of the court. |
court_bottom |
the number of pixels from screen top to the bottom of the court. |
The next variables are for the dashed center line of the court.
line_x |
the X position of the center line of the court. |
line_y |
the Y position of the starting place of the center line. |
line_length |
the length of each dashed line of the center court. |
This _draw() function handles everything that is seen on the game screen. Here's an overview of what code we will write inside of the draw function and then we'll break it down into each section.
function _draw()
    cls()

    --court
    ...

    --dashed center line
    ...

    --ball
    ...

    --player
    ...

    --computer
    ...

    --scores
    ...
end
cls() |
clear the screen |
It is common to clear the screen before drawing the updated game objects every frame. You can best understand why this is important to do by simply deleting it from the code, and running the game. You should see the paddles and ball leaving a trail behind them, because where they were is not erased, so we quickly lose track of where they are currently.
The following sections are the code that should go inside of the _draw() function.
The first thing we draw will be the outline and center line of the pong "court".
--court
rect(0,10,127,127,6)
--dashed center line
repeat
    line(line_x,line_y,line_x,line_y+line_length,5)
    line_y += line_length*2
until line_y > court_bottom
line_y = 10 --reset
rect() = "rectangle" draws the outline of a rectangle. We use the court variables to easily tell the rectangle to be drawn at the court positions we want
repeat ... until ... = is a loop that will repeat the code after "repeat" and stop when the code after "until" is true.
line() = draws a line. We use the center line variables to draw the each of the dashed lines.
line_y += line_length*2 = adds double the length of one dash to the Y position of where to start drawing the next dash. This gives us a nice even space between each dash.
until line_y > court_bottom = checks if the Y position of the next line is below the court's bottom edge and if that is true, this will stop the repeat loop.
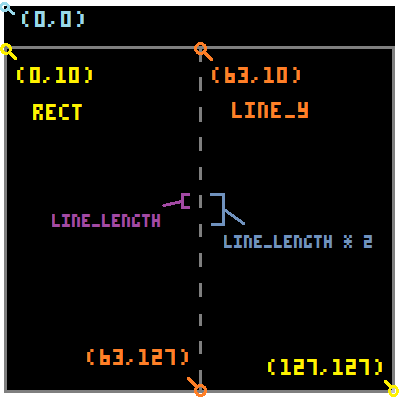
Basically, we use the court variables to set the court's outline to start from the top left corner at coordinate (0,10) which is a little lower from the top, to make room for the points. Then we set the court's bottom right corner at coordinate (127,127) which is the bottom right corner of the game screen. And finally we set the whole rectangle to be color #5 which is a dark gray.
For the center line, we set a line that starts at coordinate (63,10) which is middle screen and at the top edge of the court's rectangle. Then we repeatedly draw a short line down the screen until it gets to the bottom edge of the court's rectangle.
We are going to use a single shape drawing function to draw all 3 objects in the game. All of them are rectangles, so we'll use the filled rectangle function like this:
rectfill(x1,y1,x2,y2,color)We could write it horizontally like that, but we are going to space it out vertically so that it is easier to read. Just know that the new lines, spaces, and indentation don't matter when the code gets run.
 (Using the Ball variables to draw a rectangle.)
We need to get the data out of each of the tables by using the table name, then a dot, then the key name: table.key
--ball
rectfill(
ball.x,
ball.y,
ball.x + ball.w,
ball.y + ball.w,
ball.c
)
--player
rectfill(
player.x,
player.y,
player.x + player.w,
player.y + player.h,
player.c
)
--computer
rectfill(
com.x,
com.y,
com.x + com.w,
com.y + com.h,
com.c
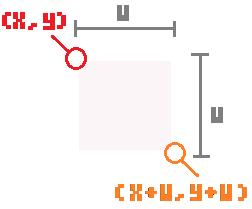
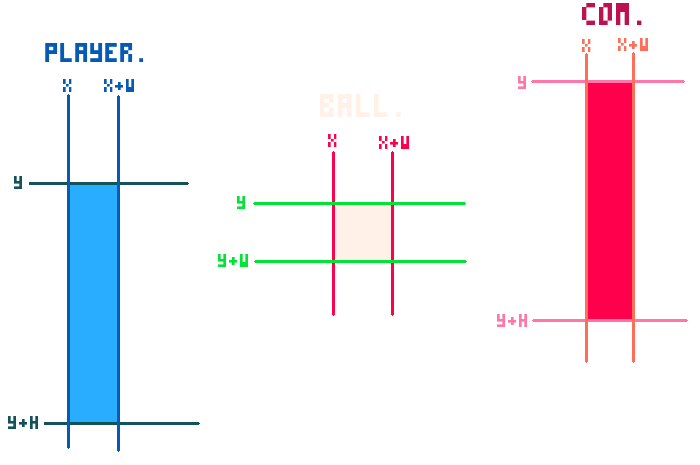
)The (x,y) position is the top left corner of each rectangle. The ( x+w, y+h ) is the bottom right corner of the rectangles, so we are just adding the width (w) to the left side (x) and adding height (h) to the top side (y). Notice that the ball only has a width (w) variable since it is a square, so its width and height are the same value. So we just add width to both left and top sides to draw a square.
The last thing we need to write in the draw function is the score board.
--scores
    print(player_points,30,2,player.c)
    print(com_points,95,2,com.c)
This code prints the number of player points at (30,2) and in the player's color. Then it prints the computer's points at (95,2) and in the computer's color.
This is the _update() function of the game. But you may notice that we are actually using the faster _update60 to get smoother movement.
function _update60()
    --player controls
    ...

    --computer controls
    ...

    --collide with com
    ...

    --collide with player
    ...

    --collide with court
    ...

    --score
    ...

    --ball movement
    ...
end
This sets up the _update60() function and shows the different sections of code that will go inside. We will go over each section of code below:
--player controls
if btn(⬆️)
and player.y > court_top+1 then
    player.y -= player.speed
end
if btn(⬇️)
and player.y + player.h < court_bottom-1 then
    player.y += player.speed
end
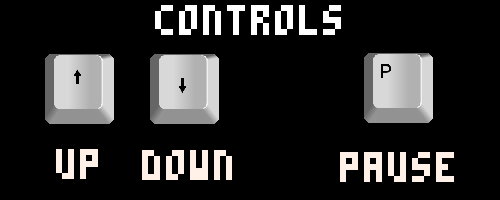
This part handles the player controls. The player only uses two buttons in this simplified game, up and down.
So we first check if the player presses up or down. The ⬆️ is made in PICO-8 by pressing Shift+U. The ⬇️is made in PICO-8 by pressing SHIFT+D.
Then we also check if the player's Y position is below the top of the court or above the bottom of the court. We do this to limit the player's paddle movement to inside the court which starts at 10 and ends at 127 vertically. The player's Y position is the top pixel, so we add the player's height to compare the bottom of the player's paddle with the bottom of the court.
If those checks fail, then the player does not move, even when pressing a button. This will feel like the player's paddle hit a wall at the edges of the court.
If those checks pass, then we allow the player's paddle to move by either adding or subtracting the player's speed to the player's Y position. Subtract to move upwards. Add to move downwards.
--computer controls
mid_com = com.y+(com.h/2)

if ball.dx > 0 then
    if mid_com > ball.y
    and com.y > court_top+1 then
        com.y -= com.speed
    end
    if mid_com < ball.y
    and com.y + com.h < court_bottom-1 then
        com.y += com.speed
    end
else
    if mid_com > 73 then
        com.y -= com.speed
    end
    if mid_com < 53 then
        com.y += com.speed
    end
end
This part handles the computer's controls. The computer has a simple AI built into it here.
mid_com is a new variable created to hold the middle location of the computer's paddle which is found by doing this math: com.y + (com.h/2). That takes the computer's Y position (at the top) and adds half of the com's height.
First we check if the ball.dx is more than zero, which would mean that the ball is moving towards the right because it is a positive number.
We check for this because the computer will do something different depending on whether the ball is moving toward or away from the computer's paddle.
If the ball is coming toward the computer, then we want the computer's paddle to move either up or down, based on where the ball is. It does not predict where the ball will be.
Using our new mid_com variable, we are able to compare the middle of the computer's paddle to the position of the ball to know whether the computer needs to move up or down.
So if the mid_com is more than the ball's Y then that means the computer's paddle is lower on the screen than the ball. If that is true, then the computer should move up by subtracting from the computer's Y position. And opposite if the ball is lower than the computer's paddle.
We also limit the computer's paddle to the court by also checking if the computer's Y position is more than the court's top and less than the court's bottom, just like the player.
Now going back to the first check: (if ball.dx > 0)
If that is false, then the code jumps down to the part inside else.
Now we know that the ball's DX is negative which means it is moving left, away from the computer. Instead of following the ball, the computer acts a little more human-like and waits for the ball to start coming back. But it doesn't just stop moving. We made it a little smarter than that.
So it checks if the middle of the computer's paddle (mid_com) is more than 73 or less than 53, which means that the computer is either far to the bottom or top of the court. And if either of those are true, then the computer will move up or down to return to a more middle court position to make it easier to get to the ball when it starts coming back.
To better follow how we are checking collision, it's important to understand the variables that tell us each side of the ball and the paddles. To know if the ball collides with a paddle, we will compare one side of the ball with one side of the paddle, then another side of the ball with another side of the paddle. All together, those separate side checks will tell us if the ball is touching the paddle.
So keep this visualization in mind, as we walk through the collision code.
--collide with com
if ball.dx>0
and ball.x + ball.w >= com.x
and ball.x + ball.w <= com.x + com.w
and ball.y >= com.y
and ball.y + ball.w <= com.y + com.h
then
    ball.dx = -(ball.dx + ball.speedup)
    sfx(0)
end
This code checks if the ball collides with the computer's paddle.
There are quite a few checks happening here that all must be true for the ball to be known to collide. Basically, we first check if the ball is moving towards the computer, then we compare the side.
ball.dx > 0 |
Is the ball moving right? |
ball.x+ball.w >= com.x |
Is the ball's right side to the right of the com's left side? |
ball.x+ball.w <= com.x+com.w |
Is the ball's right side to the left of the com's right side? |
ball.y >= com.y |
Is the ball's top side under the com's top side? |
ball.y+ball.w <= com.y+com.h |
Is the ball's bottom side above the com's bottom side? |
Together, if all of these checks are true, then that means the ball's closest side is touching the computer's paddle.
You could make the collision better by predicting where the ball will be in future frames but we'll leave that as a challenge for you if you want.
Anyway, if the ball does collide, then first we reverse the ball's direction from moving right to moving left.
To do that, we just take the ball's DX and flip it from a positive to a negative number. ball.dx = -ball.dx is all that is needed to flip a number from positive to negative, or negative to positive.
But we also want to speed up the ball every time it hits a paddle. So we add the ball's speedup variable to the ball's dx before flipping positive to negative. We do that using parentheses: ball.dx = -(ball.dx + ball.speedup).
Finally, we also want to play a sound effect (#0) when the ball hits the paddle. So we use the sfx(0) to play that.
--collide with player
if ball.dx < 0
and ball.x >= player.x
and ball.x <= player.x + player.w
and ball.y >= player.y
and ball.y + ball.w <= player.y + player.h
then
    --control ball dy if hit and press up or down
    if btn(⬆️) then
        if ball.dy > 0 then --ball moves down
            ball.dy =- ball.dy
            ball.dy -= ball.speedup * 2
        else --ball moves up
            ball.dy -= ball.speedup * 2
        end
    end
    if btn(⬇️) then
        if ball.dy < 0 then --ball moves up
            ball.dy =- ball.dy
            ball.dy += ball.speedup * 2
        else --ball moves down
            ball.dy += ball.speedup * 2
        end
    end

    --flip ball dx and add speed
    ball.dx = -(ball.dx - ball.speedup)

    sfx(1)
end
This is basically the exact same as checking collision with the computer above, only using the opposite direction, and the player's variables.
There is one big difference where we added another control the player can have on where they want to hit the ball. So if the player holds up when hitting the ball, then the ball will move upwards too. And if the player holds down when hitting the ball, the ball will move downwards.
First, we check if the player is holding up or down. Then we check if the ball is moving up or down by checking if the ball's DY is positive (more than 0) or negative (less than 0). Next, if the player is holding a direction opposite to the direction of the ball then we have to flip the ball's DY from positive to negative or negative to positive. That is what ball.dy = -ball.dy does. But if the player is holding the same direction as the ball is moving, then we don't have to flip the ball's DY direction.
The only other difference between the player collide and the com collide is that if it collides, then we play sound effect #1 instead of #0.
--collide with court
if ball.y + ball.w >= court_bottom - 1
or ball.y <= court_top + 1 then
    ball.dy = -ball.dy
    sfx(2)
end
Here we will check if the ball collides with the bottom and top of the court.
The top of the court is at 10, and the bottom of the court is at 127, based on our court variables. So we simply check if the ball's Y position is above the top or below the bottom.
If one of those are true, then we just flip the ball's DY to be the negative or positive. Similar to flipping the DX when it hits the paddle, we do ball.dy = -ball.dy and we don't speed the ball up, so that's all we need to do to the ball when it hits the court edges.
Lastly, sfx(2) plays a different sound than hitting either of the paddles, sound effect #2.
--score
if ball.x > court_right then
    player_points += 1
    scored = "player"
    _init() --reset game
end
if ball.x < court_left then
    com_points += 1
    scored = "com"
    _init() --reset game
end
This code detects if the ball scores a point then give the point to the correct side and reset the game.
if ball.x > court_right then checks if the ball has moved beyond the right side of the court, meaning the player scored a point.
if ball.x < court_left then checks if the ball has moved beyond the left side of the court, meaning the computer scored a point.
player_points += 1 adds 1 to the player's score.
com_points += 1 adds 1 to the computer's score.
scored = "player" or scored = "com" remembers who scored the last point when the game resets. This is used to play a happy or sad sound effect at the start of the next round.
_init() calls the whole _init function to run again and reset all the game variables except for the variables set outside of _init(). So it won't reset the scores nor who scored.
--ball movement
ball.x += ball.dx
ball.y += ball.dy
The last thing we do in this game is apply the momentum (DX and DY) to the ball's position.
We simply add the ball's DX to the ball's X position, and add the ball's DY to the ball's Y position.
That is it for this classic bite-size game! Try it out yourself by either following the video, downloading the game cartridge, or copying the full code below. For an extra challenge or some suggestions of how to improve this game yourself, check out the "Challenges" section on the left and near the top of this page.
![]()
player_points = 0
com_points = 0
scored = ""

function _init()
    --variables
    player={
        x = 8,
        y = 63,
        c = 12,
        w = 2,
        h = 10,
        speed = 1
    }
    com={
        x = 117,
        y = 63,
        c = 8,
        w = 2,
        h = 10,
        speed = 0.75
    }
    ball={
        x = 63,
        y = 63,
        c = 7,
        w = 2,
        dx = 0.6,
        dy = flr(rnd(2))-0.5,
        speed = 1,
        speedup = 0.05
    }
    --sound
    if scored=="player" then
        sfx(3)
    elseif scored=="com" then
        sfx(4)
    else
        sfx(5)
    end
	--court
	court_left = 0
	court_right = 127
	court_top = 10
	court_bottom = 127
	--court center line
	line_x = 63
	line_y = 10
	line_length = 4
end

function _draw()
    cls()

    --court
    rect(court_left,court_top,court_right,court_bottom,5)

	--dashed center line
	repeat
		line(line_x,line_y,line_x,line_y+line_length,5)
		line_y += line_length*2
	until line_y > court_bottom
	line_y = 10 --reset

    --ball
    rectfill(
        ball.x,
        ball.y,
        ball.x + ball.w,
        ball.y + ball.w,
        ball.c
    )

    --player
    rectfill(
        player.x,
        player.y,
        player.x + player.w,
        player.y + player.h,
        player.c
    )

    --computer
    rectfill(
        com.x,
        com.y,
        com.x + com.w,
        com.y + com.h,
        com.c
    )

    --scores
    print(player_points,30,2,player.c)
    print(com_points,95,2,com.c)

end

function _update60()
    --player controls
    if btn(⬆️)
    and flr(player.y) > court_top + 1 then
        player.y -= player.speed
    end
    if btn(⬇️)
    and flr(player.y) + player.h < court_bottom - 1 then
        player.y += player.speed
    end

    --computer controls
    mid_com = com.y + (com.h/2)

    if ball.dx>0 then
        if mid_com > ball.y
        and com.y>court_top+1 then
            com.y-=com.speed
        end
        if mid_com < ball.y
        and com.y + com.h < court_bottom - 1 then
            com.y += com.speed
        end
    else
        if mid_com > 73 then
            com.y -= com.speed
        end
        if mid_com < 53 then
            com.y += com.speed
        end
    end

    --collide with com
    if ball.dx > 0
    and ball.x + ball.w >= com.x
    and ball.x + ball.w <= com.x + com.w
    and ball.y >= com.y
    and ball.y + ball.w <= com.y + com.h
    then
        ball.dx = -(ball.dx + ball.speedup)
        sfx(0)
    end

    --collide with player
    if ball.dx < 0
    and ball.x >= player.x
    and ball.x <= player.x + player.w
    and ball.y >= player.y
    and ball.y + ball.w <= player.y + player.h
    then
        --control ball DY if hit and press up or down
        if btn(⬆️) then
            if ball.dy > 0 then
                ball.dy = -ball.dy
                ball.dy -= ball.speedup * 2
            else
                ball.dy -= ball.speedup * 2
            end
        end
        if btn(⬇️) then
            if ball.dy < 0 then
                ball.dy = -ball.dy
                ball.dy += ball.speedup * 2
            else
                ball.dy += ball.speedup * 2
            end
        end
        --flip ball DX and add speed
        ball.dx = -(ball.dx - ball.speedup)
        sfx(1)
    end

    --collide with court
    if ball.y + ball.w >= court_bottom - 1
    or ball.y <= court_top+1 then
        ball.dy = -ball.dy
        sfx(2)
    end

    --score
    if ball.x > court_right then
        player_points += 1
        scored = "player"
        _init() --reset game
    end
    if ball.x < court_left then
        com_points += 1
        scored = "com"
        _init() --reset game
    end

    --ball movement
    ball.x += ball.dx
    ball.y += ball.dy
end

This Wretched Pong by pizza_boys
This variant of Pong takes this tutorial about as far as you possibly can! Incredible graphics and animations turns this simple arcade game into a well polished modern game with a plot and multiple levels.![]()
10796
9 Sep 2022