PICO-8
Nerdy
Game Mechanics
Game Mechanics:
Advanced Movement
![]()
Explanation of Code!
This code creates much more realistic and natural movement in the player than using Simple Movement. You may copy the Full Code at the bottom of the page to test it out in PICO-8 and adjust the physics how you would like it, but you will need to draw something in sprite #1 (the second tile).
As usual, we begin by putting variables into the _init() function.
function _init()
    player={
        x=59,
        y=59,
        dx=0,
        dy=0,
        max_dx=2,
        max_dy=3,
        acc=0.5,
        boost=4,
    }

    gravity=0.3
    friction=0.85
end
Similar to Simple Movement, we have player variables for X and Y position, but we put them inside a table named player.
To access the values that are in the table, we use the table name, then a dot (.), then the variable name. Note that when variables are inside a table, the variable name is actually called a "key". So that's the proper term, but it's alright to still think of them as variables. Learn more about tables here:
What are tables, keys, and values?
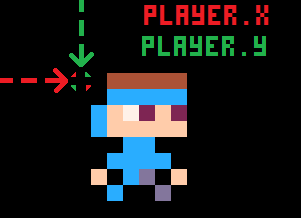
player.x is the number of pixels from the left that the player will start at.
player.y is the number of pixels from the top that the player will start at.
player.dx is the number of pixels that the player will move either left or right.
player.dy is the number of pixels that the player will move either up or down.
player.max_dx is the limit of how many pixels to allow the player to move left or right each frame.
player.max_dy is the limit of how many pixels to allow the player to move up or down each frame.
(We use the letter D before X and Y because in Mathematics we use the Greek letter "delta" to mean "change" or "how much something changes". So DX can be read as "how much X will change" or simply "change in X".)
player.acc (short for acceleration) is how much we add to DX when the player pushes the left or right buttons.
player.boost (jump power) is how much DY will suddenly decrease (making the player position higher) when the player pushes the jump button.
gravity (the force that constantly pulls "down") is how much DY will be increased every frame, all the time.
friction (the force that slows moving things down) is how much DX will be divided every frame, all the time.
Inside of an update function, we will affect the player's position based on player input and all the physics variables we prepared in _init().
function _update()
    player.dy+=gravity
    player.dx*=friction

    --controls
    if (btn(0)) then player.dx-=player.acc end -- left
    if (btn(1)) then player.dx+=player.acc end -- right
    if (btnp(5)) then player.dy-=player.boost end -- X

    --limit left/right speed
    player.dx=mid(-player.max_dx,player.dx,player.max_dx)
    --limit fall speed
    if (player.dy>0) then
        player.dy=mid(-player.max_dy,player.dy,player.max_dy)
    end

    --apply dx and dy to player position
    player.x+=player.dx
    player.y+=player.dy

    --simple ground collision
    if (player.y>110) then player.y=110 player.dy=0 end

    --if run off screen warp to other side
    if (player.x>128) then player.x=-8 end
    if (player.x<-8) then player.x=128 end
end
Remember that player.x and player.y are the coordinates of the top left corner of the sprite.
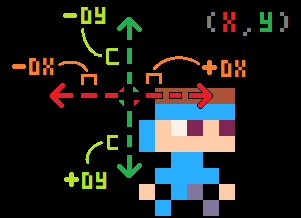
We won't be directly changing the X and Y like we do in Simple Movement. Instead, we will use these:
player.dx (Change in X)
If dx is a positive number, then the player will move to the right.
If dx is a negative number, then the player will move to the left.
player.dy (Change in Y)
If dy is a positive number, then the player will move down.
If dy is a negative number, then the player will move up.
In Simple Movement, the number of pixels the player moves each frame is fixed (never changes). Which also means that the player's speed never changes. That means the player starts and stops moving suddenly, which can look and feel unnatural.
But in Advanced Movement, we have turned that fixed number into variables dx and dy so that we can change them to make the player move at different speeds. This means we can change how much the player speeds up or slows down even while already moving. This will make movement more natural by speeding up when the player starts moving and slowing down before the players stops.
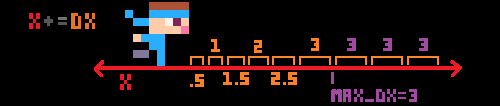
Here is an example showing how a positive DX increases over time to slowly build up the speed of the player moving right:
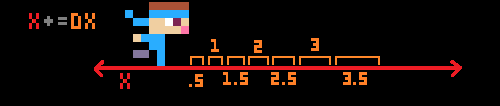
So we build up speed with dx or dy but we don't let it go past max_dx or max_dy.
player.max_dx (Maximum change in X)
player.max_dy (Maximim change in Y)
NOTE: we only limit the dy when falling, so that the jump power, boost, can be a large number to create a sudden launch of the jump before gravity pulls the player back down. Also note that in this demo, we are not limiting the number of times the player can jump, which allows for double or more jumps in the air. You can add code for limiting the jump action in different ways later.
player.acc (short for acceleration) is how much we add to DX when the player pushes the left or right buttons. It should be a small number, usually less than 1, because dx will grow with each acceleration added to it as the player continues to press a directional button.
Changing this variable will change how fast or slow the player builds up speed. Balance this with friction.

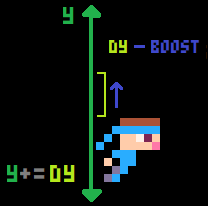
player.boost (jump power) is how much DY will suddenly decrease (making the player position higher) when the player pushes the jump button.
Changing this variable will change how high the player can jump. Balance this with gravity.
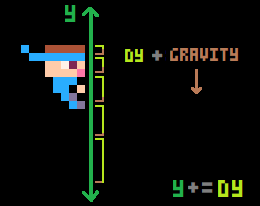
gravity is constantly added to DY to always pull the player downwards.
Changing this variable will change how strong and quickly the player is pulled down. Balance this with boost.
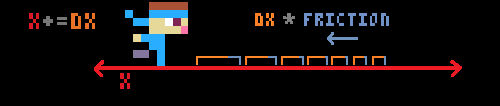
friction is constantly dividing DX back towards zero.
dx * friction is actually multiplying but friction is a decimal between 0 and 1. When you multiply a decimal less than 1, it has the same outcome as dividing. So we are dividing DX smaller by multiplying. More explained below.
To really understand the math we use with friction, you should have a solid understanding of positive and negative numbers, and multiplying or dividing by decimals (or fractions).
In this example, friction=0.85, so that is a decimal and less than 1. And let's imagine the player runs to the right to build up the dx to 3. Then when the player stops pushing the right button, what will happen is friction will be multiplied to the DX and here is what the math looks like for each frame that this happens:
| Frame | Old DX * Friction | New DX |
| 1 | 3 * 0.85 | 2.55 |
| 2 | 2.55 * 0.85 | 2.16 |
| 3 | 2.16 * 0.85 | 1.84 |
| 4 | 1.84 * 0.85 | 1.56 |
| 5 | 1.56 * 0.85 | 1.33 |
| 6 | 1.33 * 0.85 | 1.13 |
Notice that the "New DX" becomes the "Old DX" in the very next frame, and so in only 6 frames, the momentum is cut down from 3 pixels all the way to just 1 pixel. By the way, negative numbers will behave the same way as positive numbers do here. So if the player moves left and reaches -3 DX, then friction will still multiply 0.85 to it, and the -3 DX will become -2.55. So the leftwards momentum will "shrink" back towards zero the same way rightwards momentum does.
Changing the single friction variable will change how much resistance is against the player moving both left and right.
However, because we are multiplying by a decimal between 0 and 1, a high decimal number means lower friction.
A High friction decimal means that the player will quickly speed up and slowly slow down.
A Low friction decimal means that the player will slowly speed up and quickly slow down.
Balance this with acc.
So overall, when you are playing with and deciding the physics of your player movement, here is what you should be considering:
| Problem | Solution |
| Player is too slow. | increase accor decrease frictionor increase max_dx |
| Player is too fast. | decrease accor increase frictionor decrease max_dx |
| Player barely jumps. | increase boostor decrease gravity |
| Player jumps too high. | increase gravityor decrease boost |
| Player falls too slow. | increase gravityor increase max_dy |
| Player falls too fast. | decrease gravityor decrease max_dy |
You really only need to draw your player but we have added more here just for this demo.
function _draw()
    cls()
    spr(1,player.x,player.y)

    --ground
    rectfill(0,118,127,127,13)

    --display info
    print("dx= "..player.dx)
    print("dy= "..player.dy)
end
cls() clears the screen.
spr() draws the sprite of the player to the screen.
The rest of the code we added to this demo cart to draw a rectangle at the bottom of the screen to act as a ground. Then we also print the DX and DY player variables at the top of the screen. This is a good idea to do in your own game when you are debugging or tweaking certain variables.
![]()
function _init()
    player={
        x=59,
        y=59,
        dx=0,
        dy=0,
        max_dx=2,
        max_dy=3,
        acc=0.5,
        boost=4,
    }

    gravity=0.3
    friction=0.85
end

function _update()
    player.dy+=gravity
    player.dx*=friction

    --controls
    if (btn(0)) then player.dx-=player.acc end -- left
    if (btn(1)) then player.dx+=player.acc end -- right
    if (btnp(5)) then player.dy-=player.boost end -- X

    --limit left/right speed
    player.dx=mid(-player.max_dx,player.dx,player.max_dx)
    --limit fall speed
    if (player.dy>0) then
        player.dy=mid(-player.max_dy,player.dy,player.max_dy)
    end

    --apply dx and dy to player position
    player.x+=player.dx
    player.y+=player.dy

    --simple ground collision
    if (player.y>110) then player.y=110 player.dy=0 end

    --if run off screen warp to other side
    if (player.x>128) then player.x=-8 end
    if (player.x<-8) then player.x=128 end
end

function _draw()
    cls()
    spr(1,player.x,player.y)

    --ground
    rectfill(0,118,127,127,13)

    --display info
    print("dx= "..player.dx)
    print("dy= "..player.dy)
end
15113
5 Oct 2022