![]()
PICO-8
Platformer Setup
Follow along with the videos to create a platformer game!
The video moves quickly so pause whenever you need.
The video doesn't explain everything, but this page does!
Make sure you understand why this code works or you won't be able to make your own games later!
After you made this platformer, change it up! Change the sprites, fiddle with the numbers, and even finish the game to see what you can create!
Table of Contents
| Video | |
| 1 | Draw Player Sprites |
| 2 | Draw Map Tiles |
| 3 | Advanced Player Variables |
| 4 | Map Collision Function |
| 5 | Advanced Player Movement |
| 6 | Game Level and Camera |
| 7 | Improving Map Collision |
| 8 | Improving Player Movement |
Challenges!
After following the lesson, take on some of these challenges to test your knowledge and skills!
1. Draw your own player character, instead of this ninja.
2. Draw your own map tiles, and add more.
3. Design a complex map level.
4. Apply your own movement and physics settings.
How to make a Platformer Game!
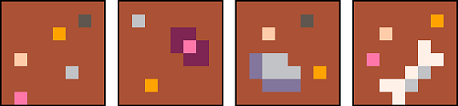
Game Sprites!
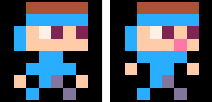
Standing Idle
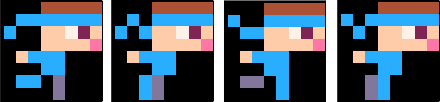
Running
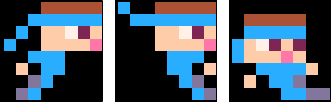
Jumping, Falling, Sliding
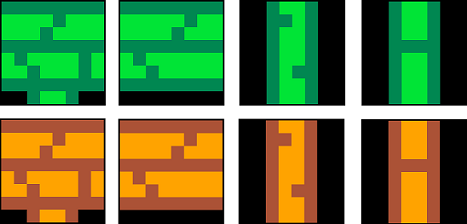
Grass Tiles
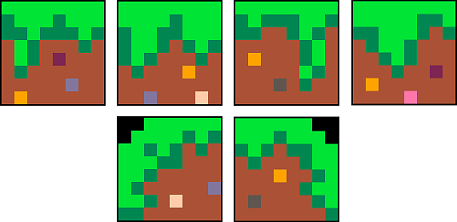
Dirt Tiles
Bamboo Tiles
You can copy these sprites or make your own! Make sure you draw each of these sprites in the exact same place, because the code will look for their sprite number. But once you understand the code, you can draw as many sprites as you want, where ever you want!
Explanation of Code!
-
What is a variable?
The Player Variables
function _init()
    --add your variables here
end
By setting up your variables inside of the
_init()function, you can easily reset your game by calling_init(), and the variables here have access to any custom functions you write. That might come in handy later so it's a good practice.
player={ sp=1, x=59, y=59, w=8, h=8, flp=false, dx=0, dy=0, max_dx=2, max_dy=3, acc=0.5, boost=4, anim=0, running=false, jumping=false, falling=false, sliding=false, landed=false }sp= "sprite" and holds the sprite number.x= holds the horizontal position of the playery= holds the vertical position of the playerw= "width" and is how wide the player sprite is in number of pixelsh= "height" and is how tall the player sprite is in number of pixelsflp= "flip" and is true or false if the player faces left or rightdx= "delta X" and is how much to change the player X position to move left or rightdy= "delta Y" and is how much to change the player Y position to move up or downmax_dx= "maximum delta X" and is the limit of how much the player can move left or rightmax_dy= "maximum delta Y" and is the limit of how much the player can move up or downacc= "acceleration" and is how much to add to the DX when running (to build up speed)boost= how much to add to the DY when jumping (the jump power)anim= "animation" and is the time decimal for when the last animation change occurredrunning, etc= movement status and they are true or false to remember what the player is currently doing.
Tip 1: Set your game variables inside of the
_init()function so that you can easily call _init() from anywhere in your game and it will reset those variables to restart your game. Also, PICO-8 will run_init()immediately after all the code is evaluated. So if you need to call a function to establish variables or create data tables, then it can be done here.
Tip 2: Organize your variables in groups of game objects (such as players, enemies, bullets, items, etc.) by creating a table to hold the variables as keys and values.
What are tables, keys, and values?

The Physics Variables
gravity=0.3 friction=0.85gravityis how much we add to thedyto increase the falling speed.frictionis how much we shrink thedxto slow horizontal movement down.
-->8
--name of tab here
-->8 = next tab
This code does not appear in the PICO-8 code editor, but you will see it if you open .p8 files in other editors. And you will see it in the "Full Code" section below.
Tabs separate the code nicely inside the PICO-8 editor. And you can name each tab by writing a comment directly after this, or on the first line of the new tab inside PICO-8.
function collide_map(obj,aim,flag) end()= "parentheses" identify this code as a function. They can be empty for functions that run the exact same way every time. Or they can have a list of variables that will hold the values of whatever is passed to them.Passing variables to a function must be done in the same order that they are listed inside of the parentheses here.
Only the values are passed, not the variable names. So a custom function can have its own variable names of these values.
obj= "object" a common abbreviation for a game object's table in PICO-8, and also a common abbreviation for similar tables of information in other programming languages.
aim= (shorter word for "direction") a string that will tell the function which direction the game object is moving, (left, right, up, or down) so that the function will know which way in front of the object to check for a map tile.
flag= "flag number" which is a number from 0 to 7 that can be turned on for organizing different types of sprites. Flags can be used to identify sprites in any way that you want.In this code, we will use flag 0 to identify map tiles that can stop falling objects. And flag 1 will be used to identify map tiles that can stop jumping objects. This way, we can separate map tiles like platforms that allow jumping up through, but also can be stood on without falling down through.
local x=obj.x    local y=obj.y
local w=obj.w    local h=obj.h
local = a variable that is limited to a small region of code.
It is the opposite of "global" which is a variable that can be 'seen' anywhere in the code.
This set of local variables simply takes the values out of the game object's table (named obj by this function) and saves them to x, y, h, and w for easier writing of the function's code. Without these, then the rest of the function would have to refer to the table name everytime it wants to use one of the object's values.
local x1=0    local y1=0
local x2=0    local y2=0
These local variables are only temporarily set to 0 and are created for holding the position information of a "behind-the-scenes" rectangle in front of the object, for where to check for map tiles.
This game might only use 8x8 objects, but this function is written so that it can be used with any size objects.
if aim=="left" then
   x1=x-1  y1=y
   x2=x    y2=y+h-1

elseif aim=="right" then
   x1=x+w    y1=y
   x2=x+w+1  y2=y+h-1

elseif aim=="up" then
   x1=x+1    y1=y-1
   x2=x+w-1  y2=y

elseif aim=="down" then
   x1=x      y1=y+h
   x2=x+w    y2=y+h
end
The "hitbox" is the area where collision is checked. In the video, it is referred to as an "invisible rectangle", which is a true description of hitboxes because they are normally rectangular and not visible in the game.
The above code will check which direction aim is set to, and then it sets the (x,y) coordinates
of where the corners of the hitbox should be.
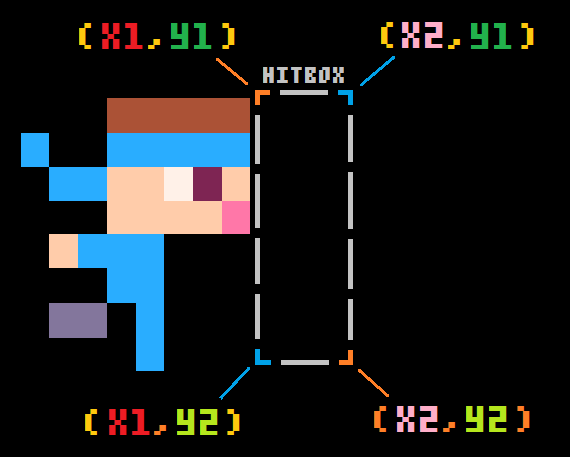
This shows what the x1, y1, x2, y2 represent as the hitbox corner positions.
And the hitbox should move based on the direction of the object. So if left, then the hitbox will be to the left.
If right, then the hitbox will be adjusted to the right. If up, then the hitbox will be above. And if down, then the hitbox will be below.
Using only the object's position (x,y) coordinates (knowing it is the top left corner of the sprite), and the object's size (w, h) width and height, we can adjust the hitbox to the appropriate location.
We suggest you draw these out on a graph paper if you want to better understand how we figure them out. It's great practice for geometry, and this type of logic and math will be used a lot in game development.
--pixels to tiles
x1/=8    y1/=8
x2/=8    y2/=8
We will need to know the position of each corner of the hitbox in map tiles, which is 1 tile for every 8 pixels. So this simply divides our coordinates by 8 to find the map location (tiles) instead of the screen location (pixels).
if fget(mget(x1,y1), flag)
or fget(mget(x1,y2), flag)
or fget(mget(x2,y1), flag)
or fget(mget(x2,y2), flag) then
    return true
else
    return false
end
This last part of the map collision function does the actual checking if any one of the hitbox's corners is on a map tile, then return true, and if none are, then return false.
fget() is a built-in PICO-8 function that takes a sprite number and a flag,
then compares the flags on that sprite, with the flag being checked.
The flag that will be looked for, is given to this whole collide_map() function as the last variable named flag.
So the only thing we don't know, is which sprite number to check. So instead of putting a variable of a sprite number, we use another function
that returns a sprite number.
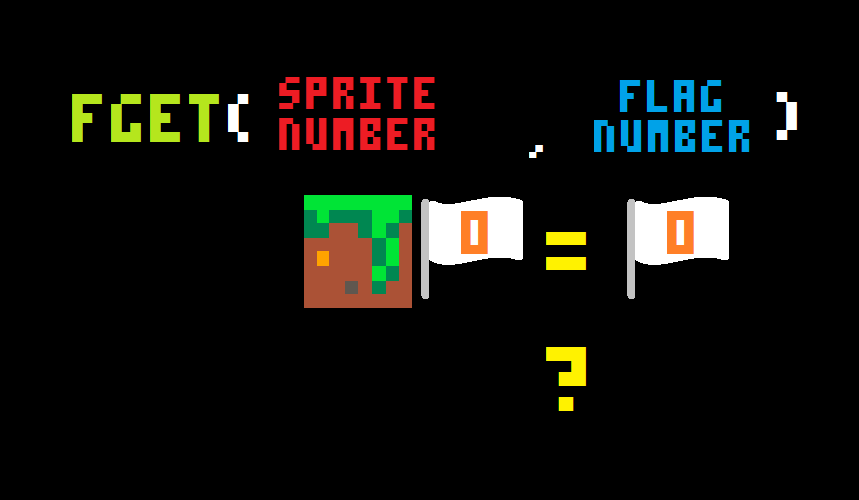
mget() is another built-in PICO-8 function that takes map coordinates (x,y), and finds
the sprite number of the sprite that is in that location on the map.
So mget() will take the map coordinates that we prepared, and give the sprite number of that location to fget(), which then compares that sprite's flags with the flag we want to find. And it will return true if the sprite has the flag, or false if it does not.
Then the collide_map function returns true if any of those come out to be true, or false,
if all four corners turn out to be false.
function player_update()

end
player_update = a custom function that holds the player movement code.
It should only be run once from inside the game _update() function.
And it is its own function so that our code stays organized.
() = "parentheses" identify this code as a function.
They can be empty for functions that run the exact same way every time.
  --physics
    player.dy+=gravity
    player.dx*=friction
gravity = the amount that DY will be increased by each update, used to
constantly pull the player down the screen.
friction = the amount that DX will be decreased by each update, used to
constantly slow the player's horizontal movement (left or right).
  --controls
if btn(⬅️) then
    player.dx-=player.acc
    player.running=true
    player.flp=true
end
    if btn(➡️) then
    player.dx+=player.acc
    player.running=true
    player.flp=false
end
btn = "button" a built-in PICO-8 function that
detects if a button is pressed and held down.
⬅️ = "left" *shift L*
PICO-8 converts uppercase letters to glyphs (tiny images)
and so if you are editing inside of the PICO-8 code editor,
then an uppercase L will appear as an arrow facing left. And this is
understood as the correct button number (0).
player.dx-=player.acc = "DX decreases by acceleration"
The player table holds dx and acc (acceleration). This code takes the acceleration amount
and subtracts it from the DX (how much X changes). So this does not immediately move the player
to the left, but it slowly builds up momentum for moving the player left.
➡️ = "right" *shift R*
Just like "L" above if you are editing inside of the PICO-8 code editor,
then an uppercase R will appear as an arrow facing right. And this is
understood as the correct button number (1).
player.dx+=player.acc = "DX increases by acceleration"
Just like acceleration is subtracted if moving left, it is added to the DX if moving right.
And this will build up the DX momentum for moving the player right.
player.running=true = a change in the player movement status.
It is used to know what sprite to show in the animation code. And it can
be used elsewhere for simple checks in your game where something should
only happen if the player is running.
player.flp=[true/false] = a flip in the player sprite.
It is used when drawing the player sprite. If it is false, which is the default setting,
then the player sprite will remain as you drew it. If it is true, then the player sprite
will be flipped horizontally and facing the opposite direction.
So if you drew your sprite facing right, then this will flip it to draw it facing left.
  --slide
if player.running
and not btn(⬅️)
and not btn(➡️)
and not player.falling
and not player.jumping then
    player.running=false
    player.sliding=true
end
This code simply changes the player movement status from running to sliding.
It will only happen if the player is running, and the running buttons (left or right) are not being pressed, and the player is not falling or jumping because that is the only time a slide should happen.
NOTE: not player.falling and not player.jumping can actually be simplified to:
player.landed
  --jump
if btnp(❎)
and player.landed then
    player.dy-=player.boost
    player.landed=false
end
This code checks if button X is pressed once and if the player is standing on a ground or platform.
Then it will make the player jump by suddenly decreasing the dy
by the BOOST amount. And since the player will leave the ground, turn landed off.
  --check collision up and down
if player.dy>0 then
    player.falling=true
    player.landed=false
    player.jumping=false

    player.dy=limit_speed(player.dy,player.max_dy)

    ...
if player.dy>0 then = check if the dy is a positive number.
A positive dy means that the player will be moving down the screen. So with advanced movement,
if you ever want to know if the player is falling, this is the check for that.
player.falling=true = sets the falling value in our player table to on (true).
Remember that this movement status is used in animation, and can be helpful anywhere in our
game where something should only happen if the player is falling.
player.landed=false = sets the landed value in our player table to off (false).
Since the player is falling then they must not be standing on a ground or platform.
player.jumping=false = sets the jumping value in our player table to off (false).
They player may have been jumping, and the gravity just increased the dy
from a negative number to a positive. But also, if the player is now falling, they must not be jumping.
player.dy=limit_speed(player.dy,player.max_dy) = uses our custom function to limit the dy if it goes past max_dy.
See the later section on how this limit_speed() function works.
  --check collision up and down (continued)
    ...
    if collide_map(player,"down",0) then
        player.landed=true
        player.falling=false
        player.dy=0
        player.y-=((player.y+player.h+1)%8)-1
    end
if collide_map(player,"down",0) then = uses our map collision function from above to check if there is a map tile under the player ("down") that the player can stand on (flag 0).
player.landed=true player.falling=false = change the movement status from falling to landed.
player.dy=0 = The video says "kill momentum" for this line of code
which means to suddenly set the dy to 0, so that the player movement is stopped right away.
That should only happen if the player hits a solid object like a wall or ground tile.
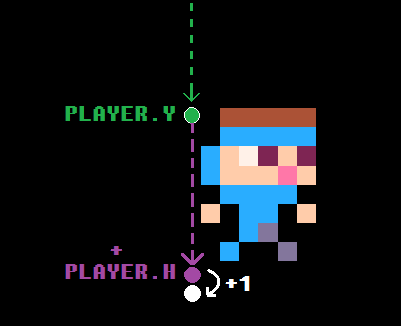
player.y-=(player.y+player.h)%8 = Reset the player position to just above a ground tile.
This is explained in detail in the next section.
  --check collision up and down (continued)
--
elseif player.dy<0 then
    player.jumping=true
    if collide_map(player,"up",1) then
        player.dy=0
    end
end
elseif player.dy>0 then = check if the dy is a negative number.
A negative dy means that the player will be moving up the screen.
So with advanced movement,
if you ever want to know if the player is jumping, this is the check for that.
player.jumping=true = sets the jumping value in our player table to on (true).
Remember that this movement status is used in animation, and can be helpful anywhere in our
game where something should only happen if the player is jumping. So you don't have to check DY everytime.
if collide_map(player,"up",1) then = uses our map collision function to check above the player ("up") for a map tile that cannot be jumped through (flag 1).
player.dy=0 = "kills momentum" of the player movement upwards by suddenly setting the DY to 0.
And since gravity is always going to pull the player down, it will add to the DY to make the player start falling until the player hits a ground tile.
player.y-=((player.y+player.h+1)%8)-1
player.y-= = the player position on the Y-axis, from the top of the screen.
(player.y+player.h+1) = takes the player position and adds the player height, to find the screen position under the player sprite.
Then adds 1 more pixel to be 2 pixels under the player.
% = "modulo" or "modulus" finds the remainder when dividing.
So 10 % 5 = 0 because 5 evenly divides into 10, so there is no remainder.
But 11 % 5 = 1 because 1 is the remainder when dividing 11 by 5.
%8 = divide something by 8, and find the remainder.
When you put all of this together, we are checking if the number on the Y-axis of two pixels under the player, can be evenly divided by 8.
And so, then %8 will be zero, and the player position will not change.
But if the player is a little lower than a map tile (stuck in the ground), then %8 will find
how many extra pixels the player is away from standing on the ground, and we add that many pixels to the player
Y position immediately, so that the player never looks stuck.
Another way to explain it would be, find how far off the player position is from being lined up with the map grid (made of 8x8 pixel tiles), then subtract that number of pixels from the player position to move the player up to be aligned with the map grid. And since the player is 8x8 pixels, the bottom of the player will be just above the top of the next tile on the grid, which would be a ground tile thanks to the collision function.
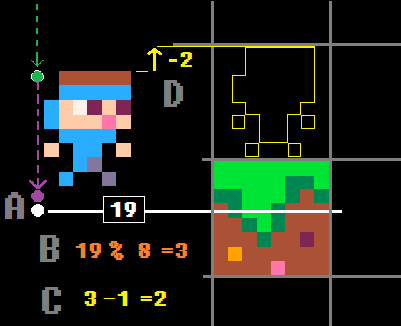
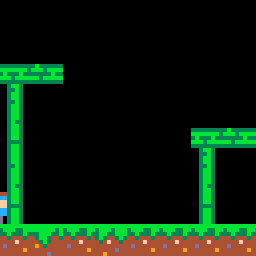
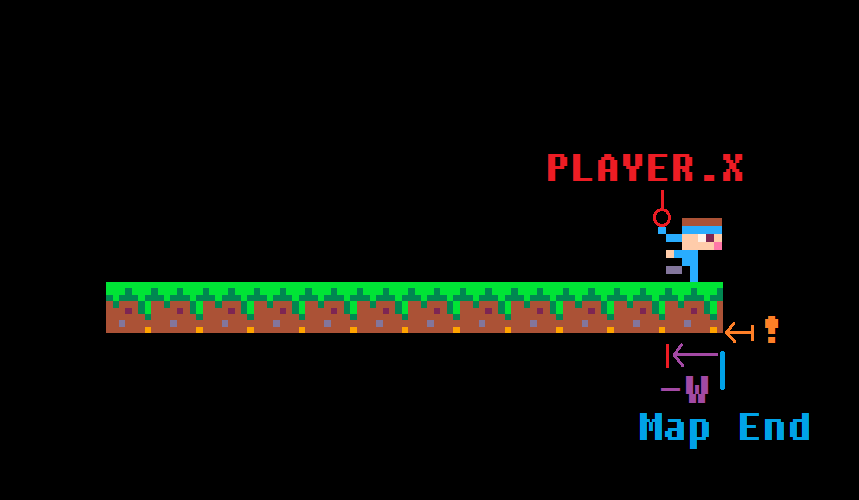
For example, in the above image:
A. player's Y + player's height + 1 pixel = 19
B. 19 divided by 8 gives remainder 3
C. 3 minus 1 equals 2
(That tells us that the player is 2 pixels under a map grid line, the tops of map tiles)
D. Subtract the 2 from the player Y to make player (an 8x8 sprite) lined up on the map grid (8x8 tiles)
Try removing this line of code, and jump around in your game to see how you can sometimes get stuck too low in a ground tile.
function player_animate()
...
end
player_animate = a custom function that holds the player animation code.
It should only be run once from inside the game _update() function.
And it is its own function so that our code stays organized.
() = "parentheses" identify this code as a function.
They can be empty for functions that run the exact same way every time.
...
  if player.jumping then
    player.sp=7
  elseif player.falling then
    player.sp=8
  elseif player.sliding then
    player.sp=9
...
These are pretty straight forward. When we only have one sprite pose for a certain action, then we simply check if that action is set to true, and set the player sprite to the sprite number of that pose.
...
  elseif player.running then
    if time()-player.anim>.1 then
      player.anim=time()
      player.sp+=1
      if player.sp>6 then
        player.sp=3
      end
    end
...
For the running animation we are using four different sprites that need to cycle through
if player.running is true. So this uses a simple animation code that cycles
to the next sprite pose in the line, restarts the cycle at the right point, and also controls
the animation timing.
.1 = the animation wait time. So you can increase this number to lengthen the delay
between the animation poses. That will slow the animation down. Decrease this number to shorten
the delay, and so speed the animation up.
...
  else --player idle
    if time()-player.anim>.3 then
      player.anim=time()
      player.sp+=1
      if player.sp>2 then
        player.sp=1
      end
    end
  end
...
For the idle (not moving) animation we are using two different sprites that need to cycle through if all the other movement statuses are false. So this uses a simple animation code that cycles to the next sprite pose in the line, restarts the cycle at the right point, and also controls the animation timing.
.3 = the animation wait time. So you can increase this number to lengthen the delay
between the animation poses. That will slow the animation down. Decrease this number to shorten
the delay, and so speed the animation up.
Camera and Map Variables
--simple camera
  cam_x=0

  --map limits
  map_start=0
  map_end=1024
cam_x = camera X position
Used for moving the camera left and right. In our example game, we are ignoring the Y axis (up and down),
but you can also make a cam_y if you want to make levels taller than one game screen.
map_start=0 = the pixel from the left of the map editor where the map level begins.
If you create multiple levels then you only need to change this variable to position the camera at the beginning of that level.
map_end=1024 = the pixel from the left of the map editor where the map level ends.
In the example game, we only create one long level so the end of it is at pixel 1024.
If you create multiple levels then you only need to change this variable to position the camera at the beginning of that level.
Camera Update
function _update()

  ...

  --simple camera
  cam_x=player.x-64+(player.w/2)
  if cam_x<map_start then
     cam_x=map_start
  end
  if cam_x>map_end-128 then
     cam_x=map_end-128
  end
  camera(cam_x,0)
end
cam_x=player.x-64+(player.w/2) = set the camera X position to always center the player.
We subtract 64 because that is half the screen width, and the camera X is the left side of the screen.
So the left side of the camera should be half a game screen behind the player, putting the player almost in the middle.
Then we add half the player width, to really center the camera on the player because the player X is the left side of the player,
but we want the middle of the player to be in the middle of the screen.

You could put this code inside of its own function and name it camera_update(), just like we did with the player.
We named this "simple" because there is a more advanced camera that is not locked to the player, but instead allows the player some room to move around in the center of the screen without adjusting the camera until the player moves far enough away.
function player_update()

  ...

  --limit player to map
  if player.x<map_start then
    player.x=map_start
  end
  if player.x>map_end-player.w then
    player.x=map_end-player.w
  end
end
if player.x<map_start then = check if the player moves left, past the start of the map.
player.x=map_start = set the player back to the map start
This will reset the player position before the game finishes the update, so
even if the player tries to move off to the left, the player will look like it is hitting a wall.
if player.x>map_end-player.w then = check if the player moves right, past the end of the map.
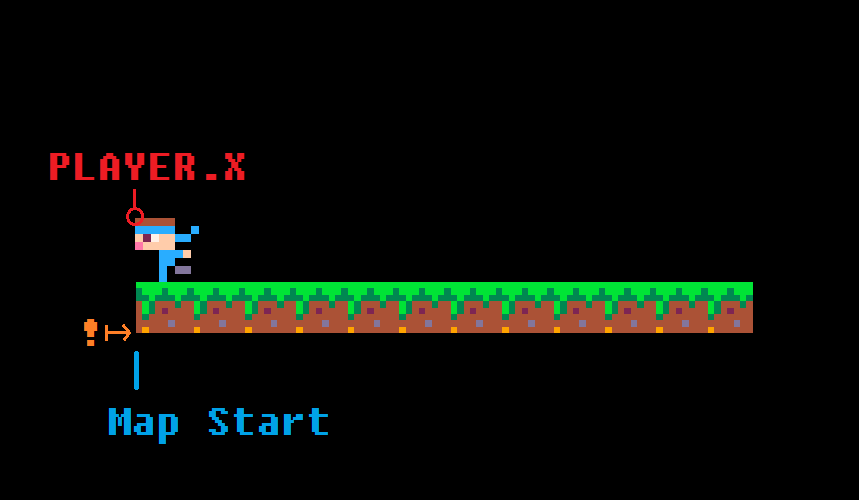
player.x=map_end-player.w = set the player back before the map end
This will reset the player position before the game finishes the update, so
even if the player tries to move off to the right, the player will look like it is hitting a wall.
We must also subtract the player width because player X is the left side of the player, so to keep them on the game screen, we need them to be left of the map end. How much left? Well however wide they are.
--variables

function _init()
  player={
    sp=1,
    x=59,
    y=59,
    w=8,
    h=8,
    flp=false,
    dx=0,
    dy=0,
    max_dx=2,
    max_dy=3,
    acc=0.5,
    boost=4,
    anim=0,
    running=false,
    jumping=false,
    falling=false,
    sliding=false,
    landed=false
  }

  gravity=0.3
  friction=0.85

  --simple camera
  cam_x=0

  --map limits
  map_start=0
  map_end=1024
end

-->8
--update and draw

function _update()
  player_update()
  player_animate()

  --simple camera
  cam_x=player.x-64+(player.w/2)
  if cam_x<map_start then
     cam_x=map_start
  end
  if cam_x>map_end-128 then
     cam_x=map_end-128
  end
  camera(cam_x,0)
end

function _draw()
  cls()
  map(0,0)
  spr(player.sp,player.x,player.y,1,1,player.flp)
end

-->8
--collisions

function collide_map(obj,aim,flag)
 --obj = table needs x,y,w,h
 --aim = left,right,up,down

 local x=obj.x  local y=obj.y
 local w=obj.w  local h=obj.h

 local x1=0	 local y1=0
 local x2=0  local y2=0

 if aim=="left" then
   x1=x-1  y1=y
   x2=x    y2=y+h-1

 elseif aim=="right" then
   x1=x+w-1    y1=y
   x2=x+w  y2=y+h-1

 elseif aim=="up" then
   x1=x+2    y1=y-1
   x2=x+w-3  y2=y

 elseif aim=="down" then
   x1=x+2      y1=y+h
   x2=x+w-3    y2=y+h
 end

 --pixels to tiles
 x1/=8    y1/=8
 x2/=8    y2/=8

 if fget(mget(x1,y1), flag)
 or fget(mget(x1,y2), flag)
 or fget(mget(x2,y1), flag)
 or fget(mget(x2,y2), flag) then
   return true
 else
   return false
 end

end

-->8
--player

function player_update()
  --physics
  player.dy+=gravity
  player.dx*=friction

  --controls
  if btn(⬅️) then
    player.dx-=player.acc
    player.running=true
    player.flp=true
  end
  if btn(➡️) then
    player.dx+=player.acc
    player.running=true
    player.flp=false
  end

  --slide
  if player.running
  and not btn(⬅️)
  and not btn(➡️)
  and not player.falling
  and not player.jumping then
    player.running=false
    player.sliding=true
  end

  --jump
  if btnp(❎)
  and player.landed then
    player.dy-=player.boost
    player.landed=false
  end

  --check collision up and down
  if player.dy>0 then
    player.falling=true
    player.landed=false
    player.jumping=false

    player.dy=limit_speed(player.dy,player.max_dy)

    if collide_map(player,"down",0) then
      player.landed=true
      player.falling=false
      player.dy=0
      player.y-=((player.y+player.h+1)%8)-1
    end
  elseif player.dy<0 then
    player.jumping=true
    if collide_map(player,"up",1) then
      player.dy=0
    end
  end

  --check collision left and right
  if player.dx<0 then

    player.dx=limit_speed(player.dx,player.max_dx)

    if collide_map(player,"left",1) then
      player.dx=0
    end
  elseif player.dx>0 then

    player.dx=limit_speed(player.dx,player.max_dx)

    if collide_map(player,"right",1) then
      player.dx=0
    end
  end

  --stop sliding
  if player.sliding then
    if abs(player.dx)<.2
    or player.running then
      player.dx=0
      player.sliding=false
    end
  end

  player.x+=player.dx
  player.y+=player.dy

  --limit player to map
  if player.x<map_start then
    player.x=map_start
  end
  if player.x>map_end-player.w then
    player.x=map_end-player.w
  end
end

function player_animate()
  if player.jumping then
    player.sp=7
  elseif player.falling then
    player.sp=8
  elseif player.sliding then
    player.sp=9
  elseif player.running then
    if time()-player.anim>.1 then
      player.anim=time()
      player.sp+=1
      if player.sp>6 then
        player.sp=3
      end
    end
  else --player idle
    if time()-player.anim>.3 then
      player.anim=time()
      player.sp+=1
      if player.sp>2 then
        player.sp=1
      end
    end
  end
end

function limit_speed(num,maximum)
  return mid(-maximum,num,maximum)
end
font