![]()
PICO-8
This PICO-8 guide helps you find the code or commands you need, based on what you want to do. It also helps explain the basics of programming, how to use functions, and provides many examples. Whether you are new to PICO-8 or not, this guide is a nice reference companion while making games in PICO-8.
The official manual has everything you might need to know.
Pico-8 Manual
If you already know the code, and want to search by that, try these:
Wiki Reference
PICO-8 Cheatsheet
by Neko250 and iiviigames
PICO-8 Guide
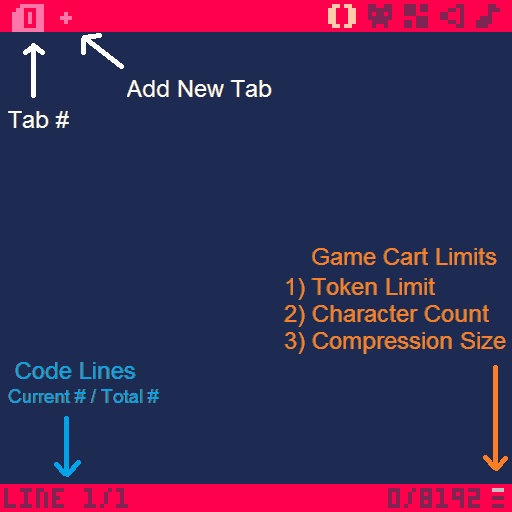
Main Screen
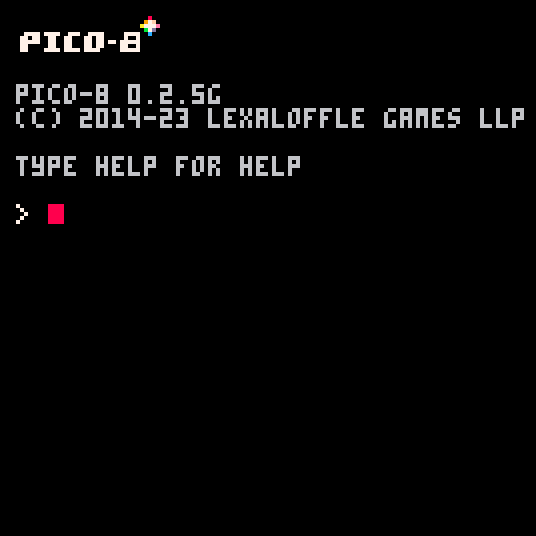
This is what you will see every time you start up PICO-8. It is a fun retro style command line like the original home computers. You have to type in commands to navigate your folders and load your games.
To begin editing a blank game, just press

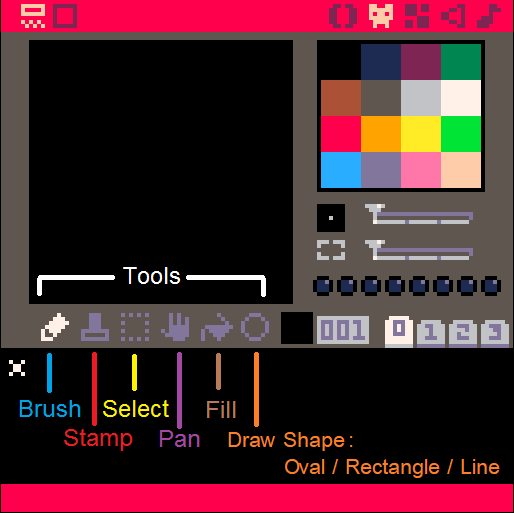
Game Editors
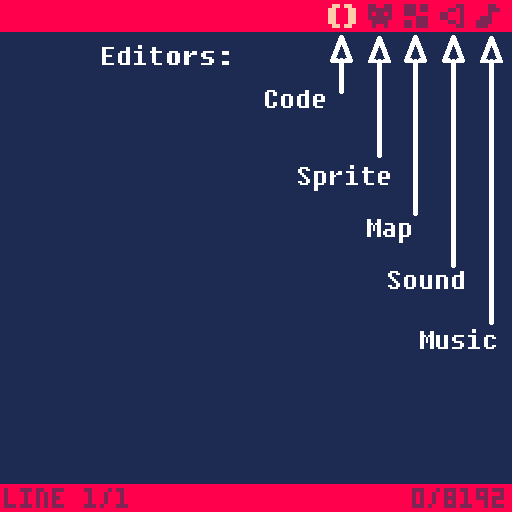
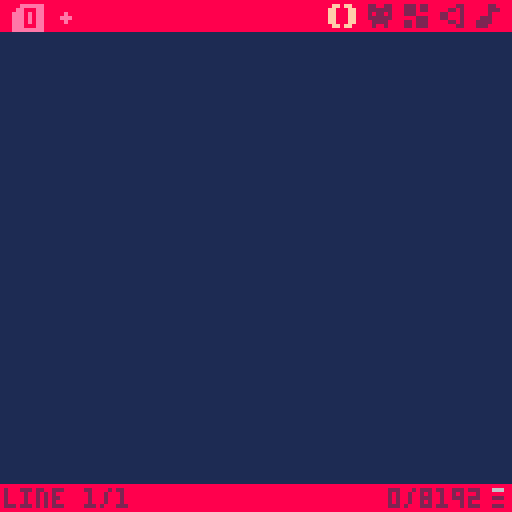
Code Editor
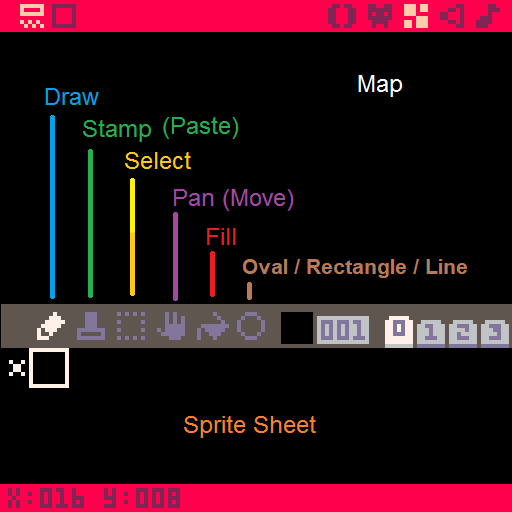
Sprite Editor
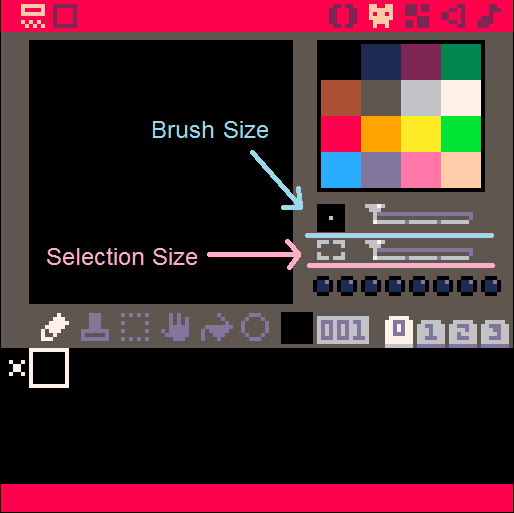
Map Editor
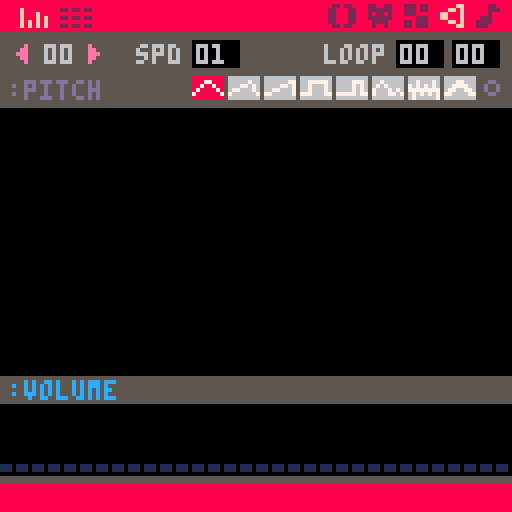
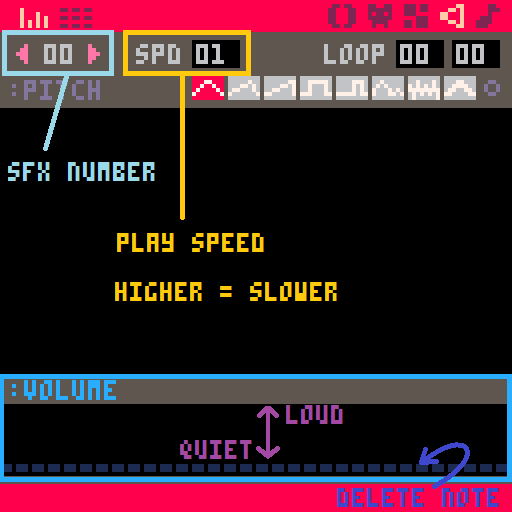
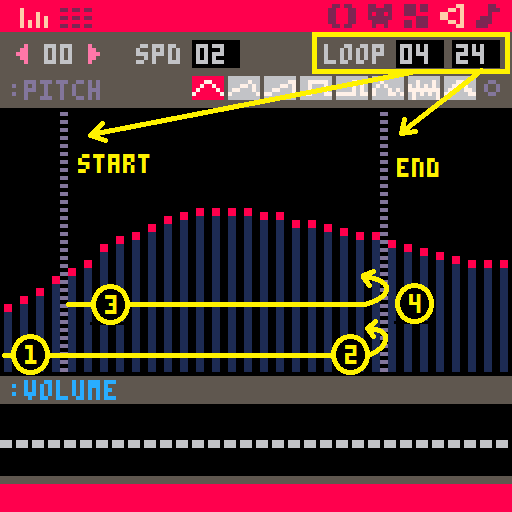
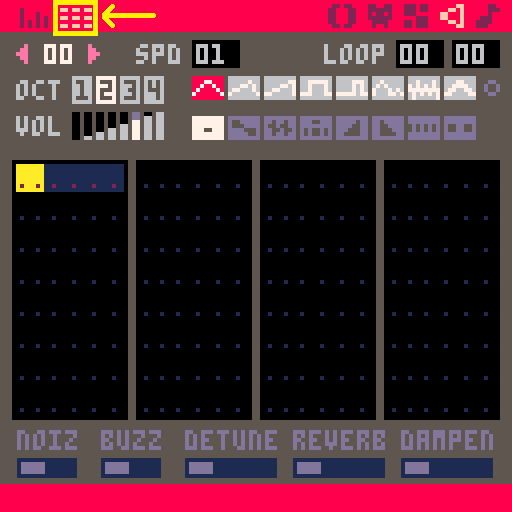
Sound Effects (SFX) Editor
Pitch Mode
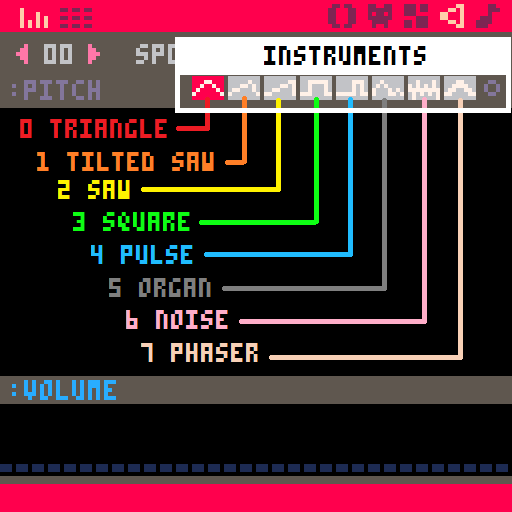
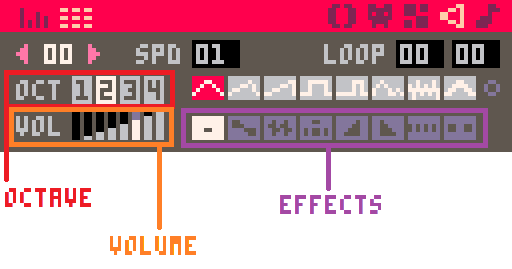
Instruments and Loop Controls
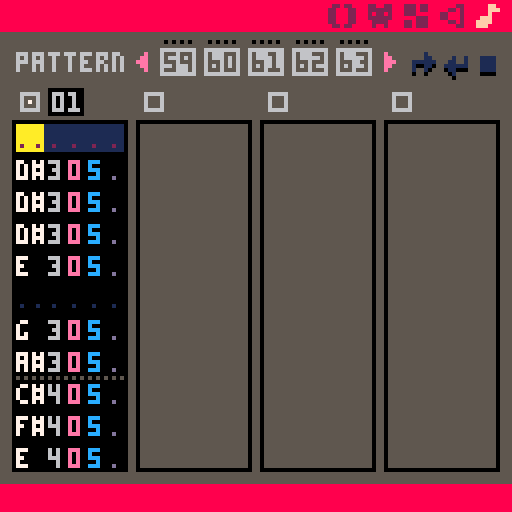
Tracker Mode
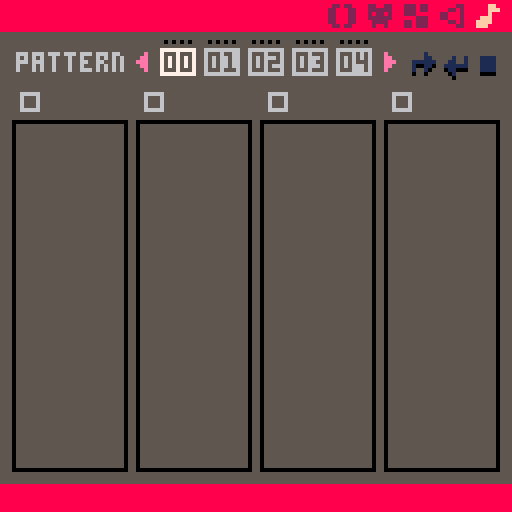
Music Editor
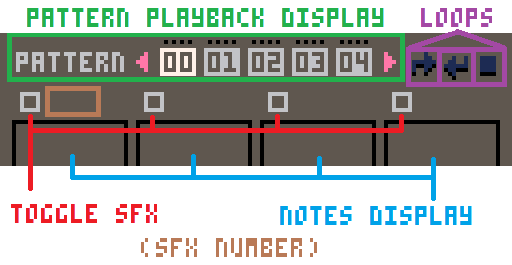
Example of a selected SFX (#1) being used in a Music Pattern:
Get Help
helplists all commands to navigate PICO-8
See Files and Folders
dirorlsdir = "directory" (folder)
ls = "list"
shows all files and folders inside the folder currently open
Open Folder outside of PICO-8
folderOpens the current folder in a new window, outside of PICO-8
View the actual saved PICO-8 files and folders.
Open Folder inside PICO-8
cd folder_namecd = "change directory" or "change folder"
Opens the folder with that name if it is inside the folder already open
Make Folder
mkdir folder_namemk = "make"
dir = "directory" (folder)
creates a new folder inside the folder already open
Back 1 Folder
cd ..cd = "change directory" or "change folder"
.. = "back"
steps back to the parent folder that holds the folder currently open
Download Games
sploresplore = "explore"
opens menu for finding and downloading PICO-8 games
Load Game
load game_nameloads the game if that game file is in the folder already open
Save Game
save game_namesaves the loaded game into the folder already open
or anywhere in PICO-8, press:


Play Game
runType this into the command screen.
run = play the loaded game
or anywhere in PICO-8, press:

Exit Game
exits the running game
Continue Game
resumeResume = "continue"
resumes the running game from last exit point
Edit Game
From PICO-8 command menu, press:
Opens game editor of the loaded game
If game is running, press ESC twice
Set Player Buttons
keyconfig"keyconfig" = key configuration (button set up)
Opens button editor
Restart PICO-8
rebootReboot = "restart"
restarts the whole PICO-8 system, make sure you save first!
Exit PICO-8
shutdowncloses the whole PICO-8 system, make sure you save first!
Set up the Game
function _init()init = "initiate"
do something one time when game starts
not needed for the game to run
Update the Game
function _update()do something every frame we see: 30 times per second
Frame: 1 picture on screen.
Needed for game to run.
function _update60()or use this for 60 times per second
Draw to the Game Screen
function _draw()do something every frame we see: 30 times per second
Frame: 1 picture on screen
Needed for game to run
Write on Screen
print( string, x, y, color)print = write on the screen at (x, y) position, in a color
x = (optional) number of pixels from the left going right
y = (optional) number of pixels from the top going down
color = (optional) a color number
Set Position on Screen
cursor( x, y )cursor = imagine a mouse pointer on the screen(PICO-8 games do not have a mouse)
x = number of pixels from the top left corner going right
y = number of pixels from the top left corner going down
Erase Screen
cls()CLS = "clear screen"
erases the entire screen
Erasing and re-drawing everything on the screen every frame is standard practice.
So you will almost always want to have this in the first line of the _draw() function.
Move camera
camera( x, y )sets the camera to position on screen
x = number of pixels from the top left corner going right
y = number of pixels from the top left corner going down
camera()reset camera to 0,0 position
Crop the screen
clip( x, y, w, h )Clipping is for creating a smaller area to draw in.
x = number of pixels from the top left corner going right
y = number of pixels from the top left corner going down
w = width of clipping rectangle in pixels
h = height of clipping rectangle in pixels
After using this function, the screen will not draw outside of the clipped area.
clip()Reset to fullscreen, no clipping
Circle Outline
circ( x, y, radius, color )circ = circle
x = number of pixels from the top left corner going right
y = number of pixels from the top left corner going down
x,y = the position of the center of the circle
radius = number of pixels from the center to the outside
color = (optional) color number
Circle Filled
circfill( x, y, radius, color )circfill = circle filled
x = number of pixels from the top left corner going right
y = number of pixels from the top left corner going down
x,y = the position of the center of the circle
radius = number of pixels from the center to the outside
color = (optional) a color number
Line
line(x1, y1, x2, y2, color)circ = circle
x = number of pixels from the top left corner going right
y = number of pixels from the top left corner going down
x1, y1 = the position of the start of the line
x2, y2 = the position of the end of the line
color = (optional) a color number
Rectangle Outline
rect( x1, y1, x2, y2, color )rect = rectangle
x = number of pixels from the top left corner going right
y = number of pixels from the top left corner going down
x1, y1 = the position of the first corner
x2, y2 = the position of the opposite corner
color = (optional) a color number
Rectangle Filled
rectfill( x1, y1, x2, y2, color )rectfill = rectangle filled
x = number of pixels from the top left corner going right
y = number of pixels from the top left corner going down
x1, y1 = the position of the first corner
x2, y2 = the position of the opposite corner
color = (optional) a color number
Draw Patterns
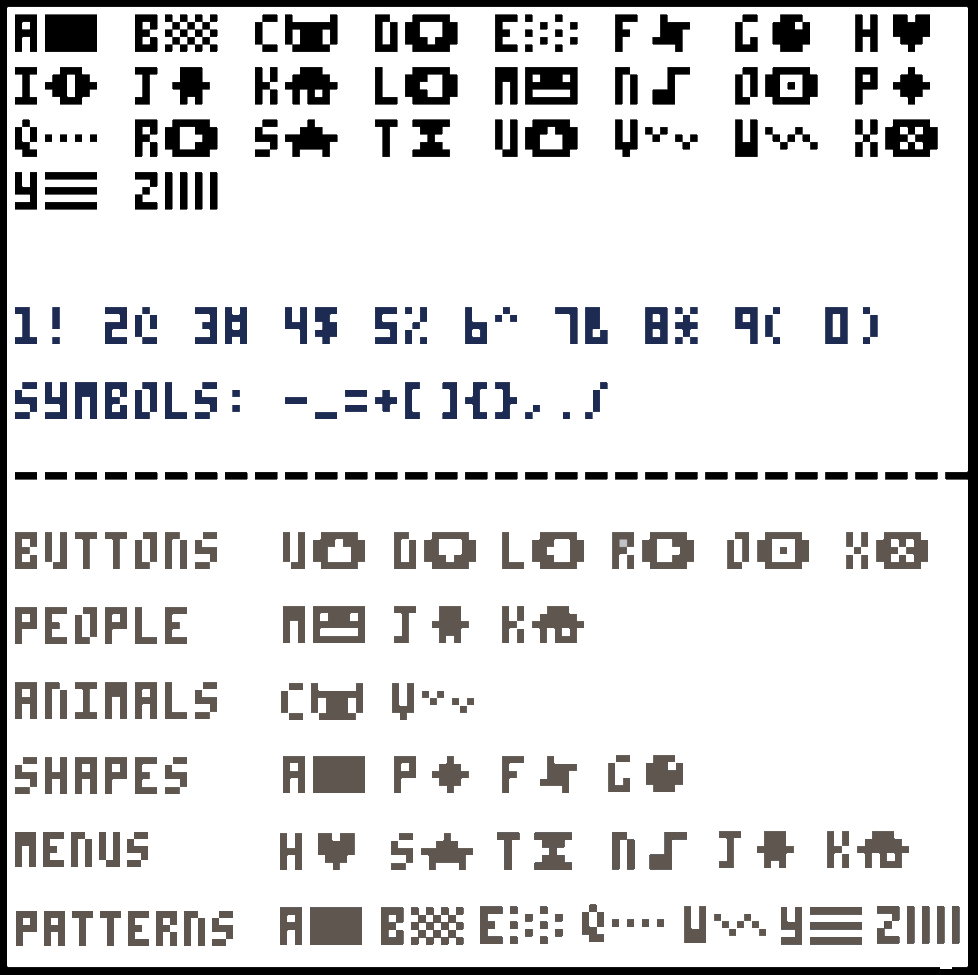
fillp( glyph )fillp = fill pattern
glyph = one of the special PICO-8 font characters that replace capital letters.
Write Glyphs
print( glyph ) --as a string fillp( glyph )glyph = one of the special PICO-8 font characters that replace capital letters.
You can also use glyphs ( L, R, U, D ) with button detection code instead of button numbers.
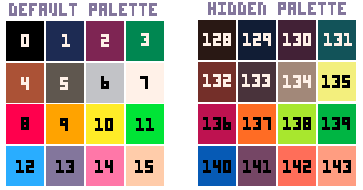
if btn( glyph ) thenColor Numbers
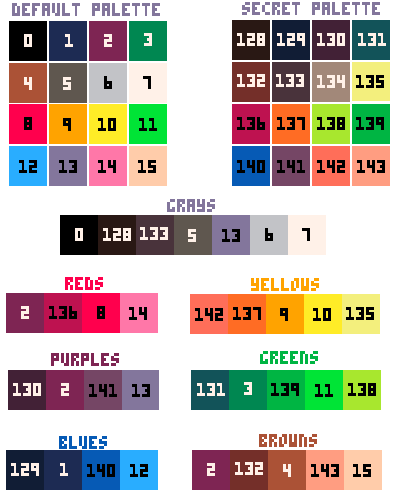
00(#000000) black
01(#1D2B53) navy
02(#7E2553) maroon
03(#008751) emerald
04(#AB5236) brown
05(#5F574F) charcoal
06(#C2C3C7) gray
07(#FFF1E8) white
08(#FF004D) red
09(#FFA300) orange
10(#FFFF27) yellow
11(#00E756) green
12(#29ADFF) sky
13(#83769C) lavender
14(#FF77A8) pink
15(#FFCCAA) peach128(#291814) onyx
129(#111D35) midnight
130(#422136) plum
131(#125359) forest
132(#742F29) chocolate
133(#49333B) eggplant
134(#A28879) beige
135(#F3EF7D) lemon
136(#BE1250) burgundy
137(#FF6C24) pumpkin
138(#A8E72E) lime
139(#00B543) jade
140(#065AB5) blue
141(#754665) mauve
142(#FF6E59) coral
143(#FF9D81) salmon
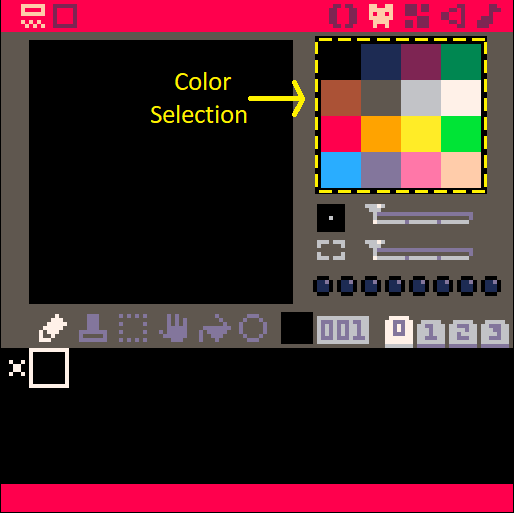
Select Color
color( number )select the color to be used
This will set the color to be used in the next use, such as:
print() circ() rect() line()If those and functions like them do not use the optional color setting, then whatever color was last set will be used. By using the optional color settings in functions that have them, it sets the new color to be the currently selected color.
Example:
color(8)
--changed color to red
print("hello world")
--hello world will be in red
The above is the same as:
print("hello world",0,0,8)    --0 for x, 0 for y, 8 for red
--hello world will be in red
This is how they work together:
print("hello",0,0,8)    --0 for x, 0 for y, 8 for red
--hello will print in red
color(7)
--changed color to white
print("world")
--world will print in white
Get Color from Screen
pget( x, y )pget = "pixel get" (1 pixel)
x = number of pixels from the top left corner going right
y = number of pixels from the top left corner going down
Returns the color number of the pixel at location (x,y) on the screen.
Set Color to Screen
pset( x, y, color )pset = "pixel set" (1 pixel)
x = number of pixels from the top left corner going right
y = number of pixels from the top left corner going down
color = (optional) a color number
Get Color from Sprite Sheet
sget( x, y )sget = "sprite sheet get" (1 pixel)
x = number of pixels from the top left corner going right
y = number of pixels from the top left corner going down
Returns the color number of the pixel at location (x,y) on the sprite sheet (not screen).
Both x and y must be within the range of 0 and 127.
Set Color to Sprite Sheet
sset( x, y, color )sset = "sprite set" (1 pixel)
x = number of pixels from the top left corner going right
y = number of pixels from the top left corner going down
color = (optional) a color number
Swap Colors
pal( current color, new color, boolean )pal = "palette" (set of colors)
current color = color number to change
new color = color number to change to
boolean = (optional) 0 for next draw or 1 for already drawn, default 0.
pal()resets all colors to the default palette
pal(table)swap full palette using a table.
pal({1,2,3,...})This will swap color numbers 1-15 (in order) to the numbers set within the table.
Make Color Transparent
palt( color, boolean )palt = "palette transparent"
color = a color number
boolean = true or false to set transparency on or off
true = do not draw this color pixel
false = do draw this color pixel
palt()resets all colors to default transparency, where only black (#0) is transparent
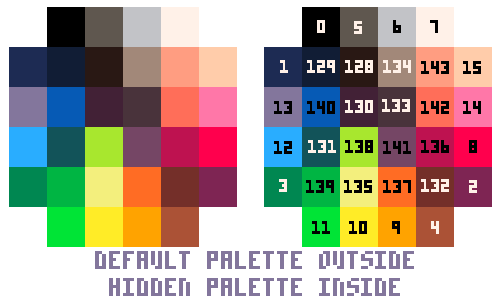
Hidden Colors
PICO-8 has 16 extra colors that are undocumented and a bit tricky to access.
This means we actually have 32 colors to choose from and you can set your own 16 color palette using a mix of them both.
pal( current color, new color, 1 )Using the palette swapping function, you can change a default color with a hidden color but you must set the last argument to 1.
poke(0x5f2e,1)This accesses the PICO-8 memory and sets the color palette to change. Do this to see the code below.
pal({1,2,3...},1)swap the full palette using a mix of default and hidden color numbers in a table and the second argument set to 1.
pal({[0]=128,129,130,131,132,133,134,135,136,137,138,139,140,141,142,143},1)swap all of the default colors to the hidden colors.
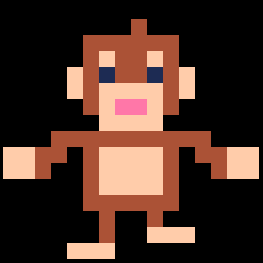
What is a Sprite?
sprite = a drawing using multiple pixels that can be considered as a single thing.
A character, item, or piece of the background are usually made of one or many sprites. Multiple sprites that look similar but have small changes between them are often used to create sprite animations.
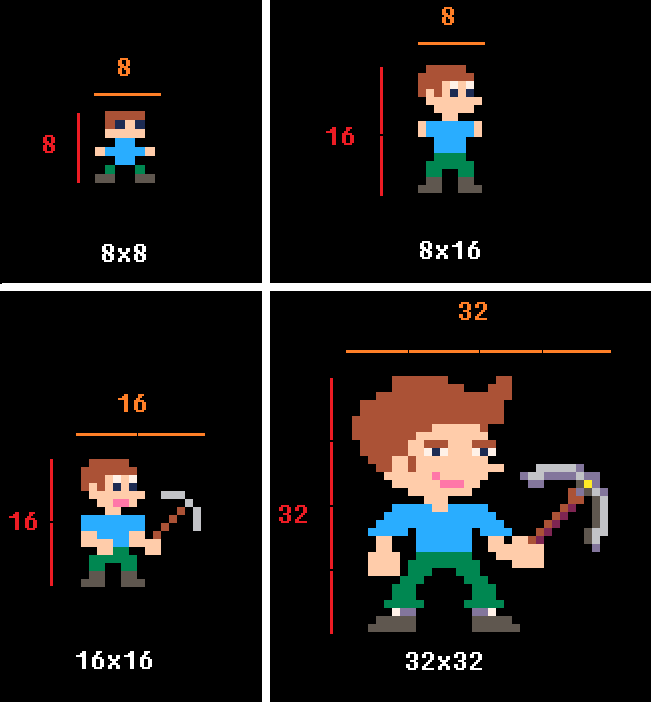
A sprite has a width (W) and a height (H). The W is the number of pixels wide and the H is the number of pixels tall.
We can communicate the size of a sprite by saying these two numbers together.
The size of a sprite is called its "dimensions".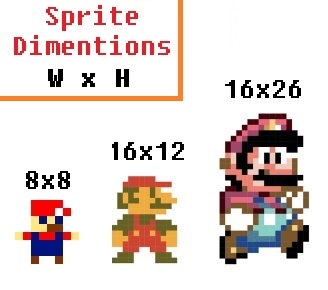
As you can see, the bigger sprite looks better because it has more pixels and can show more detail. In fact, even the most beautiful and detailed digital pictures are just made of many many pixels. Here is how we can take the same character and draw him in larger dimensions in PICO-8.
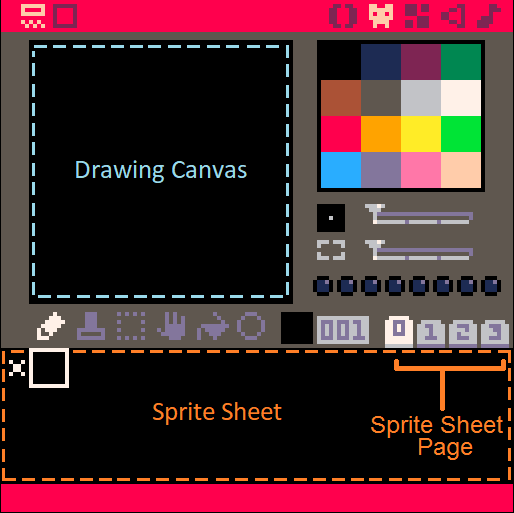
What is a Sprite Sheet?
sprite sheet = a collection of multiple sprites.
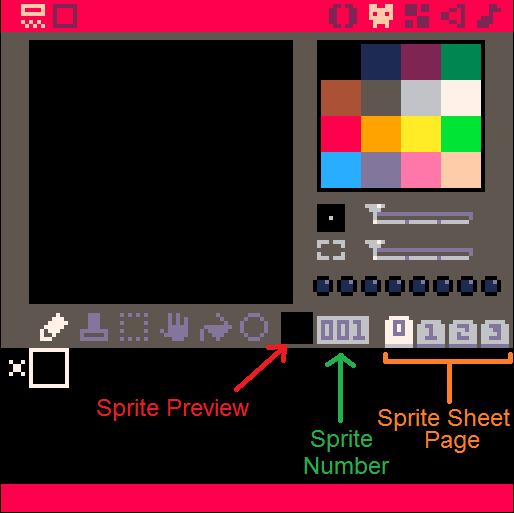
You can find the PICO-8 sprite sheet in the sprite editor. Each PICO-8 game has one sprite sheet that appears broken up into 4 pages. The sprite editor is more than just a place to draw our sprites:
Example of a full sprite sheet (1st page):
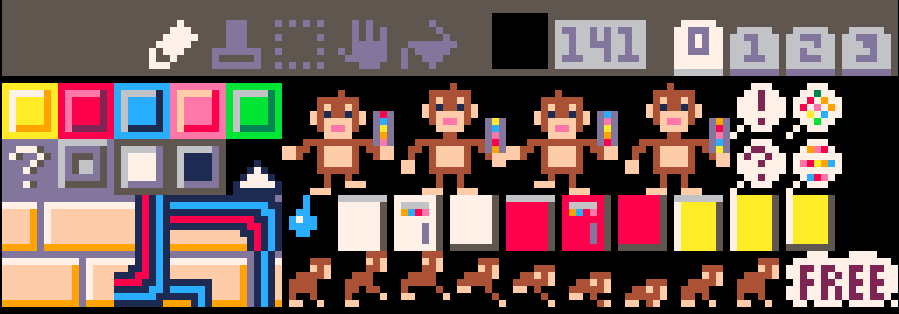
Here, you can see multiple sprites in a sprite sheet used to create movement animation.
Each small monkey is a single tile (8x8) and there are 9 different sprites that are used to make it look like one monkey is running in the game.
Hover your mouse over a selected sprite's top left corner and you will see the x and y values of the sprite location on the sprite sheet. This is useful for the SSPR( ) function.
Draw a Sprite on Screen
spr( sprite number, x, y, w, h, flip x, flip y )SPR( ) Full Tutorial!
spr = "sprite"
sprite # = a number of the sprite in the sprite sheet
x = a number of pixels from the top left corner of the game screen going right
y = a number of pixels from the top left corner of the game screen going down
w = (optional) a number for how wide the sprite is in tiles (8 pixels in 1 tile) Default = 1
h = (optional) a number how tall the sprite is in tiles (8 pixels in 1 tile) Default = 1
flip x = (optional) true or false for flipping or reversing the sprite from left to right / right to left
flip y = (optional) true or false for flipping or reversing the sprite from top to bottom / bottom to top
If you do not include columns and rows, the default is 1. So the simplest form of this code draws an 8x8 sprite.
Example of a 16x16 pixel sprite:
A sprite is always drawn starting from the top left corner of the sprite. So the X and Y coordinates given will be the location for the top left pixel of the sprite.
If you flip the sprite on the X or Y, this only changes the way it is drawn, not the position on the screen.
Draw a Sprite of Any Size
sspr( sx, sy, w, h, x, y, dw, dh, flip x, flip y )sspr = "special sprite" ?
sx = "sprite x" number of pixels right in sprite sheet to the top left corner of the sprite
sy = "sprite y" number of pixels down in sprite sheet to the top left corner of the sprite
w = "width" number of pixels wide from sx
h = "height" number of pixels high from sy
x = # pixels from the left to start drawing sprite on screen
y = # pixels from the top to start drawing sprite on screen
dw = (optional) the width of the sprite drawn on the screen. Default = w
dh = (optional) the height of the sprite drawn on the screen. Default = h
flip x = (optional) If true, the image is drawn inverted left to right. Default = false
flip y = (optional) If true, the image is drawn inverted top to bottom. Default = false
A sprite is always drawn starting from the top left corner of the sprite. So the X and Y coordinates given will be the location for the top left pixel of the sprite.
If you flip the sprite on the X or Y, this only changes the way it is drawn, not the position on the screen.
Draw Part of Map on Screen
map( tile x, tile y, x, y, w, h, flag )tile x = column number of top left corner of map section in tiles (8 pixels per tile)
tile y = row number of top left corner of map section in tiles (8 pixels per tile)
x = # pixels from the left to start drawing map section on screen
y = # pixels from the top to start drawing map section on screen
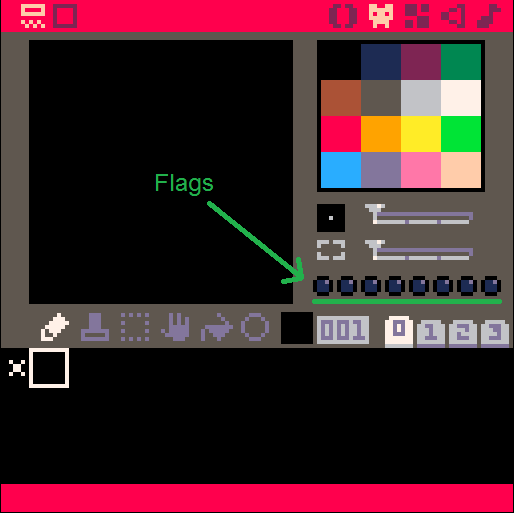
flag = (optional) a flag number to specify certain sprites.
Get Sprite on Map
mget( column, row )mget = "map get"
columns = number of tiles from the top (8 pixels in 1 tile)
rows = number of tiles from the right (8 pixels in 1 tile)
player_column = player_x / 8
player_row = player_y / 8

mget( player_column + 1, player_row )
This is useful for finding certian things on the map near the player. In the code above, you get what sprite number is to the right of the player on the map. For example, I might want to check for a door on the map.
Set Sprite on Map
mset( column, row, sprite number )mset = "map set"
columns = number of tiles from the top (8 pixels in 1 tile)
rows = number of tiles from the right (8 pixels in 1 tile)
sprite number = number of the sprite in the sprite sheet
playerColumn = playerX / 8
player_row = playerY / 8
door_column = 4
door_row = 5
door_open = 20 --sprite #
door_close = 21 --sprite #

if player_column == door_column
and player_row == door_row then
    mset( door_column, door_row, door_open )
else
    mset( door_column, door_row, door_close )
end
This is useful for changing certain things on the map, when something happens. In the code above, we check if the player is standing on a door, then set the door sprite to be open, else set it closed.
What is a String?
"any text inside quotation marks"A string is a line of text. It can be one letter or a full sentence, or just symbols.
This tells the computer to see anything inside quotation marks (" ") as just letters and symbols, not as numbers or variables.
Example:
b = "hello"
print( b ) --prints: hello
Without quotation marks, it is a variable name. Example error:
a = hello
print( a ) --prints [nil]
nil (null, nothing) printed because the computer was looking for a variable named
hello, not a string.
Count the Length of the String
#stringPlacing a # in front of a variable name that holds a string counts how many characters are in the string.
Example:
a = "hello"
print( #a ) -- prints: 5
What is a Variable?
variable = "information"A variable is a letter, symbol, or word that holds information.
This tells the computer to make the variable hold the information and remember them.
Example 1:
a = 1
print( a ) --prints: 1
Anytime the Computer sees A, it will remember that A is 1.
Example 2:
b = 20
c = 10
print( b + c ) --prints: 30
The computer understands B as 20 and C as 10 so adding B and C, the computer adds 20 and 10 and prints the answer.
A variable can hold a "string": words = "these are words"
A variable can hold a "numeral": num = 120
A variable can hold a "boolean": bool = true
A variable can hold a "table": tbl = { key = value }
A variable can hold a "function": p = print
(This is specific to the Lua programming language)
Mix Strings with Variables
string..variablethe .. tells the computer to read a string and then change to read a variable, or the other way around.
Example:
points = 10
print( "score= "..points ) --prints: score= 10What is a table?
Table = a set of information placed into rows and columns
You can collect and organize your game information easily into tables.
You can't see the tables in PICO-8, so you will have to imagine them.
Example:
Column 1
(key)Column 2
(value)1 "A" 2 "B" 3 "C" Key = The first column's data. A number or string used to find the data stored in Column 2
Value = The second column's data. A number, string, boolean, or table that you want to store
Create an Empty Table
variable = { }
{ = starts the table
} = ends the table
Example:
fruit = { }Fruit
Create a Table as a Simple List
variable = { a, b, c }{ = starts the table
} = ends the table
a, b, c, = data added to the table and automatically placed in rows 1, 2, and 3
Example:
colors = { "red", "blue", "pink", "yellow" }| Colors | |
| 1 | "red" |
| 2 | "blue" |
| 3 | "pink" |
| 4 | "yellow" |
Create a Table with Named Keys
variable = { a=b, c=d, e=f }{ = starts the table
} = ends the table
a=b = information added to the table and put in key: A linked with value: B
Example:
highscores={ "john"=10, "bob"=143, "kim"=984 }Or write it like this:
highscores = { }      --creates empty table
highscores.john = 10 -- adds key "john" with value 10
highscores.bob = 143
highscores.kim = 984
This is what it would look like:
| HighScores | |
| john | 10 |
| bob | 143 |
| kim | 984 |
Create a Table inside another Table
variable = { a={ }, b={ } }{ = starts the table
} = ends the table
a={ } : First table (named a) inside main table
b={ } : Second table (named b) inside main table
items={
    sword={ name="iron sword", strength=20 },
    shield={ name="wood shield", strength=8 }
}| Items | |||||
| sword |
| ||||
| shield |
|
You may also insert tables without key names, so that each item added is automatically numbered.
enemies = {
    { health=10, attack=3 },
    { health=20, attack=8 }
}| Enemies | |||||
| 1 |
| ||||
| 2 |
|
Add to a Table
add( table, value )table = the variable name of the table
value = the information to add to the table
, = commas separates the table name with the information to add
colors = { "red", "blue", "pink", "yellow" }| Colors | |
| 1 | "red" |
| 2 | "blue" |
| 3 | "pink" |
| 4 | "yellow" |
add( colors, "purple" )| Colors | |
| 1 | "red" |
| 2 | "blue" |
| 3 | "pink" |
| 4 | "yellow" |
| 5 | "purple" |
Delete from a Table
del( table, value )table = the variable name of the table
value = the data to delete from the table
, = commas separates the table name with the data to delete
| Colors | |
| 1 | "red" |
| 2 | "blue" |
| 3 | "pink" |
| 4 | "yellow" |
del( colors, "blue" )| colors | |
| 1 | "red" |
| 2 | "pink" |
| 3 | "yellow" |
Notice that BLUE was key #2. Deleting BLUE, also moved the rest of the list up one number.
This happens for tables that have numbered keys, but it does not change tables that have keys that are strings.
Get the Total Number of things in a Table
#table# = count the number of items in a table
| HighScores | |
| john | 10 |
| bob | 143 |
| kim | 984 |
#highscores --count: 3Set Value in a Table
table[ key ] = value[ ] = the key of the table(left column)
| HighScores | |
| john | 10 |
| bob | 143 |
highscores[ "john" ] = 30| HighScores | |
| john | 30 |
| bob | 143 |
Or:
table[ number ] = value[ ] = the key of the table(left column)
| Colors | |
| 1 | ""red" |
| 2 | "blue" |
| 3 | "pink" |
colors[ 2 ] = "orange"| colors | |
| 1 | "red" |
| 2 | "orange" |
| 3 | "pink" |
Get Value from a Table with Numbered Keys
table[ number ][#] = the number key of the table (left column)
| Colors | |
| 1 | "red" |
| 2 | "orange" |
| 3 | "pink" |
print( colors[ 2 ] ) --prints: orangeGet Value from a Table with Named Keys
table[ key ]OR
table.key[ ] = the variable name key of the table (left column)
This is just like a variable, so just asking for the table and key, it will be whatever the value is in the table at that key.
| HighScores | |
| john | 10 |
| bob | 143 |
print( highscores[ "john" ] ) -- prints: 10print( highscores.john ) -- prints: 10Repeat a Certain Number of Times
for variable = start, stop, count_by do
    --code to repeat
end
variable = a letter or word to set as the current repeat count
start = a number for the repeat count to start at
stop = a number for the repeat count to end at
count by = a number for the count to increase or decrease by (optional, default 1) To count down, make this a negative number.
"FOR LOOPS" begin counting from the "start" number, count up or down by the "count by" number, and stops at the "stop" number.
Example:
for i = 1, 9, 2 do
    print( i )
end

--prints: 1 3 5 7 9
If the "count by" number is left out, then it will automatically be 1.
Example:for i = 1, 9 do print( i ) end --prints: 1 2 3 4 5 6 7 8 9
If you want to start at a high number and count down, then make the "count by" number a negative number.
Example:for i = 10, 3, -1 do print( i ) end --prints: 10 9 8 7 6 5 4 3
Repeat Until something Happens
repeat code until condition code = whatever code you want to repeat
condition = a variable or statement that will resolve to true or false
"REPEAT LOOPS" continue doing the code after REPEAT and stops repeating when the condition is true.
a = 0
repeat
    print( a )
    a += 1
until a == 5

--prints: 0 1 2 3 4
NOTE: Repeat always runs the code at least once, before checking the conditional.
Repeat While something is Happening
while condition do
    code
end
condition = a variable or statement that will resolve to true or false
code = whatever code you want to repeat
"WHILE LOOPS" repeat the code after DO and stops repeating when the condition is false.
b = 4
while b < 10 do
    print( b )
    b += 1
end

--prints: 4 5 6 7 8 9
Repeat this For Each Entry in a Table
foreach( table, funct )table = a variable holding a table
funct = name of a function to run multiple times
| fruit | |
| 1 | "apple" |
| 2 | "banana" |
| 3 | "pear" |
foreach( fruit, print )
--prints: apple banana pear
From the first to the last entry in the list, send each through the PRINT function.
Notice there are no parentheses on the function print. This is only passing the name of the function to be called, not calling the function here.
Repeat for All Entries in a Table
for variable in all( table ) dovariable = a local variable name (used within this loop) that will hold the value of each entry from the table
table = a variable that holds a table
| HighScores | |
| john | 10 |
| bob | 143 |
| kim | 984 |
for score in all( highscores )
    print( score )
end

-- prints: 10 143 984
To get both the value and the key from a table, use:
for key, value in pairs( table ) dokey = a local variable name (used within this loop) that will hold the key name (left column data)
value = a local variable name (used within this loop) that will hold the value data (right column data)
table = name of a table
for name, score in pairs( highscores )
    print( name )
    print( score )
end

-- prints: john 10 bob 143 kim 984
Force a Loop to Stop
breakfor i = 0, 10 do
if i == 5 then
break
end
print ( i )
end
--prints 0 1 2 3 4
Save Game
save gamename
Type this into the command screen of PICO-8.
Or, anywhere in PICO-8, do this:
Save Game Label

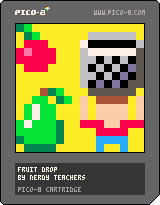
This takes a screen shot of your game, and saves it as the game's label when creating the game cartridge.
Save Game Cartridge
save gamename.p8.png
Type this into the command screen of PICO-8.
This saves your game cartridge as an image, with the label on the cover.
You can share this image with others who have PICO-8 and they can play it in PICO-8.
WAIT! Before you save your game image, you should write this in the first two lines of your game's code and it will show on your game cartridge:
--(game name)
--(made by)
Example:
Export Game as Website
export gamename.html
Type this into the command screen of PICO-8.
This exports the game for websites. It gives you two files that need to stay together. One is .html and the other is .js
Export Game as Desktop App
export gamename.bin
Type this into the command screen of PICO-8.
This exports the game as a standalone application. Share your game with anyone! They don't need PICO-8 to play it.
Export Sprite Sheet
export gamename.png
Type this into the command screen of PICO-8.
This exports the sprite sheet as an image in png format.
Export Sound FX
export gamename.wav
Type this into the command screen of PICO-8.
This exports the game's sound effects as a wav file. Share your game with anyone! They don't need PICO-8 to play it.
Check Button Press
btn( number , number )First Number = a button number or button symbol (see chart below)
Second Number = (optional) a player number (0-7)
If you hold the button down, this will act like it is rapidly pressed.
btnp( number , number )First Number = a button number or button symbol (see chart below)
Second Number = (optional) a player number (0-7)
If you hold the button down, this limits one press every other game frame.
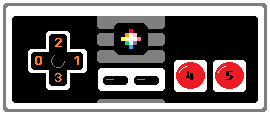
For multiplayer games, you will need to include player numbers: 0-7
Instead of button numbers, you can also use the symbols.
Button Number Symbol Left 0 shift+L Right 1 shift+R Up 2 shift+U Down 3 shift+D O 4 shift+O X 5 shift+X
Play a Sound Effect
sfx( sfx-number, channel, offset )sfx-number = the SFX number of the sound you want to play or stop
channel = (optional) a number specifying which of the 4 channels (#0-3) to play on.
offset = (optional) a number of notes into a sound for when to start playing the sound
If sfx-number is -1, current sound on the channel is stopped
If sfx-number is -2, it will finish the sound but stop looping.
If channel is -1 (default), a channel that is not in use will be picked automatically.
Example:
sfx( 1 ) -- play SFX-number 1sfx( 3, 0 ) -- play SFX-number 3 in channel 0sfx( 4, 3, 6 ) -- play SFX-number 4 in channel 3, start 6 notes in
Stop a Sound Effect
sfx( -1, channel)channel = (optional) a number specifying which of the 4 channels (#0-3) to play on.
Play Music
music( music-number, channel, offset )music-number = the number of the song in the music editor.
channel = (optional) a number specifying which of the 4 channels (#0-3) to play on.
offset = (optional) a number of notes into the music for when to start playing the music
music( 1 ) -- play music number 1music( 3, 0 ) -- play music 3 in channel 0music( 4, 3, 8 ) -- music 4, channel 3, start 8 notes inRound a number down
flr( number )flr= ("floor") find the nearest whole number by rounding downNumber = any number or decimal
Example:
a = flr( 1.6 ) -- a = 1b = flr( 7 / 3 ) -- b = 2
Make a number Positive
abs( number )abs = ("absolute") same number but ignore the sign( + / - )
Number = any number or decimal
a = abs( 16 ) -- a = 16b = abs( -2.5 ) -- b = 2.5d = abs( 1.5 - 2 ) -- d = 0.5Get a number's sign: ( + / - )
sgn( number )sgn = "sign" positive or negative ( + / - )
Number = any number or decimal
If # is positive, SGN(#) = 1
If # is zero, SGN(#) = 1
If # is negative, SGN(#) = -1
a = sgn( 16 ) -- a = 1b = sgn( 0 ) -- b = 1c = sgn( -2.5 ) -- c = -1d = sgn( 5 - 16 ) -- d = -1Notice that SGN( 0 ) returns 1, simply as a non-negative number.
This is a handy function for recognizing 0 and returning: ( 1 / 0 / -1 )
function truesgn(a)
    local r=0
    if (a!=0) r=sgn(a)
    return r
end
(shared by @dw817)
Square Root
sqrt( number )sqrt = "square root"
Number = any number or decimal
What is Square Root?
To square a number, means you times the number by itself:
3 x 3 = 9 or "3-squared" = 9
Square Root is the opposite and finds what number times itself equals the #:
"square-root of 9" = 3
a = sqrt( 16 ) -- a = 4b = sqrt( 100 ) -- b = 10c = sqrt( 30 - 21 ) -- c = 3 Get Larger Number
max( number , number )max = "maximum"
First Number = any number or decimal
Second Number = (optional) any number or decimal, defaults to 0
This compares two numbers and returns the higher value
a = max( 16 , 25 ) -- a = 25a = max( 5 ) -- a = 5a = max( -10 ) -- a = 0b = max( 20+30 , 100-30 ) -- b = 70Get Smaller Number
min( number , number )min = "minimum"
First Number = any number or decimal
Second Number = (optional) any number or decimal, defaults to 0
This compares two numbers and returns the lower value.
a = min( 16 , 25 ) -- a = 16a = max( 5 ) -- a = 5a = max( -10 ) -- a = 0b = min( 20+30 , 100-30 ) -- b = 50Get Middle Number
mid( number , number , number )MID = "middle"
Number = any number or decimal
This sorts a list of numbers then gives the middle number ("median") of the list.
a = mid( 25 , 10 , 40 ) -- a = 25b = mid( 20+30 , 100-30 , 10+50 ) -- b = 60Make a Wave
sin( # ) -- sine wavecos( # ) -- cosine waveatan2( # , # ) -- arc tangentPurple = Cosine
Green = Sine

Random Number: Decimal
rnd( number )rnd = "random"
Number = any number or decimal
Generates a random number from 0 to the number given (including 0 and number given)
a = rnd( 8 ) --returns a decimal between 0 and 8b = rnd( 20+30 ) --returns a decimal between 0 and 50Random Number: Whole #
flr( rnd( number ) )rnd = "random" (see Random Number: Decimal)
flr = "floor" (round down)
Number = any number or decimal
Generates a random number from 0 to the number given (including 0 and the number given) then rounds down to the nearest whole number and returns that.
a = flr( rnd( 3 ) ) --gives whole number between 0 and 3b = rnd( 5*10 ) --gives a decimal between 0 and 50
This is a menu and coding reference for Pico-8.
font