![]()
PICO-8
Cells Cartridge
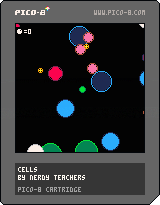
This is a single player game similar to agar.io, where you become a single celled organism trying to eat smaller cells to grow larger.
It uses only code and a few Sound FX. It does not use any Sprites or Map. So everything is drawn on the screen using only code!
This will be made into a video tutorial in the future. So if you have suggestions for improvements, or what other games would make great Bite-Size game tutorials, then send us a message either on Facebook, Youtube, or Email. theNerdyTeachers@gmail.com
Challenges!
After following the lesson, take on some of these challenges to test your knowledge and skills!
1. Make your own Sound FX.
2. Change the colors of the cells. (Hint)
2. Add some background music.
3. Use the Main Menu tutorials to add a Menu and other scenes.
Bite-size Game: Cells!
[ Video Coming Soon! ]
Explanation of Code!
Before you start making this game, you should know some of these basics of coding.
1. Variables
2. If Statements
3. Tables
4. Custom Functions
This game uses tables to hold almost all of the variables. So it is important to either already be comfortable reading and writing code with tables, or at least be prepared to focus on learning that here.
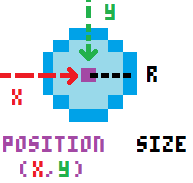
You will see a table for the
player, and theenemies. These each hold similar information about each of those game objects, such as the position (x,y), the circle size (r for radius), and the color (c).
--init
function _init()
    --colors
    ...

    --player table
    ...

    --game settings
    ...
end
PICO-8 runs
_init()("initialize") as the first function, before even_update()or_draw().Even though
_init()is optional, in these bite-size games, we often use it to set up the game variables and create a good point to reset the game each time we want to play a new round.Inside of the
_init()function, we will create most of the variables of the game, and what numbers things should start at in the beginning of each game when we reset everything.
--colors
black = 0
dblue = 1
purple = 2
dgreen = 3
brown = 4
dgray = 5
gray = 6
white = 7
red = 8
orange = 9
yellow = 10
green = 11
blue = 12
indigo = 13
pink = 14
peach = 15
The first set of variables we put inside
_init()are just the game colors so we can use the color names instead of their color numbers everywhere. This also makes reading the code and changing the colors much easier.
Next is a player table where many keys will be held and used as the player variables in the code. Everything specific to the player's settings will be here.
What is a table and keys?--player table player={ x = 60, y = 60, c = green, --inside color c2 = dgreen, --outside color r = 2, dx = 0, dy = 0, speed = 0.08, eat = 0 }We can imagine this player table like this:
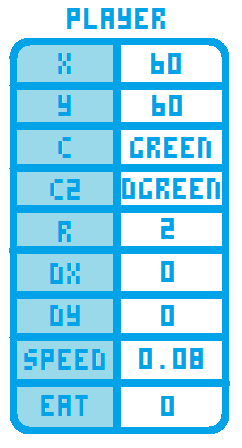
player= a table that holds all of the data specific to the player's cell.x= the position on the X axis (the number of pixels from the left).y= the position on the Y axis (the number of pixels from the top).c= ("color") the inner circle color of the player's cell.c2= ("color 2") the outer circle color of the player's cell.r= ("radius") a number of pixels from the center of a circle to the outside edge.dx= ("delta X") or ("change in X") a number for the X axis momentum on the player's cell to move left and right.dy= ("delta Y") or ("change in Y") a number for the Y axis momentum on the player's cell to move up and down.speed= a number for how much the player's cell should speed up by.eat= a number for how many enemy cells the player has eaten. Used as a score.
Most of those are self explanatory, but DX and DY are often harder to understand if you are using them for the first time. They are well explained in the Platformer Tutorials (#3 and #5).
In this game, they are used for keeping track of the current direction and speed of the player's cell.
DX: if positive, then the cell is moving right. If negative, then the cell is moving left.DY: if positive, then the cell is moving down. If negative, then the cell is moving up.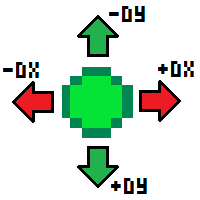
The DX and DY are not only positive or negative, but also can be different amounts, which means how fast the cell is moving.
If
DXis close to zero, then the cell moves slowly left or right.If
DXis far from zero, then the cell moves quickly left or right.If
DYis close to zero, then the cell moves slowly up or down.If
DYis far from zero, then the cell moves quickly up or down.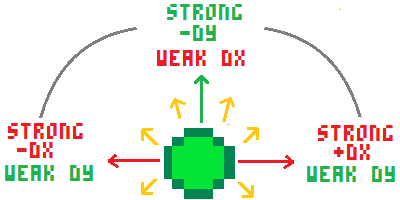
When the DX and DY work together at different amounts, it creates a cell that can float around in any direction, making the player movement more interesting.
--game settings enemies = {} max_enemies = 15 max_enemy_size = 10 enemy_speed = 0.6 win_amount = 500The last set of variables inside of the
_init()function are the game settings. Most of them deal with the enemies and how difficult the game is.enemies= an empty table (for now) to hold all of the enemy cells' data.max_enemies= a number for how many enemies will be created.max_enemy_size= a number of pixels for the largest size (radius) an enemy cell can be.enemy_speed= a number used to set the average speed of each enemy cell.win_amount= a number of enemy cells that the player must eat to win.
This is the _update() function of the game. It is where we will do all of our logic
to change things based on what is happening in the game.
--update
function _update()
--player controls
...
--player movement
...
--flip sides
...
--enemy update
...
end
This opens the _update() function and shows the different sections
that go inside. We will go over each section of code below:
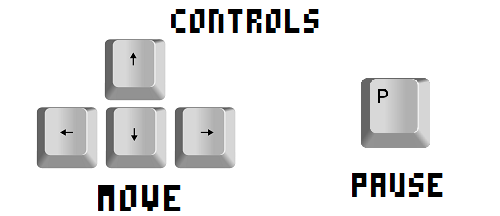
--player controls
if btn(⬅️) then player.dx -= player.speed end
if btn(➡️) then player.dx += player.speed end
if btn(⬆️) then player.dy -= player.speed end
if btn(⬇️) then player.dy += player.speed end
This part handles the player controls. The player only uses four buttons in this game for moving in 4 directions.
We first check if the player presses left. If so, then we subtract the player speed from the player's current DX amount.
The ⬅️ is made in PICO-8 by pressing Shift+L.
The ➡️ is made in PICO-8 by pressing Shift+R.
The ⬆️ is made in PICO-8 by pressing Shift+U.
The ⬇️ is made in PICO-8 by pressing Shift+D.
Remember that DX is the player's momentum moving left or right. So if the DX is positive, that means the player is moving to the right, and so we subtract to slow it down. If the DX is already negative then subtracting is also good because it will speed up the movement to the left.
Then we check if each direction button is pressed and either add or subtract from the DX or DY. Compare this code with our explanation of how DX and DY work when we created the player table above to fully understand each step, and why we should be adding or subtracting based on the direction the player presses.
--player movement
player.x += player.dx
player.y += player.dy
This part applies the player's momentum to the player's position. So after we adjust the player's momentum based on the player's button presses, we add the new momentum to the player's position.
We can simply add the DX and DY, even if they are negative because adding a negative number will subtract. And that is exactly what we want it to do. Really understanding how negative numbers work, helps us simplify a lot of math in our code. So it is very useful!
--flip sides
if player.x > 127 then player.x = 1 end
if player.x < 0 then player.x = 126 end
if player.y > 127 then player.y = 1 end
if player.y < 0 then player.y = 126 end
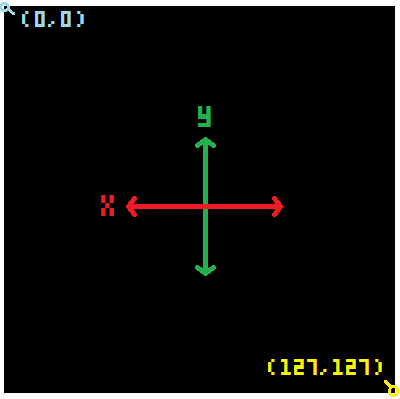
This code is used to check if the player runs off the edge of one side of the game screen and resets the player position to the opposite side of the screen. This creates the look and feel of a player running on a space that wraps around, instead of being walled in.
The PICO-8 game screen is 128 pixels wide by 128 pixels tall. But remember that the first pixel in the top left corner is 0, not 1. So that means the game screen starts at 0 and ends at 127, for both width and height.
--enemy update
create_enemies()
for enemy in all(enemies) do
--movement
...
--outside screen
...
--collide with player
...
end
In the "enemy update" section we will write the code for creating, deleting, moving, and checking collision of the enemy cells.
We are going to save one complicated part of this game for later
because we will build a custom function named create_enemies().
For now, let's just add it here because this is where we want that function's code
to run.
It will simply add cells in random places with random sizes and speeds all around the game screen. And we want it to run every time in case some enemy cells move outside the game screen and get deleted.
After creating all the enemies in the create_enemies() function, we
will update each enemy cell.
To focus on each enemy inside of our enemies table, we will need to cycle
through ("iterate") each entry of the table. We do that with a for entry in all(table) do loop.
In this case, each entry is a single enemy cell, and the table name is enemies. So we write it like this:
for enemy in all(enemies) do ... end
After the do we can now use the variable we named enemy to refer to the currently
selected entry of the table, and it will repeat over each and every entry in the table until the last.
Funny thing is, each entry of the enemies table, will be ANOTHER table!
But don't worry! It sounds more complicated than it actually is.
And this should help you understand what we are about to do.

--movement
enemy.x += enemy.dx
enemy.y += enemy.dy
The first thing we do to each enemy is the same thing we do to the player's
movement: add the DX to the X and the DY to the Y.
Each enemy will have its own momentum (DX and DY) variables and this is just applying the momentum to the enemy position.
--outside screen
if enemy.x > 137
or enemy.x < -10
or enemy.y < -10
or enemy.y > 137 then
del(enemies,enemy)
end
The next thing we want to do for each enemy is to detect if the enemy
moves too far outside of the game screen. The enemy cells will never turn, so they
would move away from the game screen forever. So we should delete them from the enemies table.
--collide with player
if circ_collide(
player.x,player.y,player.r,
enemy.x,enemy.y,enemy.r
) then
--compare size
if flr(player.r) > enemy.r then
player.eat += 1
player.r += .2
sfx(0)
del(enemies,enemy)
else
sfx(1)
_init()
end
end
Here's another complicated part of the code that we are going to prepare here,
but write as its own function later. It will be called circ_collide().
To check collision of any enemy and the player cell, we might as well do that here
when we are already looping through each enemy in the enemies table.
if circ_collide(...) then will check if our future function named circ_collide will come out as true or false.
If true, then we know the player collided. If false, then the player did not collide and we don't have to do anything.
We will need to give our collision function some information to calculate if the enemy and player have hit or not. That is why we put some variables inside the circ_collide's parentheses.
The circ_collide() function will need to know the player's position (X and Y), the player's size (R), and the same for the currently selected enemy's position and size.
Now let's talk about what will happen if the player and an enemy do collide! We will write
what should happen next, after the then of this collision check.
The first thing we should know is if the player is larger or smaller than the enemy.
if flr(player.r) > enemy.r checks if the player's size (rounded down by flr)
is larger than the enemy's size.
If that is true, then we add a point to the player.eat counter.
And we increase the player's size by a little bit (0.2).
And we play a sound effect (#0) which will be a happy sound.
And we delete that enemy, using del(table,entry) function, because it has been eaten.
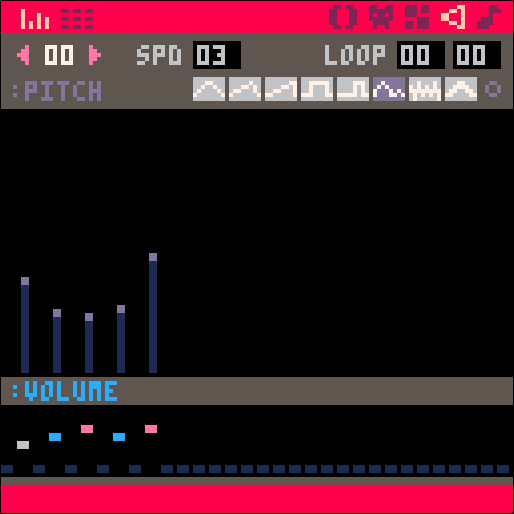
Here is how we created the eating sound effect #0:
Next, something very different should happen if the player is NOT larger than the enemy.
So we can add an else to the check because we know the player did collide, but is not larger.
If this happens then the player should be eaten and the player loses the game.
So we play sound effect (#1) which will be a sad sound. And simply restart the game
by calling the _init() to run again and reset all the game variables.
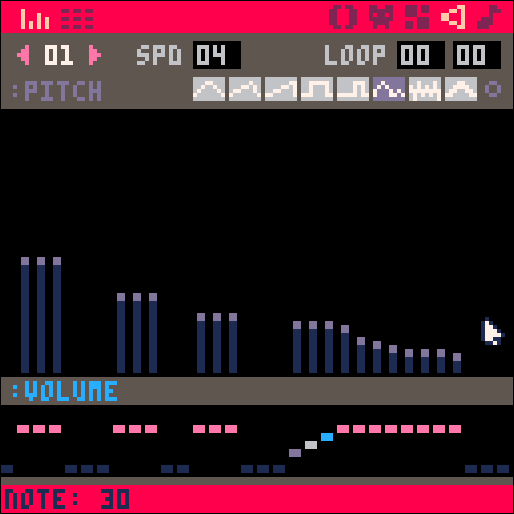
Here is how we created the sad sound effect #1:
--draw
function _draw()
cls()
--player
...
--enemies
...
--score
...
--win
...
end
This _draw() function will handle everything that is seen on the game screen.
cls() = clear the screen
It is common to clear the screen before drawing the updated game objects every frame. You can best understand why this is important to do by simply deleting it from the code, and running the game. You should see all the cells leaving a trail behind them, because where they were is not being erased, so the game screen quickly gets filled with color.
The following pieces of code are the sections that should go inside of the _draw() function.
--player
circfill(player.x,player.y,player.r,player.c)
circ(player.x,player.y,player.r+1,player.c2)
Here we will draw the player's inner and outer circles.
circfill() = "circle filled" draws a circle filled in with color.
circ() = "circle" draws the outline of a circle.
We pass the player's position (X and Y), size (R), and color (C or C2) to those circle functions.
Anytime you see player.something,
that means we are taking data from the player table.
--enemies
for enemy in all(enemies) do
circfill(enemy.x,enemy.y,enemy.r,enemy.c)
circ(enemy.x,enemy.y,enemy.r+1,enemy.c2)
end
Here we will draw the enemies' inner and outer circles.
First, we cycle through ("iterate") all of the entries in the enemy table, just like we did in the enemy update section above. This let's us access each enemy in the table and do the same thing to each one - draw them.
circfill() = "circle filled" draws a circle filled in with color.
circ() = "circle" draws the outline of a circle.
We pass each enemy's position (X and Y), size (R), and color (C or C2) to those circle functions.
Anytime you see enemy.something,
that means we are taking data from the enemy table.
--score
rectfill(0,3,20,10,black)
print("●="..player.eat,0,5,white)
Here is the code used to write the player's score (how many cells eaten) in the top left of the screen.
Before we write to the game screen, it is a good idea to put a background to the text, so that it stays easy to read, even if things in the game move behind the text. So let's make a rectangle.
rectfill() = "filled rectangle" draws the outline of a rectangle and fills it with the same color.
Next we can write the score using the print() function.
First we give it text inside of quotation marks (called a "string"). You can make that circular symbol in PICO-8 by pressing SHIFT+G.
Then we use two dots (..) to merge a string with a variable. And the variable we
add to the string is the players score: player.eat.
Next are the X and Y position where to write the text. Last is the color of the text.
--win
if player.eat > win_amount then
rectfill(0,55,127,75,dgray)
print("congratulations!!!",28,56,blue)
print("you became",43,63,blue)
print("a multicelled organism",20,70,blue)
end
The last thing to draw would be a message if the player manages to win the game
by eating more than the amount set in the game settings under win_amount.
if player.eat > win_amount then will check if the eat count is higher than the win setting.
rectfill(0,55,127,75,dgray) will draw a dark gray banner in the middle of the screen.
print("congratulations!!!",28,56,blue) will write the word "congratulations!!!" in blue over the rectangle.
And two more print functions to write "you became a mutlicelled organism" on two separate lines.
--collision
function circ_collide(x1,y1,r1,x2,y2,r2)
distsq = (x1-x2) * (x1-x2) + (y1-y2) * (y1-y2)
rsumsq = (r1+r2) * (r1+r2)
if distsq == rsumsq then
--circles touch
return false
elseif distsq>rsumsq then
--circles not touch
return false
else
--circles overlap
return true
end
end
This is the whole collision function for circles. It checks if two circles are overlapping using some basic geometry! Yay! Now you don't NEED to understand all of the math in order to use it in your game. But it will definitely help you when you make your own games!
If you have not studied Algebra or Geometry yet, you might want to skip this part and just copy our code and trust that it works. But before you move on, just understand that what we are doing here is comparing the distance between the two circles with the combined size of the two circles.
If the distance is bigger than their size, then they must be too far away to touch.
If the distance is equal to their size, then they must be touching.
If the distance is smaller than their size, then they must be close enough that they overlap.
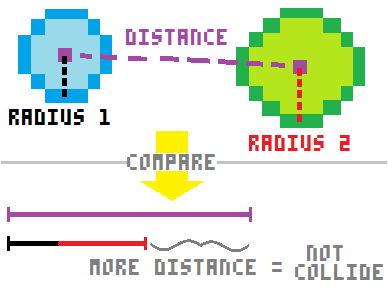
That's the basic idea, so now let's get into the math!
The first thing we need to calculate is the distance between the two circles' positions. Remember that the positions (X,Y) of each circle is the center point of each circle.
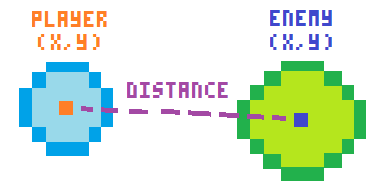
Now we can forget the circles and just think of the distance as a line between the two points.
We then name the point of the first circle (X1,Y1) and the point of the second circle (X2,Y2).
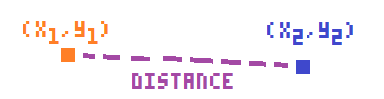
Notice that when we create this function, we name the variables that need to be passed to this code.
The first three variables will be the position and size of the first circle: (X1,Y1) and R1.
The last three variables will be the position and size of the second circle: (X2,Y2) and R2.
Then we can use the distance formula: distance2 = (x1-x2)2 * (y1-y2)2
That formula is the same as our code here: ("distsq" is short for "distance squared")
distsq = (x1-x2) * (x1-x2) + (y1-y2) * (y1-y2)
The next thing we do is combine the sizes of the two circles so we can compare that with the distance between them.
First we simply add the two radii (plural of radius) together: sum of radii = r1+r2
That's what we are doing in this code: (r1+r2)
But since we have the distance squared (multiplied by itself), we have to do that to the sum of the radii as well to properly compare them.
That why we multipy the sum by itself: (r1+r2) * (r1+r2)
And we save the answer to that calculation in a variable called rsumsq ("radii sum squared")
We can finally compare these two calculations to know if the two circles are far apart, touching, or overlapping.
If the distsq is equal to the rsumsq, then they must be touching at the edges.
We decided to allow that to happen because a player might not be able to see that happen quickly enough, and so the player might think they were unfairly killed. So we return false to say the circles did not collide yet.
If the distsq is more than the rsumsq, then they must be too far away to touch.
This means we can definitely return false to say the circles did not collide.
If those are not true then the distsq must be less than the rsumsq, and that means they are overlapping.
This means we can definitely return true to say the circles did collide!
--enemies
function create_enemies()
if #enemies < max_enemies then
--local variables
...
--random start position
...
--size determines color
...
--make enemy table
...
end
end
First we make another custom function named create_enemies().
We leave the parentheses empty because this function doesn't need to be given anything
and it will run the same way every time.
Then we only need to create enemies when the number of enemies is less than the
game settings variable: max_enemies.
So we check if #enemies < max_enemies
The # sign in front of our enemies table is an easy way to get the total count of entries in the table.
So that code reads as "if the total number of entries in the enemies table is less than the maximum enemies number..."
then we want to create more enemies don't we.
But if the number of enemies reaches the maximum, then we just skip all the rest of the code inside here and don't create any more enemies.
--local variables
local x = 0 local y = 0 --position
local dx = 0 local dy = 0 --momentum
local r = flr(rnd((max_enemy_size+player.r)/2))+1 --size
local c = 0 local c2 = 0 --in/out color
Next, inside of the first check, we need to set some local variables that we will use only inside of this function.
x and y will be the enemy cell's position.
dx and dy will be the enemy cell's momentum and direction of movement.
r will be the enemy cell's size (radius).
c and c2 will be the enemy cell's inner and outer colors.
Most of those we will set later in this function, but you'll notice we do some math for a random radius size. So let's look at that.
flr(rnd((max_enemy_size+player.r)/2))+1flr() is used to round down.
rnd() is used to get a random number between 0 and the number inside the parentheses.
+1 is at the end because we don't want a circle with a radius of 0, it should be at least 1.
(max_enemy_size+player.r) is used to create a maximum size for the random generator based on the player's size.
This is so that as the player gets bigger, so do the enemies. But we also divide that very large number by 2 /2
to bring the max enemy size back to a number not too much bigger than the player's current size.
--random start position
place = flr(rnd(4))
if place == 0 then
--left
x = flr(rnd(8)-16)
y = flr(rnd(128))
dx = rnd(enemy_speed)
dy = rnd(enemy_speed*2) - enemy_speed
elseif place==1 then
--right
x = flr(rnd(8)+128)
y = flr(rnd(128))
dx = -rnd(enemy_speed) - enemy_speed
dy = rnd(enemy_speed*2) - enemy_speed
elseif place==2 then
--top
x = flr(rnd(128))
y = flr(rnd(8)-16)
dx = rnd(enemy_speed*2) - enemy_speed
dy = rnd(enemy_speed)
elseif place==3 then
--bottom
x = flr(rnd(128))
y = flr(rnd(8)+128)
dx = rnd(enemy_speed*2) - enemy_speed
dy = rnd(enemy_speed) - enemy_speed
end
That looks like a lot of code, but let's just think about where we want enemy cells to start in the game first.
The player will start in the middle of the game screen, and enemies will spawn from the outsides and move across the screen at many different angles.

We need the enemies to spawn in one of four places: left, right, top, or bottom
So let's first create a random number between 0 and 4 to represent each side.
place = flr(rnd(4)) will find a random number between 0 and 4 and round down
so it will be one of these numbers: 0, 1, 2, or 3 (4 places total)
Then we check if place == 0 or 1 or 2 or 3 using elseif checks.
It's basically like rolling a 4 sided die to choose which side of the screen the enemy will start at!
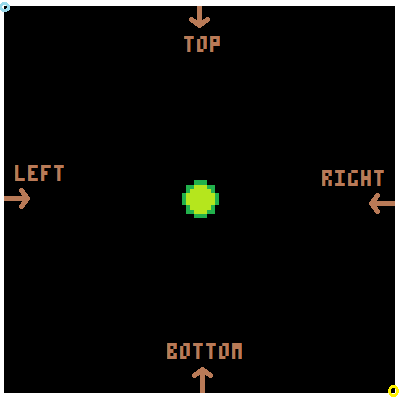
Inside of each of those checks we will set the X, Y, DX, and DY with random numbers but controlled slightly to make sure the enemies are moving in a direction across the screen, not away from it.
Let's look closer at just the first set, and that should help you figure out why the rest are set the way they are.
***Keep in mind, this is for an enemy that will start on the left side of the game screen.***
x = flr(rnd(8)-16)
This will set the X position to be a rounded down random number between 0 and 8 but minus 16.
In the end, that means X will be a number between -16 and -8.
Where will that be on the game screen? Well if the left side of the game screen is where X = 0, and this will be a negative number, then that means the enemy cell will start to the left of the visible screen. That is a good thing because as it moves towards the screen, it will appear a little at a time instead of suddenly.
So for each side of the game screen, we want to try to start the enemy cells outside of the screen's edges.
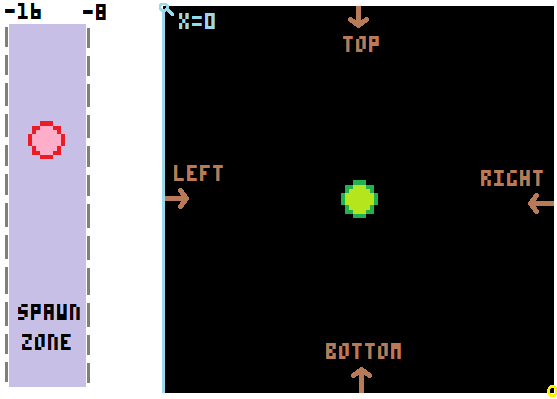
y = flr(rnd(128))
The Y for a left side enemy is easy because it can start anywhere from the top of the screen to the bottom. And we know that the top of the screen is pixel 0 and the bottom of the screen is pixel 127.
So we just need to get a random number between 0 and 128 and round it down.
dx = rnd(enemy_speed)
Since this enemy starts on the left, the DX (momentum left or right) is simple. We want the enemy to move toward the right. So any positive number between 0 and the maximum enemy speed will be fine.
dy = rnd(enemy_speed*2) - enemy_speed
The DY (momentum up or down) is a little more complicated for an enemy on the left side of the screen because it can be either positive (moving downwards) or negative (moving upwards). But we still want it to be random.
We can do this by starting with a random number between 0 and double the max enemy speed.
Then we shift that whole range back by subtracting the max enemy speed and that will give us a range of random numbers between negative max speed and positive max speed.
This should help you visualize what is happening here:

--size determines color
if r==1 then
c = yellow c2 = orange
elseif r == 2 then
c = gray c2 = white
elseif r == 3 then
c = orange c2 = brown
elseif r == 4 then
c = pink c2 = brown
elseif r == 5 then
c = purple c2 = dblue
elseif r == 6 then
c = red c2 = purple
elseif r == 7 then
c = white c2 = gray
elseif r == 8 then
c = blue c2 = dblue
elseif r == 9 then
c = dblue c2 = blue
elseif r == 10 then
c = dgreen c2 = green
else
c = red c2 = blue
end
As the title of this section of code hints, we will be setting the enemy color based on its size.
Now the size was already randomly generated and saved in the local variable r at the start of this function.
So we simply check each size up to a radius of 10 and set the inner and outer colors however we'd like.
Feel free to change these colors to whatever you want. Since we made the color names variables at the beginning, changing the colors here is very easy.
--make enemy table
local enemy = {
x = x,
y = y,
dx = dx,
dy = dy,
r = r,
c = c,
c2 = c2
}
--add it to enemies table
add(enemies,enemy)
After we have set up all of the enemy variables, we can neatly store them inside of a table.
We create a table named "enemy" with local enemy = { ... }.
Inside of the curly braces { } we list the local variables in the order of key = value.
So inside this table, there will be a key named X and it will hold the value of whatever the local variable named x became from our random number generating earlier.
And so on for each of the enemy data, all the way to its two color settings.
After we have a table for this one enemy, we add the whole table as a single entry in our parent table named enemies
add(enemies,enemy) takes the "enemy" table and adds it to the "enemies" table.
And this will repeatedly create and add each randomly generated enemy until there are enough enemies to satisfy our max_enemies number.
THAT'S IT! WE'RE DONE!
--init
function _init()
--colors
black = 0
dblue = 1
purple = 2
dgreen = 3
brown = 4
dgray = 5
gray = 6
white = 7
red = 8
orange = 9
yellow = 10
green = 11
blue = 12
indigo = 13
pink = 14
peach = 15
--player table
player={
    x = 60,
    y = 60,
    c = green,   --inside color
    c2 = dgreen, --outside color
    r = 2,
    dx = 0,
    dy = 0,
    speed = 0.08,
    eat = 0
}
--game settings
enemies = {}
max_enemies = 15
max_enemy_size = 10
enemy_speed = 0.6
win_amount = 500
end
-->8
--update
function _update()
--player controls
if btn(⬅️) then player.dx -= player.speed end
if btn(➡️) then player.dx += player.speed end
if btn(⬆️) then player.dy -= player.speed end
if btn(⬇️) then player.dy += player.speed end
--player movement
player.x += player.dx
player.y += player.dy
--flip sides
if player.x > 127 then player.x = 1 end
if player.x < 0 then player.x = 126 end
if player.y > 127 then player.y = 1 end
if player.y < 0 then player.y = 126 end
--enemy update
create_enemies()
for enemy in all(enemies) do
--movement
enemy.x += enemy.dx
enemy.y += enemy.dy
--outside screen
if enemy.x > 137
or enemy.x < -10
or enemy.y < -10
or enemy.y > 137 then
    del(enemies,enemy)
end
--collide with player
if circ_collide(
player.x,player.y,player.r,
enemy.x,enemy.y,enemy.r
) then
    --compare size
    if flr(player.r) > enemy.r then
        player.eat += 1
        player.r += .2
        sfx(0)
        del(enemies,enemy)
    else
        sfx(1)
        _init()
    end
end
end
end
-->8
--draw
function _draw()
cls()
--player
circfill(player.x,player.y,player.r,player.c)
circ(player.x,player.y,player.r+1,player.c2)
--enemies
for enemy in all(enemies) do
    circfill(enemy.x,enemy.y,enemy.r,enemy.c)
    circ(enemy.x,enemy.y,enemy.r+1,enemy.c2)
end
--score
rectfill(0,3,20,10,black)
print("●="..player.eat,0,5,white)
--win
if player.eat > win_amount then
    rectfill(0,55,127,75,dgray)
    print("congratulations!!!",28,56,blue)
    print("you became",43,63,blue)
    print("a multicelled organism",20,70,blue)
end
end
-->8
--collision

function circ_collide(x1,y1,r1,x2,y2,r2)

    distsq = (x1-x2) * (x1-x2) + (y1-y2) * (y1-y2)

    rsumsq = (r1+r2) * (r1+r2)

    if distsq == rsumsq then
        --circles touch
        return false
    elseif distsq>rsumsq then
        --circles not touch
        return false
    else
        --circles overlap
        return true
    end
end
-->8
--enemies
function create_enemies()
if #enemies < max_enemies then
--local variables
local x = 0	 local y = 0  --position
local dx = 0 local dy = 0 --momentum
local r = flr(rnd((max_enemy_size+player.r)/2))+1  --size
local c = 0  local c2 = 0 --in/out color
--random start position
place = flr(rnd(4))
if place == 0 then
    --left
    x = flr(rnd(8)-16)
    y = flr(rnd(128))
    dx = rnd(enemy_speed)
    dy = rnd(enemy_speed*2) - enemy_speed
elseif place==1 then
    --right
    x = flr(rnd(8)+128)
    y = flr(rnd(128))
    dx = -rnd(enemy_speed) - enemy_speed
    dy = rnd(enemy_speed*2) - enemy_speed
elseif place==2 then
    --top
    x = flr(rnd(128))
    y = flr(rnd(8)-16)
    dx = rnd(enemy_speed*2) - enemy_speed
    dy = rnd(enemy_speed)
elseif place==3 then
    --bottom
    x = flr(rnd(128))
    y = flr(rnd(8)+128)
    dx = rnd(enemy_speed*2) - enemy_speed
    dy = rnd(enemy_speed) - enemy_speed
end
--size determines color
if r==1 then
    c = yellow c2 = orange
elseif r == 2 then
    c = gray c2 = white
elseif r == 3 then
    c = orange c2 = brown
elseif r == 4 then
    c = pink c2 = brown
elseif r == 5 then
    c = purple c2 = dblue
elseif r == 6 then
    c = red c2 = purple
elseif r == 7 then
    c = white c2 = gray
elseif r == 8 then
    c = blue c2 = dblue
elseif r == 9 then
    c = dblue c2 = blue
elseif r == 10 then
    c = dgreen c2 = green
else
    c = red c2 = blue
end
--make enemy table
local enemy = {
    x = x,
    y = y,
    dx = dx,
    dy = dy,
    r = r,
    c = c,
    c2 = c2
}

--add it to enemies table
add(enemies,enemy)
end
end
font